
Hello, my lovely beady friends!
So, I think I promised this post back in June… of 2017.
Don’t judge me. I get distracted sometimes.
*ahem* But anyway! Now we are here and it is time to overhaul this old beauty!

This pattern is my baby, you guys. It’s by far my best seller and I originally made the design and taught it back when Beads Direct was still a brick and mortar store back in 2012. It was the first design I put in my Etsy shop and I consider it my star pattern.
But here’s the thing – I didn’t write the pattern myself. When I first made the design (right after SuperDuos first came out) I showed my boss (Lizelle Hards, who is still my boss and one of my favorite people) and she wanted me to teach it at the shop. I agreed, but confessed that I had no idea how to write a pattern. She graciously offered to do it for me and whipped up a pattern for me to teach with based on the hand-written instructions and terribly-drawn doodles I gave her.
Then, in 2013, the shop went online and we closed the store front. I had two or three patterns that I had written by then and wanted to sell them on Etsy, since I no longer had a place to teach them (this was before I had ties with Cathy at Beaded Bliss and Carole at Bead Stash). I asked Liz if she wanted to me to re-write the pattern, since I was going to be selling it, but she sweetly allowed me to sell it as my pattern.
And it has served me well! Liz is a great pattern writer. But, I have 30+ designs now and it has bothered me lately that my best selling pattern isn’t written in my style and looks so different from my other patterns. Plus! I wanted to add in a tweak to pin the side embellishment down (very much like the Toying with Tiles Update) and, due to popular request, I ALSO wanted to add in instructions for how to make the double-wide version that I really enjoy.
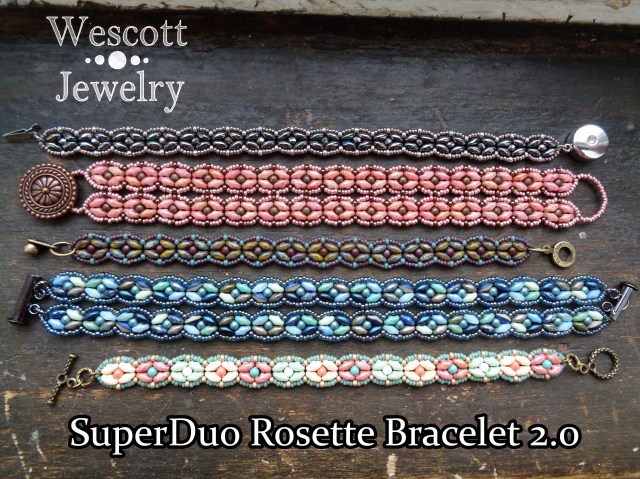
So, with that back story explained, allow me to introduce my newest oldest favorite pattern!

Tada!
So, exactly like the Toying with Tiles pattern, I have decided to do things this way. The pattern listing on Etsy, when purchased, will now include two patterns – the old one and the new one with the tweak. If you have already purchased the old pattern on Etsy and want the tweak without having to pay for the pattern twice, email me or send me a Convo through Etsy with the Order Number of our original purchase so that I can verify that you already bought the pattern. You can find your order number by going through your purchase history on Etsy. It’s a bit of a clunky system, but I think it’s the best way of making it fair.
Colors Used
I’ve been trying lately to provide the colors that I’ve used in my patterns in one spot for you guys, so here are the colors that I used in the cover photos. A quick caveat – I have made dozens of this bracelet and the photos are floating all over the internet. So if you see one with my logo and want to know what colors I used, you’ll need to send me the photo to ask if it isn’t listed here.

This original prototype – literally the first one I made in 2012 (OMG You can see the black paperclip that I wore as my engagement ring <3). For this baby, I used Chalk Lazure Green SuperDuos (503000-65455), Miyuki 11/0’s in Matte Metallic Bronze (2006), Miyuki 15/0’s in Dark bronze (457) and 3mm round metal beads in an antiqued bronze finish.

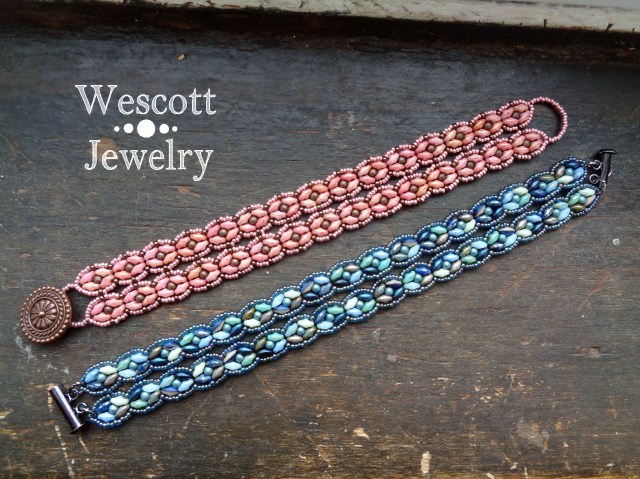
These are the three single versions.
The top bracelet used Jet Apricot SuperDuos (523980-29123), Miyuki 15/0’s in Steel (190), and Full Labrador Union beads for 11/0 (UB-11-131-27000), and Metallic Silver 2×3 Rondelle Crystals in place of the usual 3mm beads. I also used a really fancy Swarovski Elegant Elements box clasp.
The middle bracelet uses a bunch of different stuff. The SuperDuos were Chalk Red Luster (503000-14495), Chalk Orange Luster (503000-14413), and Chalk Light Green Luster (503000-14457). The 11/0’s were Miyuki Matte Duracoat Champagne (11-4204f) and the 15/0’s were Picasso Seafoam (15-4514). The 3mm pearls were Swarovski Pearls in Jade, Coral, and White.
The bottom bracelet used Opaque Olive Picasso SuperDuos (553410-43400) with Miyuki 15/0’s in Matte Brown AB (15-135fr) and Miyuki 11/0’s in Duracoat Opaque Eucalyptus (4481). The 3mm were one of the Saturated Metallic 3mm druks in a sort of plum color (I don’t have the number for that one – sorry!)
For the doubles!
For the top one, I used Chalk Red Luster SuperDuos again (503000-14495) and 3mm round copper metal beads. The 11/0’s were Miyuki Metallic Chocolate (461) and the 15/0s were Duracoat Galvanized Dark Coral (4209). I got the button at a bead show somewhere, I think, but any shank button will work!
For the bottom one, I used Miyuki 11/0’s and 15/0’s in Montana Gold Blue Luster (305) and the 3mm were a Saturated Metallic Turquoise kinda color. The SuperDuos were a mix that I made myself and then gave away as a prize after my facebook page got its 1000th like. It used more than 10 different colors and unfortunately, I did not write them down, as they were scraps and leftovers from my stash. If you combine a bunch of blues, greens, turquoises, and silvers from your own stash, you should be able to make your own “mermaid mix.”
Phew!
And that’s finally it, folks! I’ve been super nervous to tweak my superstar pattern, but it needed to be done and I’m really proud of the new pattern. Let me know what you guys think down below! Was it worth the re-write? Have you tried this pattern yet? I love hearing from you all. Thanks for checking in! <3


Hi, Sam…….this is great! My original order was on 2/20/16 and it was order number 1079301716 through etsy. Let me know if that isn’t enough. Thank you! Liz Browning Fox
LikeLike
That works just fine, Elizabeth! But go ahead and shoot me a message on Etsy or an email so I have somewhere to attach the PDF for you. Unfortunately, I can’t just pop the pattern in the comments here, haha. I’ll keep an eye out for a message from you!
LikeLike