Ok, to start off, I would like to share that today is my two year anniversary with my husband, Ethan.
This pic is actually from our engagement, but whatever. We’re precious.
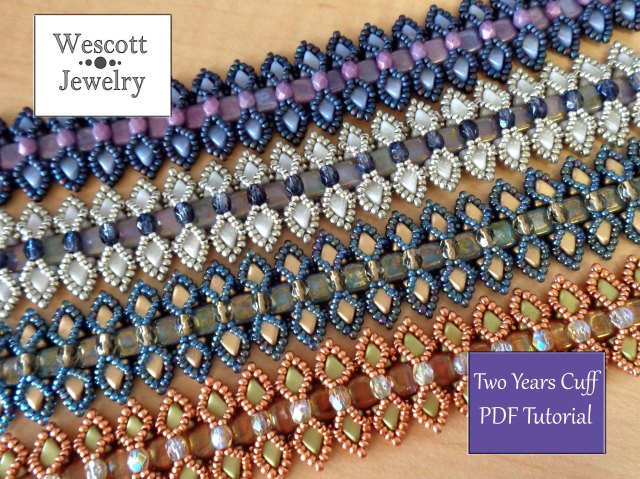
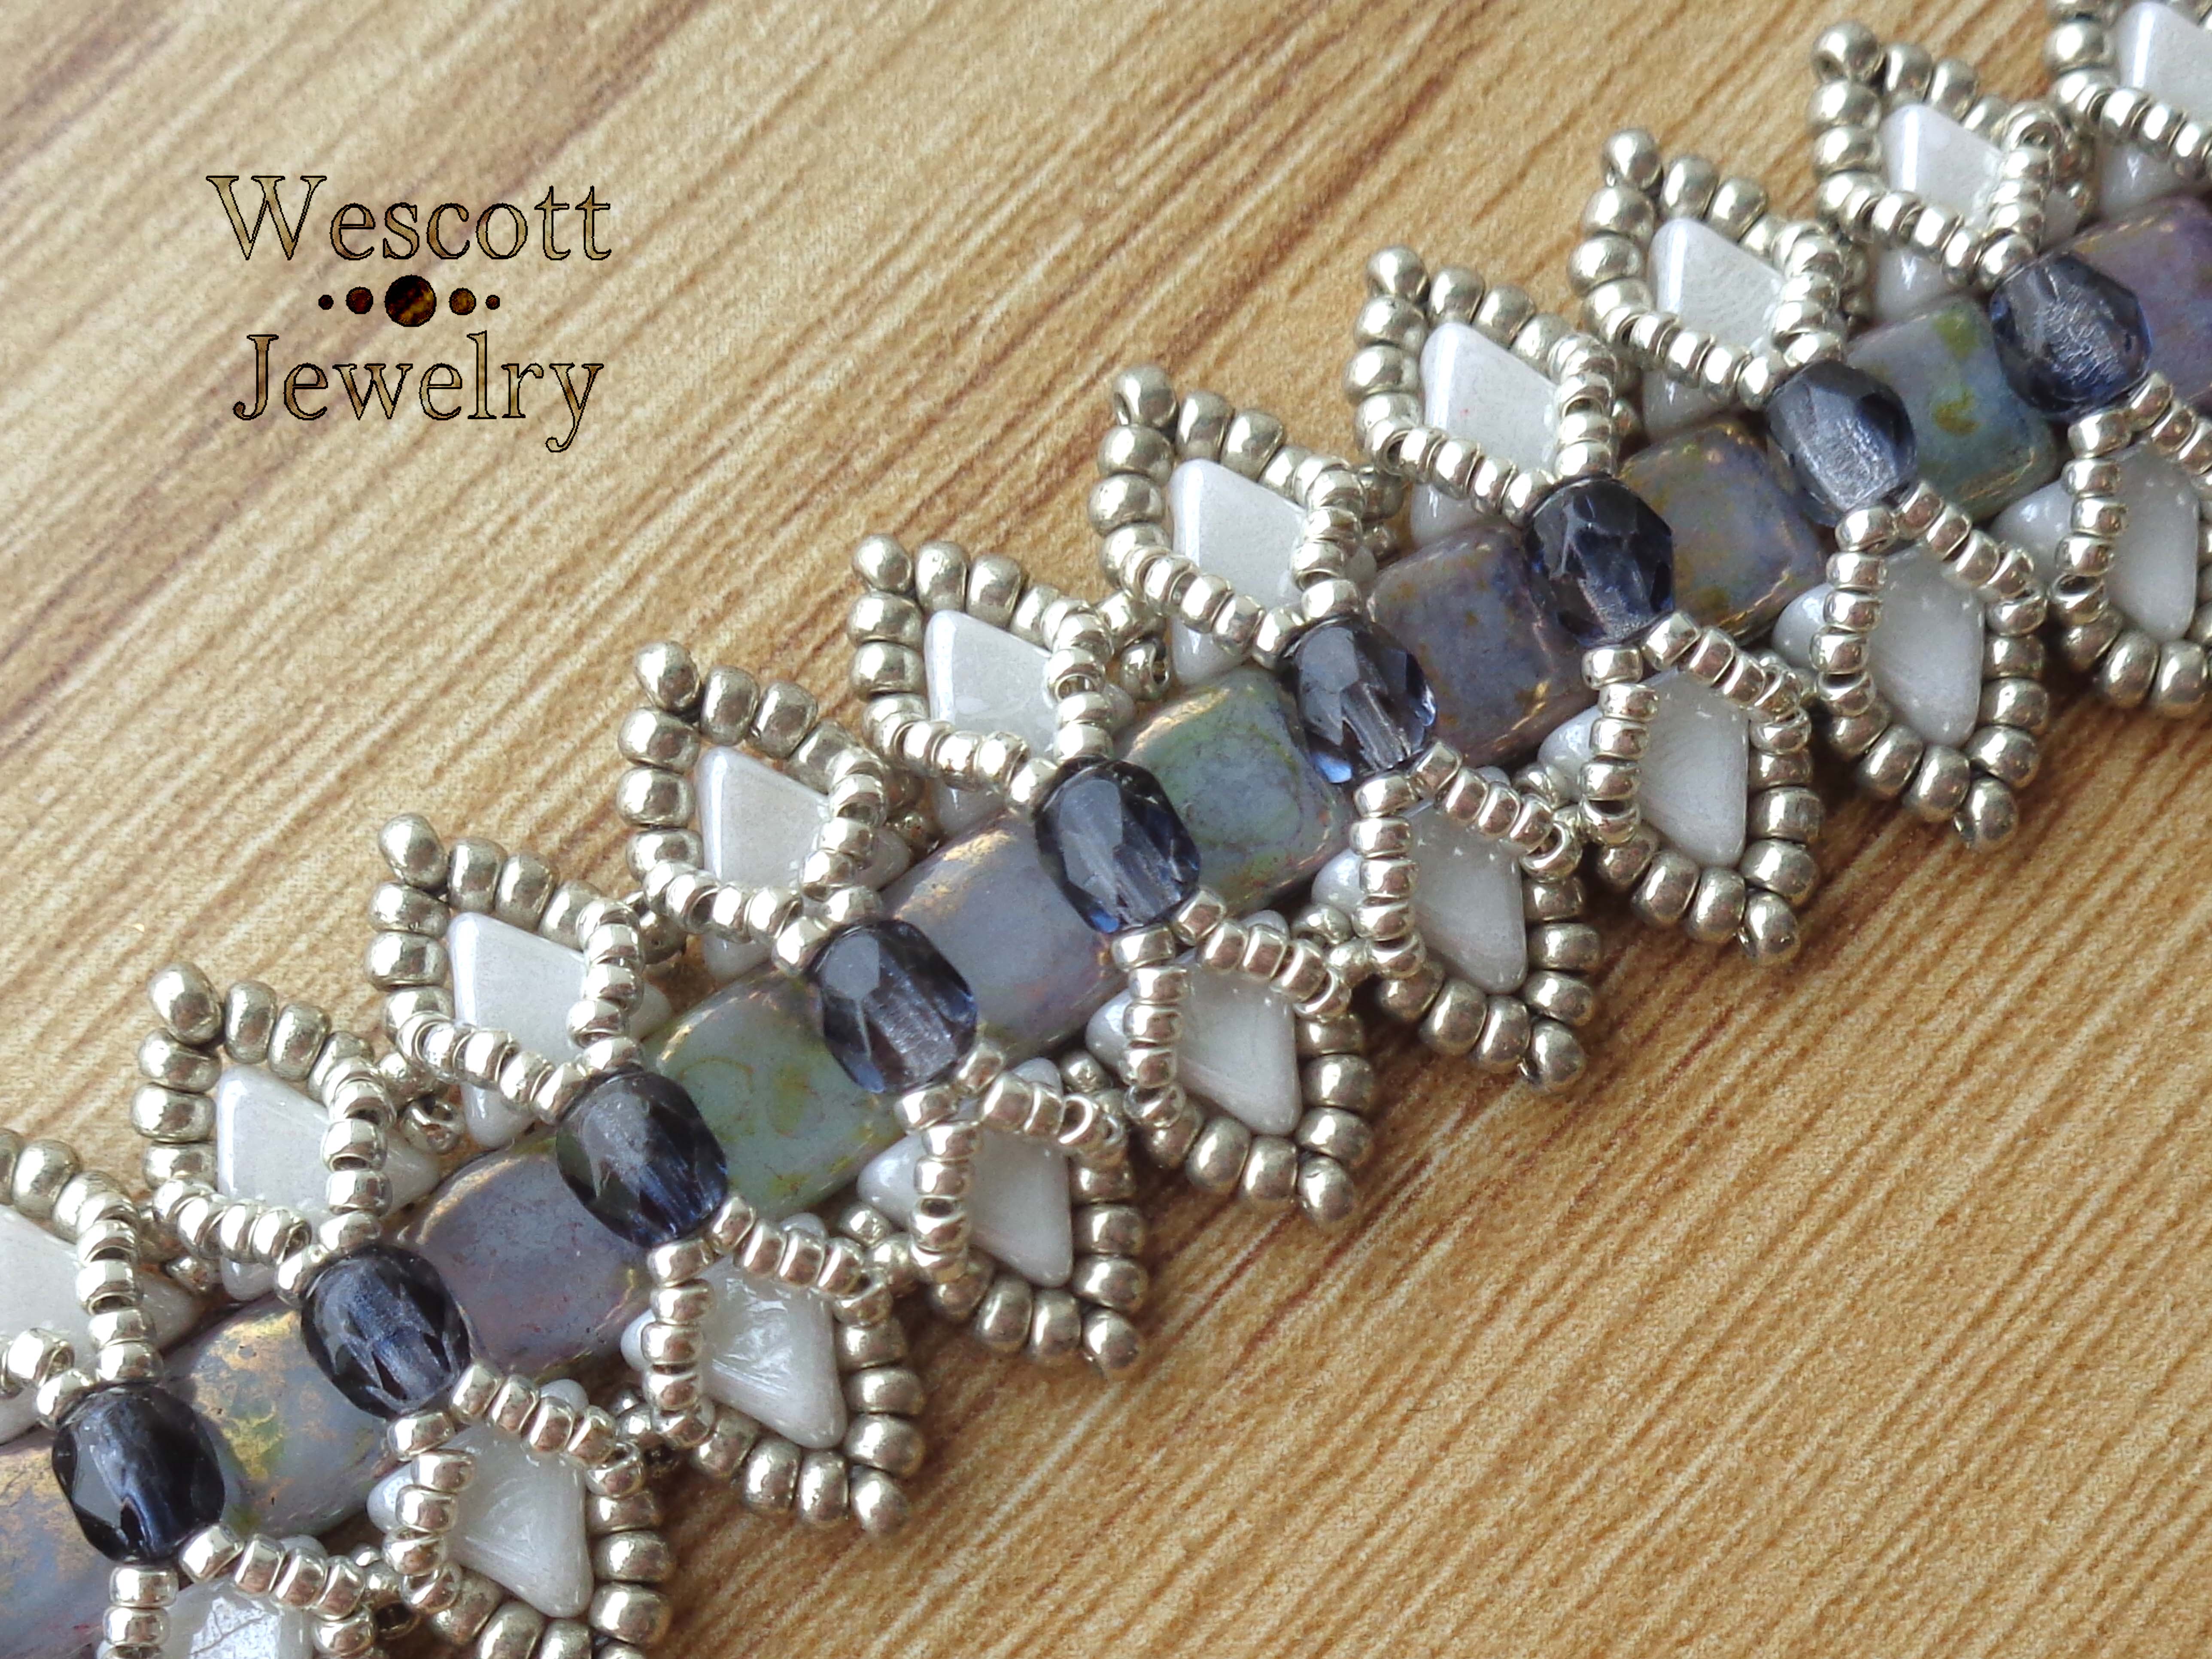
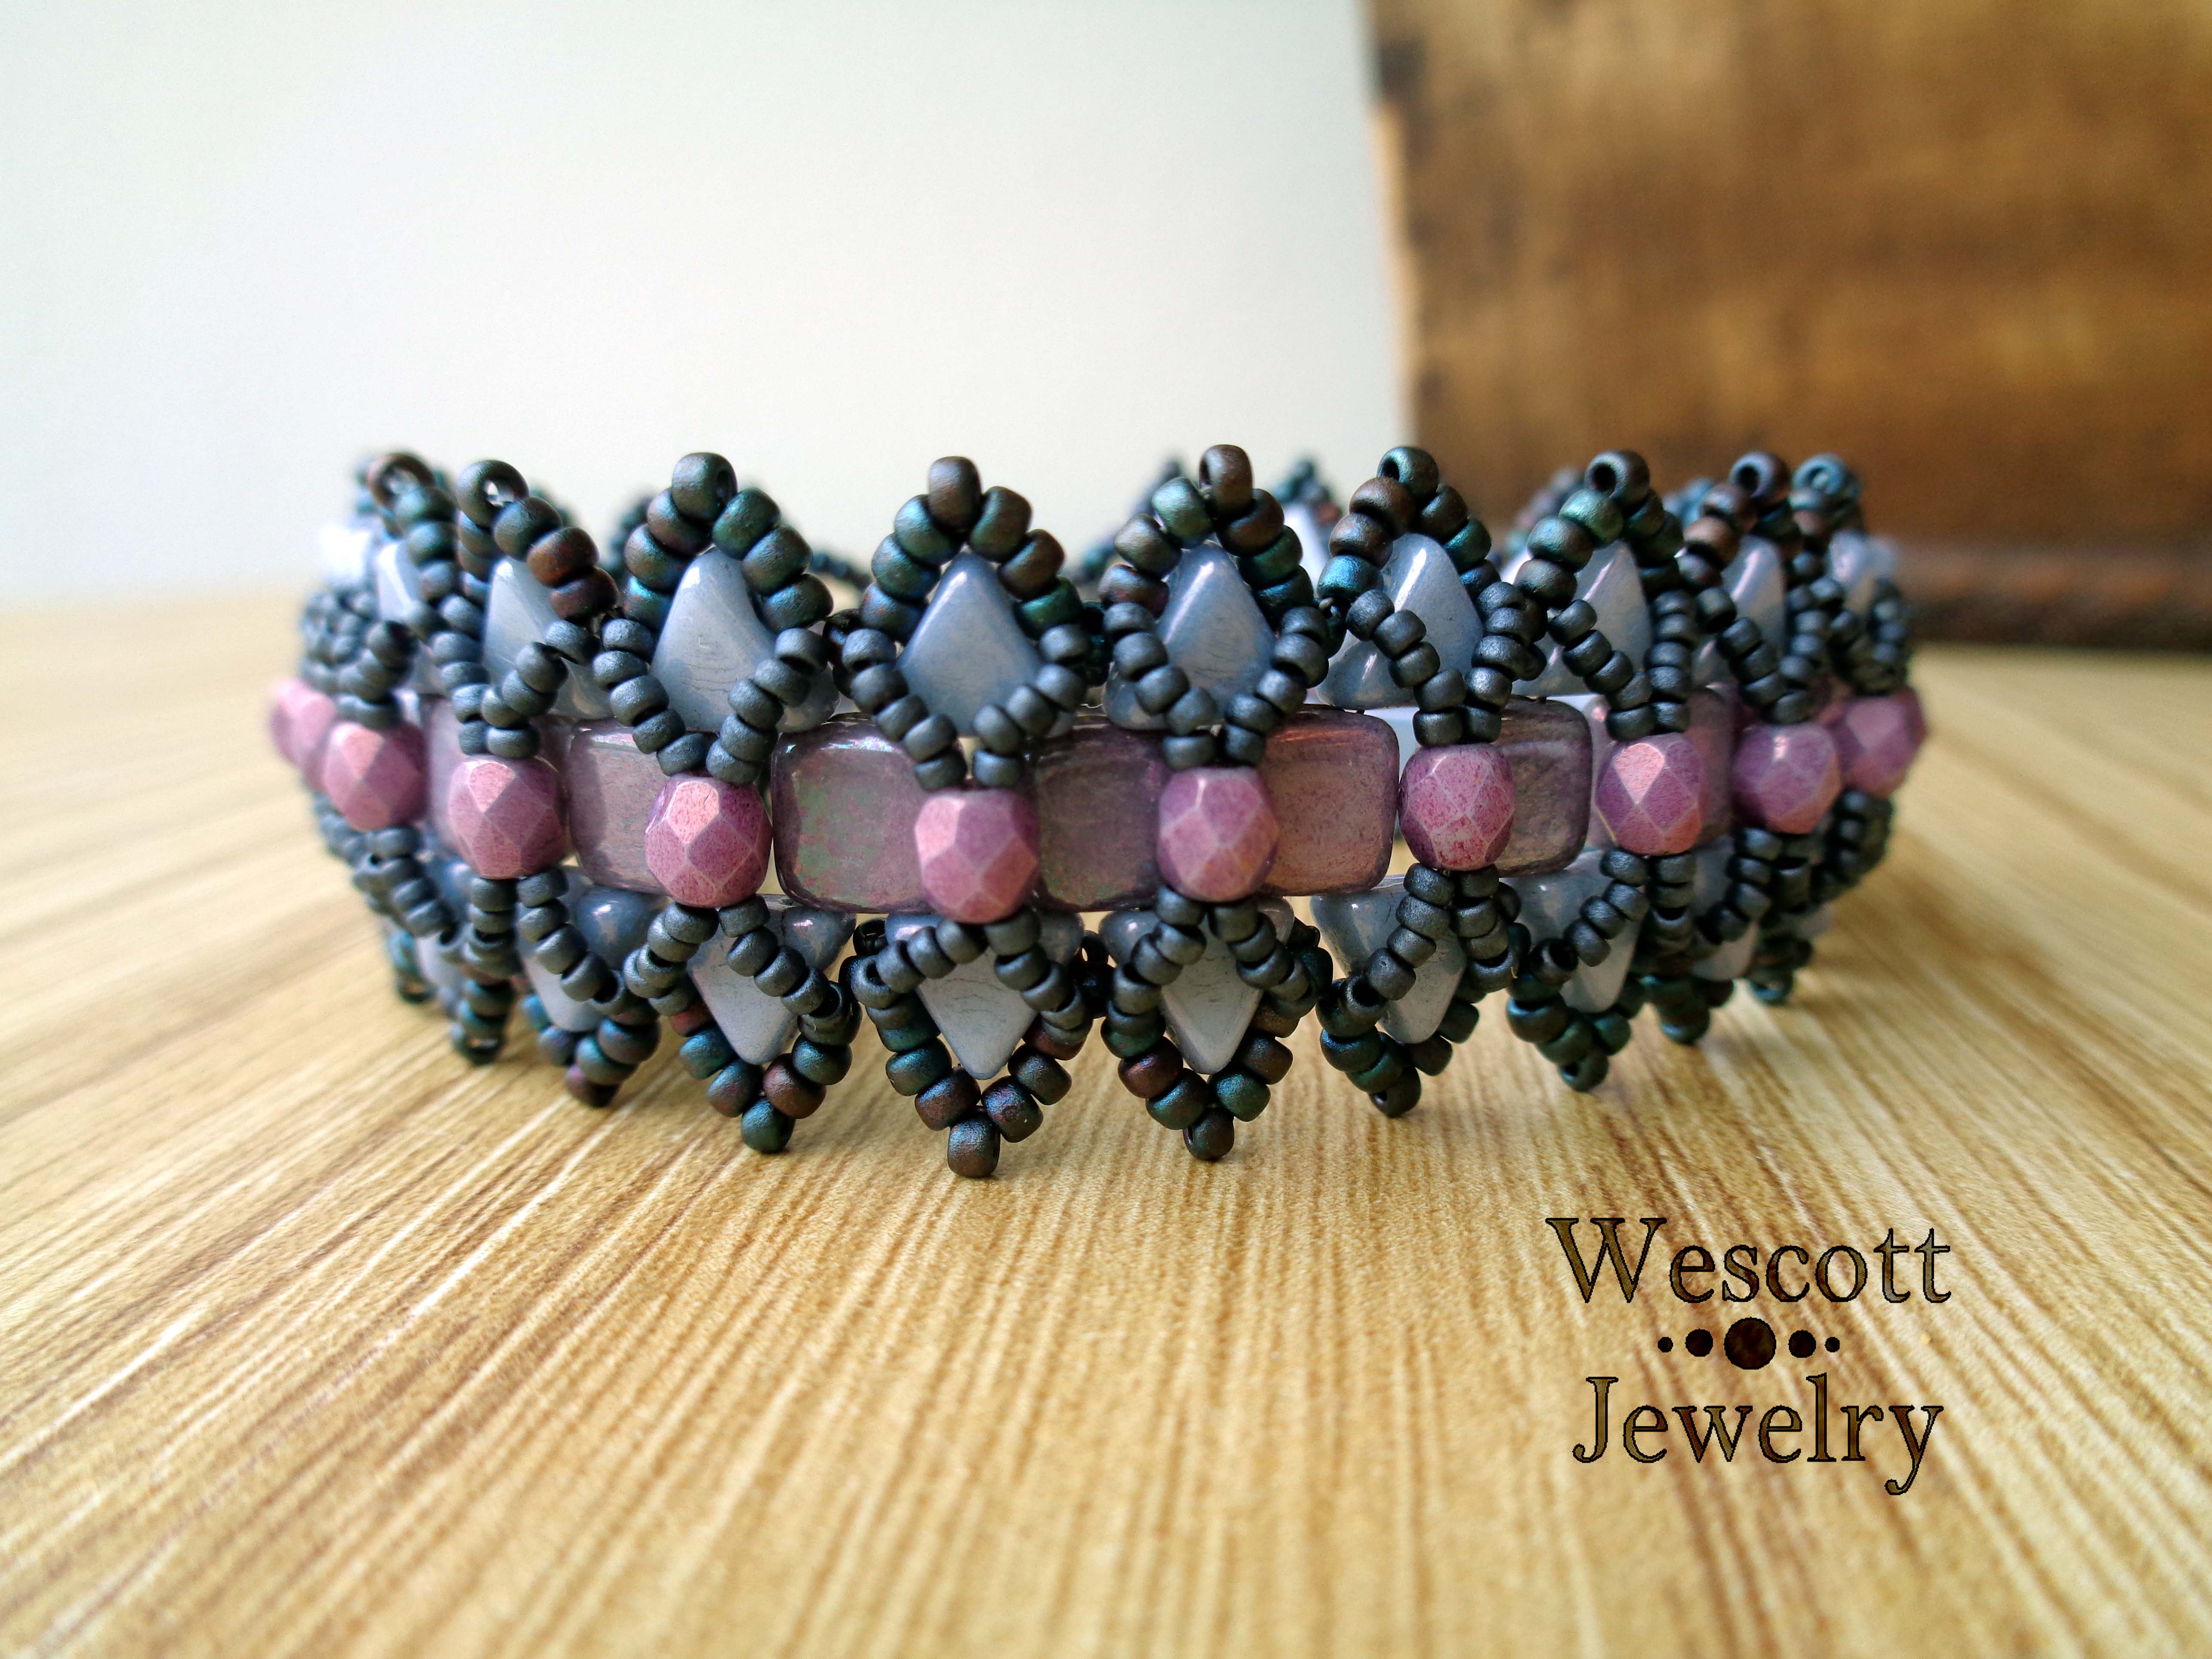
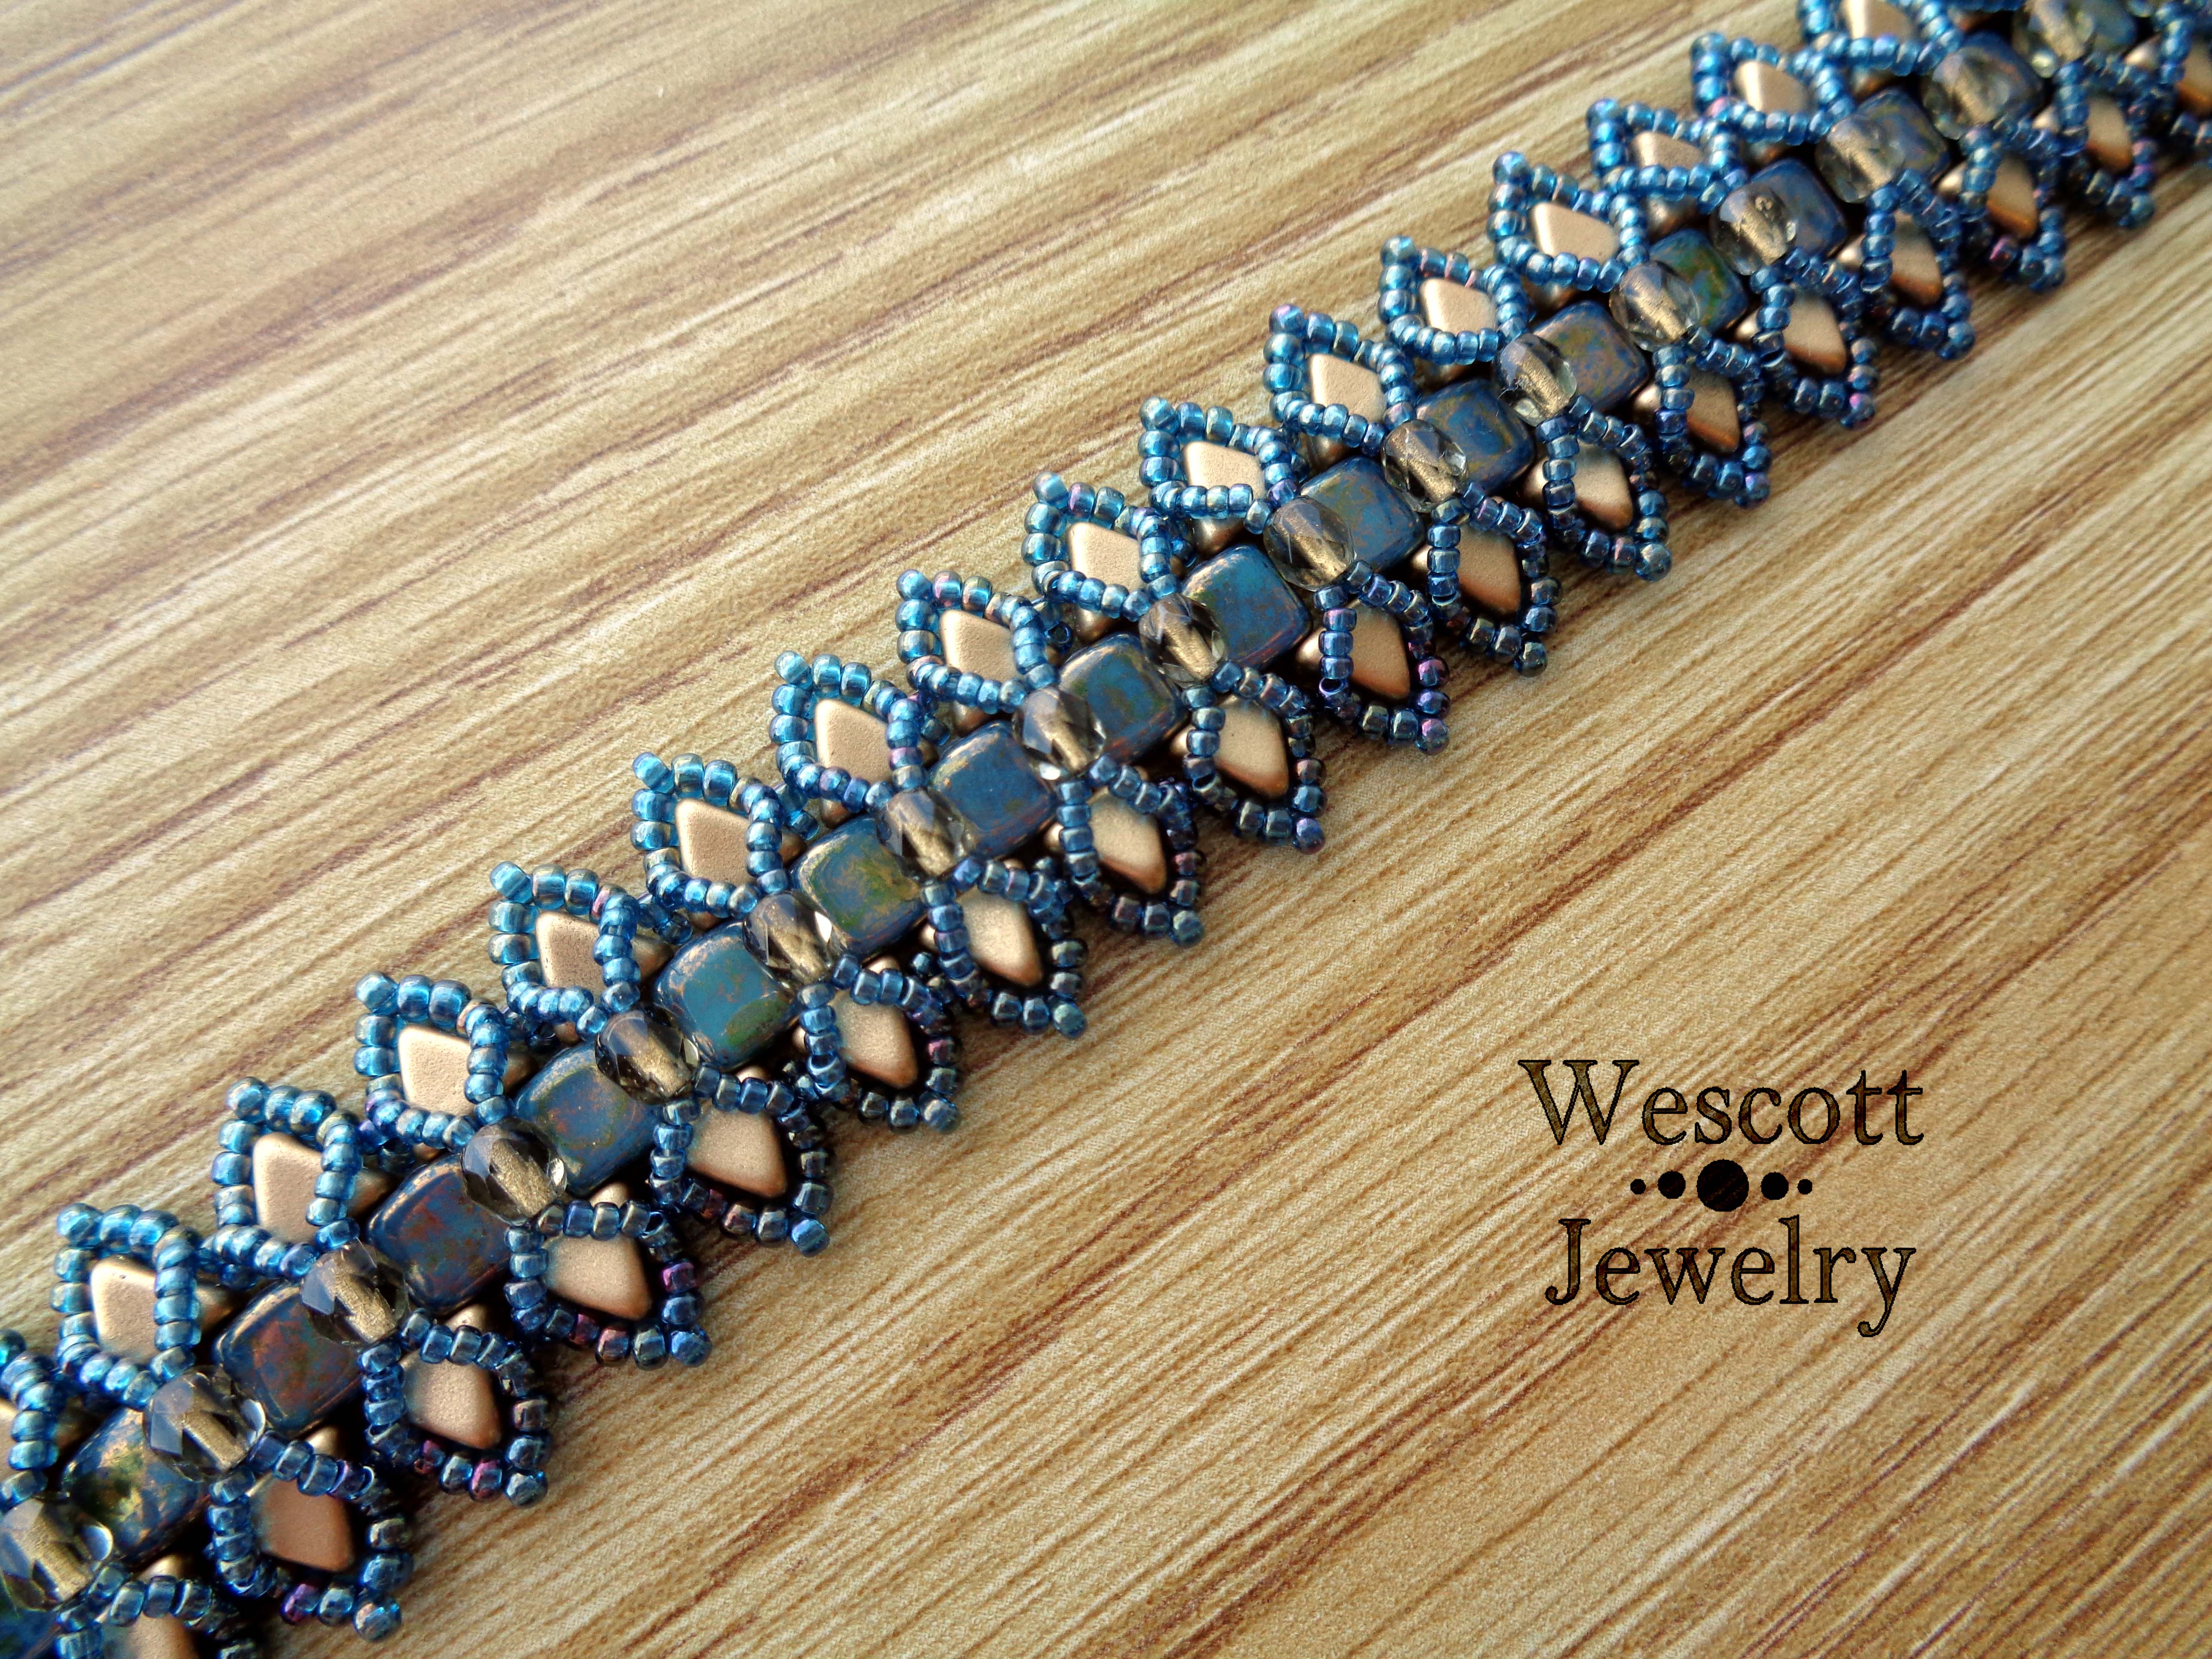
It is in honor of this occasion that I have named my newest bracelet the Two Years Cuff. It is also a fitting name because, boy, this bracelet takes about two years to make. It is not for those seeking a quick project. That being said, I am super proud of this elaborate, time-consuming piece.
Behold! This is my Two Years Cuff! It takes seed beads in a few sizes, Czech crystals, Czechmate Tiles, and the new Kheops par Puca beads! There are endless color combinations with the Pucas and Tile beads – which is why I made so many samples, haha.
This cuff can go fancy with metallics, like my first one in white and silver or this summery copper piece.
Or you can make it more casual with matte beads, like my navy and lilac bracelet. Or by using more diluted palettes, like this matte gold and Atlantis blue cuff.
Now, Kheops Puca beads are fairly new, so they aren’t available from many retailers yet. The online bead store where I work, Beads Direct USA has a great selection of Kheops, as well as a huge variety of Czechmate Tiles to pair them with. I am excited to see the Kheops becoming more popular!
I haven’t decided which new bead shapes I am going to try to design with next. I have some O-beads and Dragon Scales set aside, but haven’t gotten any inspiration yet. What about you guys? Do you have any favorite new shapes you can’t find nice patterns for? Let me know in the comments!
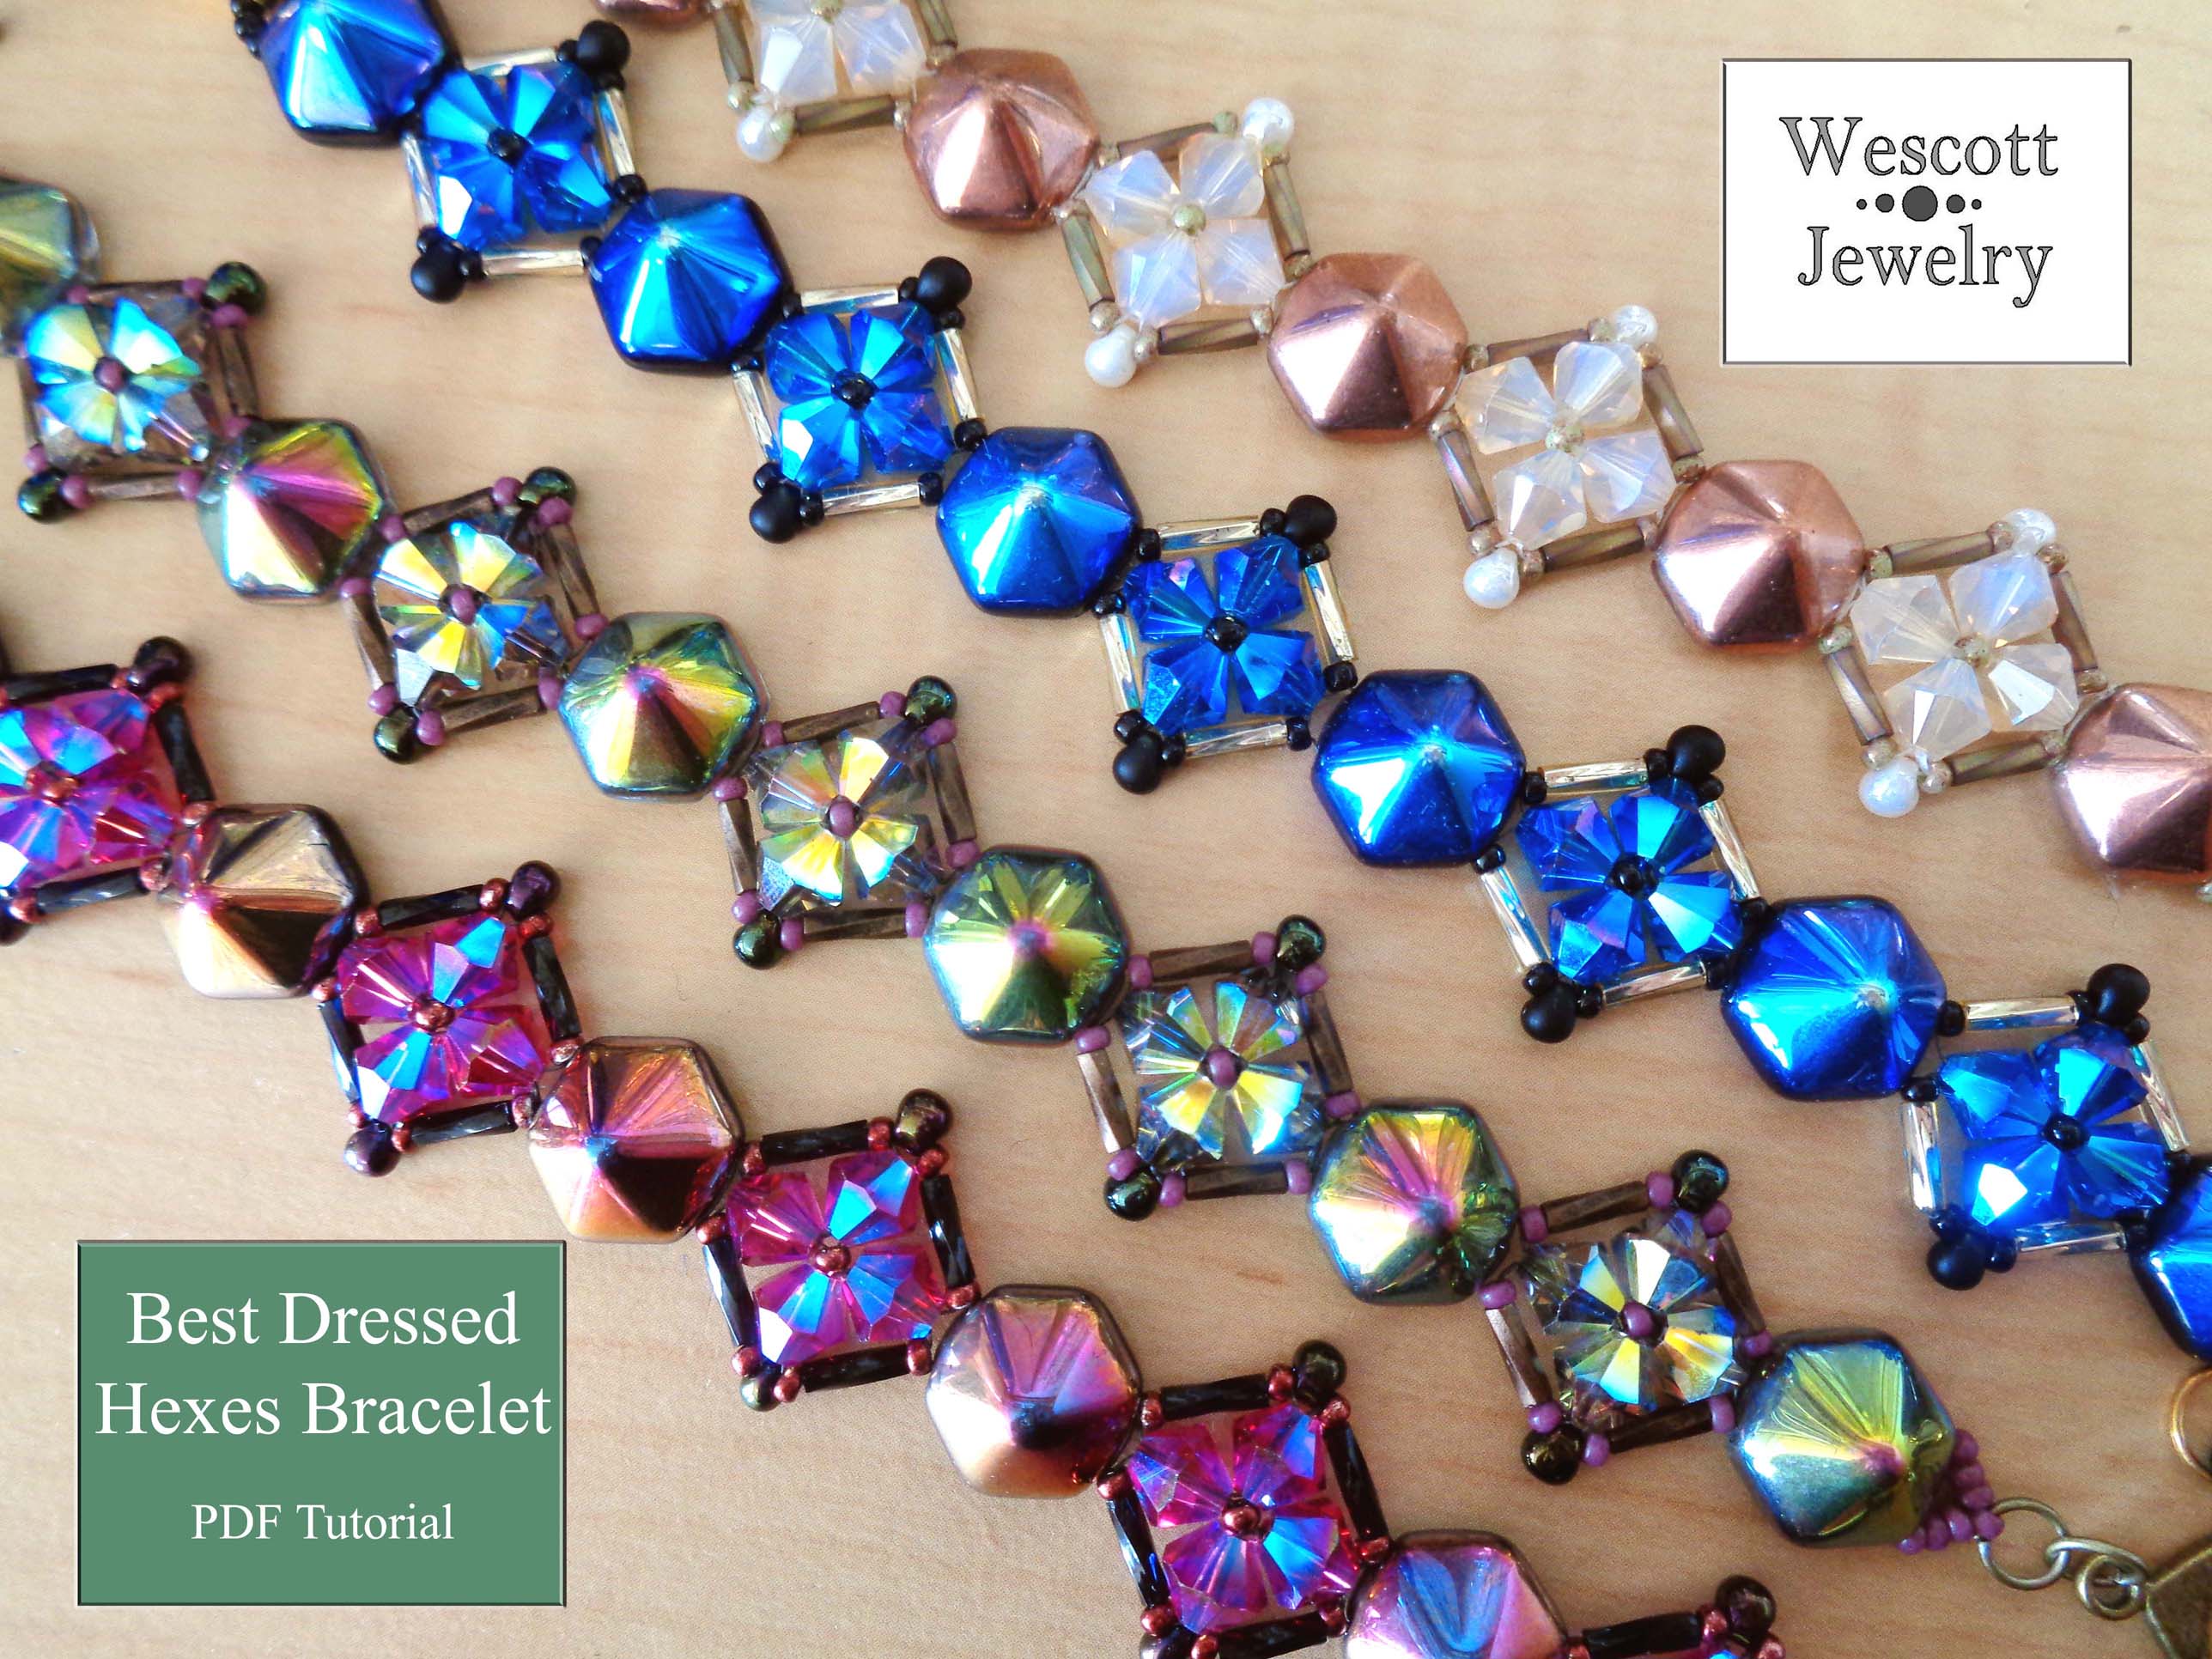
When my local bead store (Beaded Bliss in Harrison, OH) got in the new two-hole Hex Pyramid beads I had no idea what to do with them. They were beautiful, and the shop owner had purchased lots of gorgeous colors, but they were huge! 12mm of pointed glass glory. All my design ideas felt way to delicate for such substantial stud beads.
Then I thought to make crystal motifs that were even bigger than the hex pyramids – thus making them seem smaller. And… voila! My Best Dressed Hexes Bracelet was born!
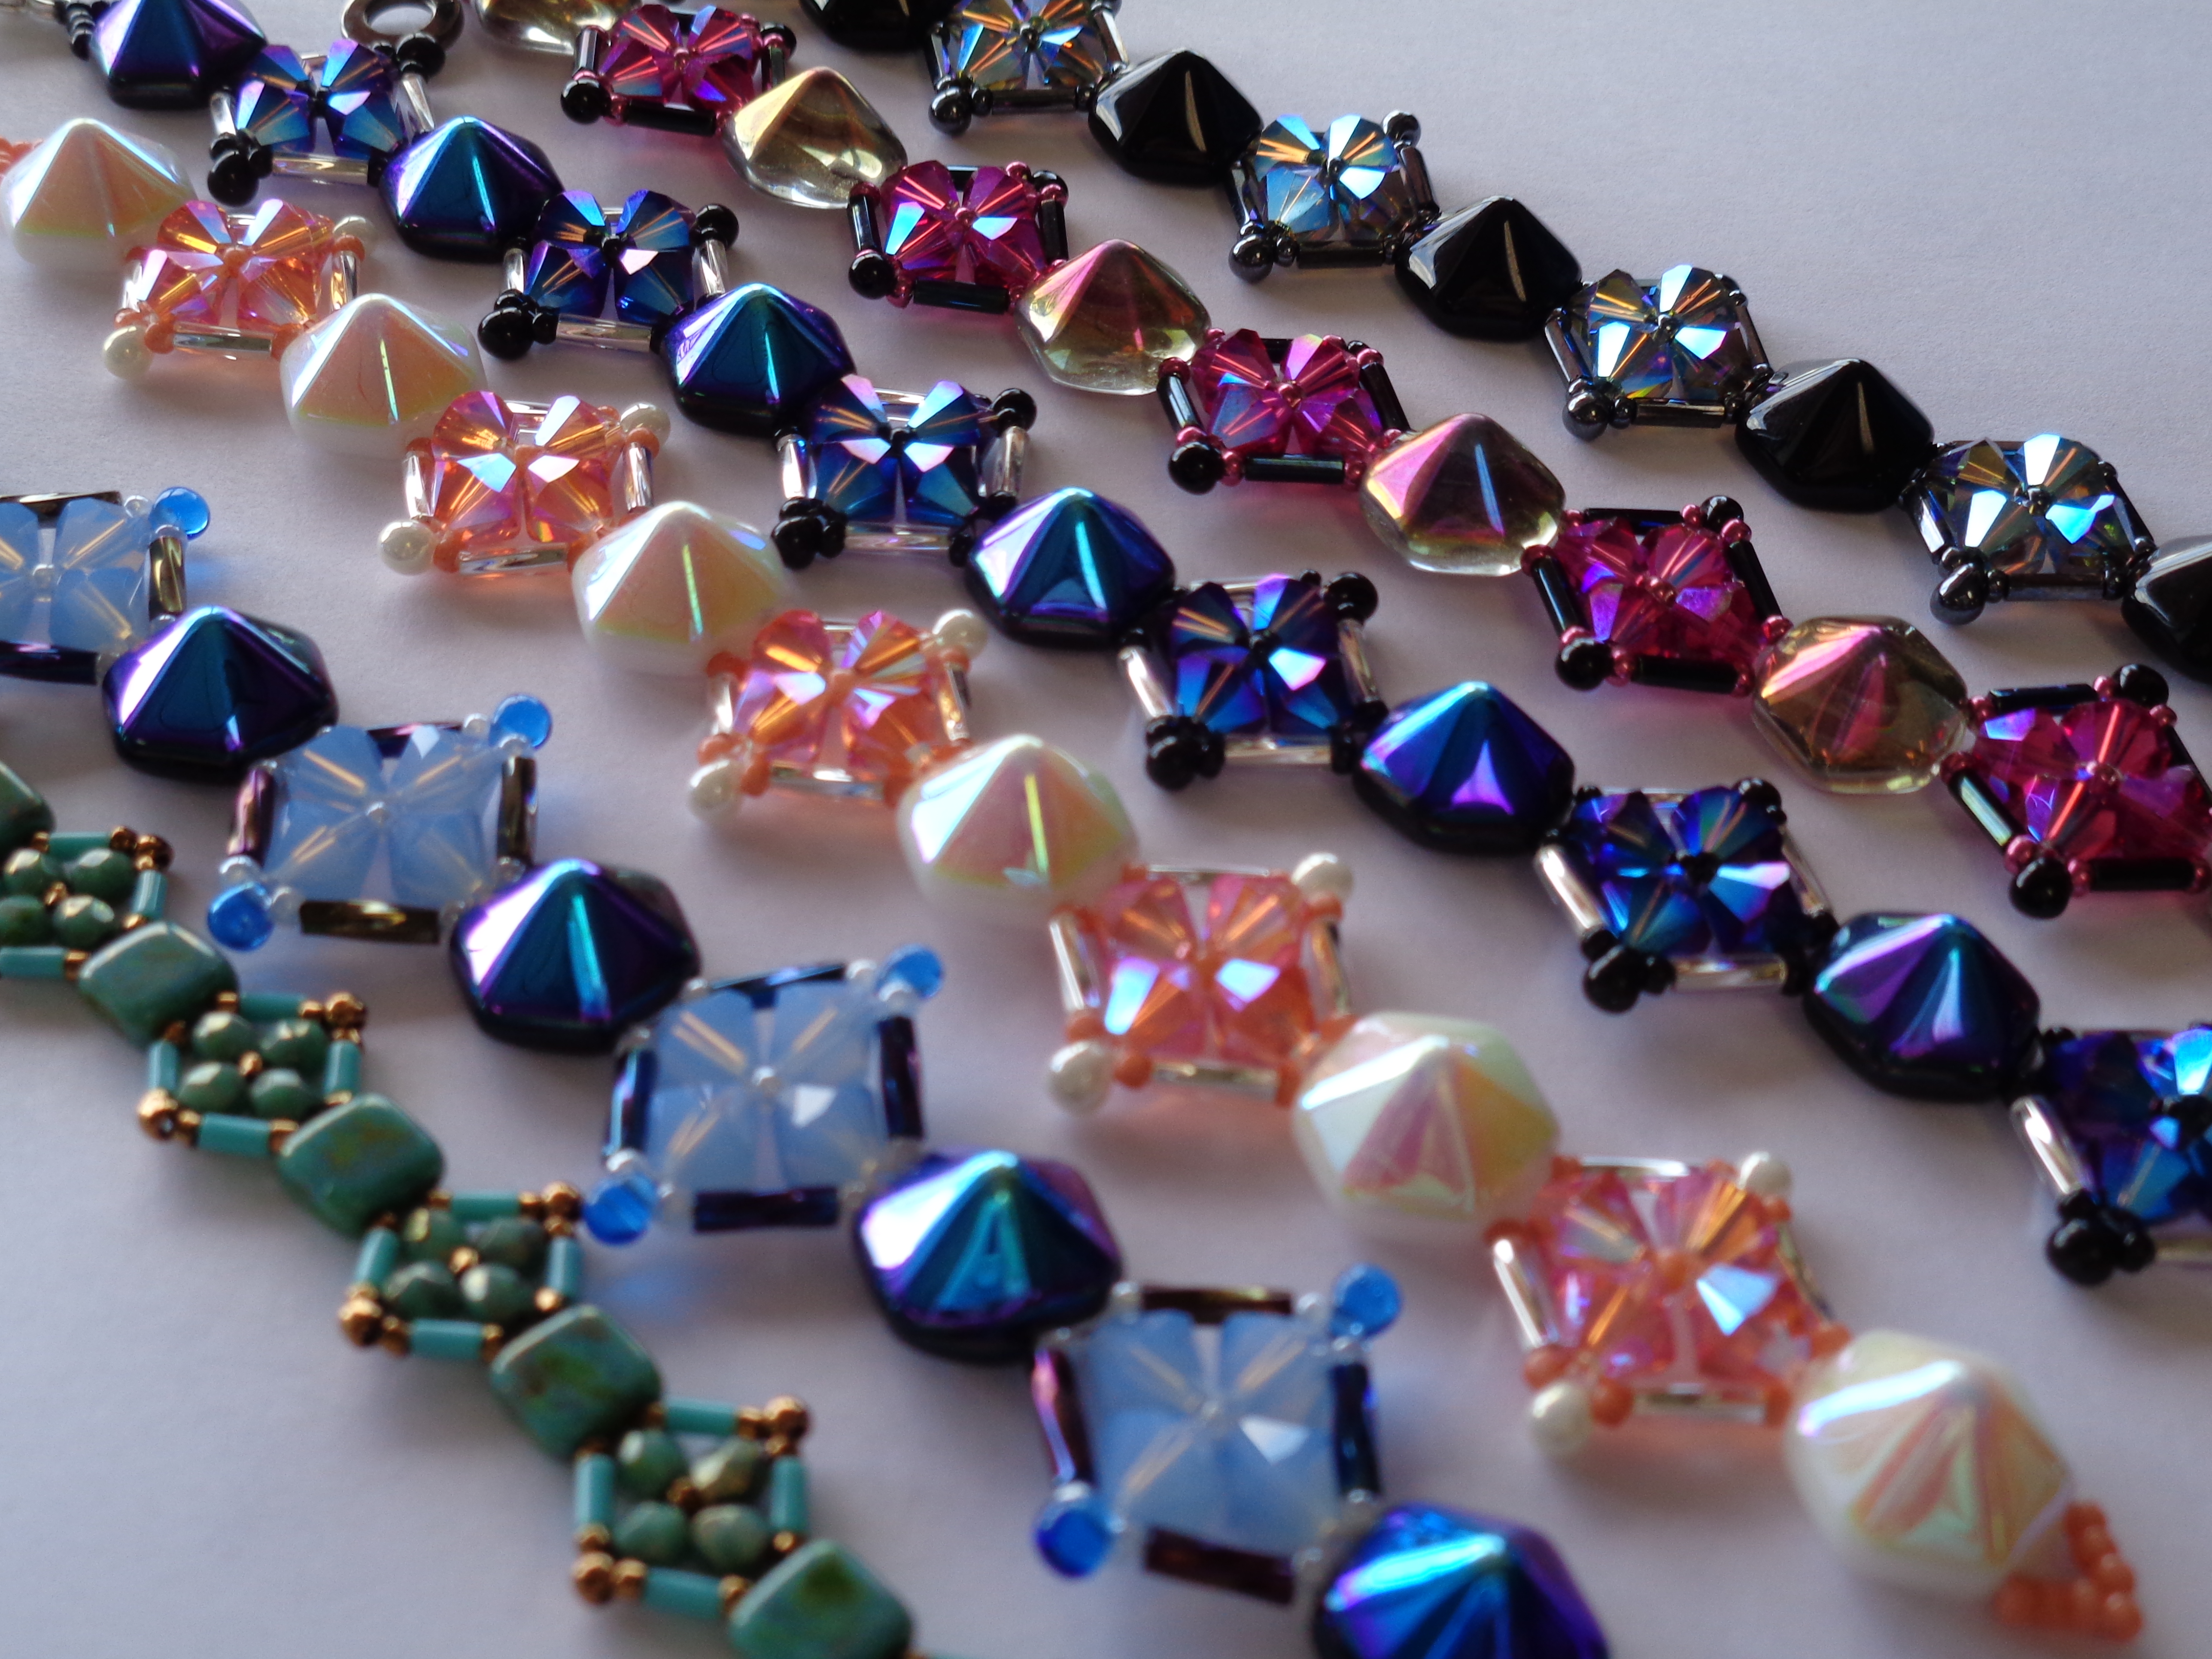
There are so many color options for this bracelet. I have four pictured here and another four sets of colors sitting on my beading table waiting to be put together. One of them became my demo set for the class I taught at Beaded Bliss this past Saturday. The ladies there are always so kind to proofread my patterns before they go online. And they let me take pictures of their finished bracelets!
(Mine is the peach and white bracelet!)
You’ll notice that the turquoise version is made much smaller. My friend, Rose, decided to experiment with switching out the beads for half-sized substitutions. Didn’t it turn out lovely?
I’m not the only one using Hex Pyramids. Deb Roberti just published a free pattern that uses them as well. You can find her pattern and post about it here. I am so excited to see what other designers are going to do with these pretty beads.
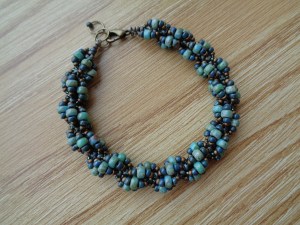
So, spiral ropes are pretty ubiquitous in the beadweaving world, right? The basic technique is explained in the back of every Beadwork and Bead & Button Magazine and the internet is full of great free tutorials and YouTube videos on how to make them.
Personally, I love this stitch and use it all the time. I don’t, however, usually use all the same size beads like in the tutorials I linked to above. I prefer to use 8/0’s for the center core and graduated bead sizes for the side loops. It’s a great way to clear out your stash a bit and the color combinations are endless!
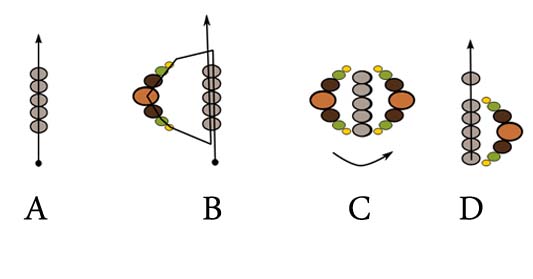
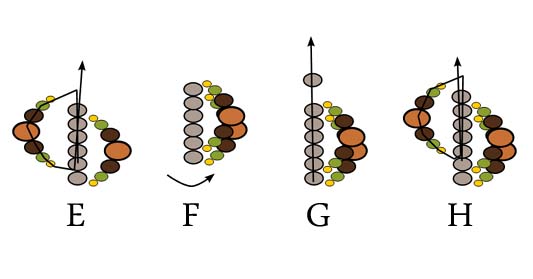
Version A : Tight and Jumbly
This is my go-to spiral set up. It’s particularly great if you wanna show off some fancy 6/0 beads (in both of my examples, the 6/0’s have special Picasso finishes). The loops are small, but kinda pudgy, so this bracelet is wide and full of texture.
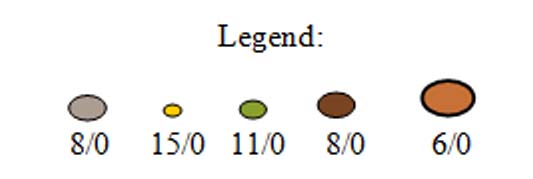
For your materials, you will need seed beads in lots of sizes, so this bracelet is great for stash-busting. You will need sizes 15/0, 11/0, 8/0, and 6/0 for the loops and size 8/0 in a different color for your core beads.
To make this variation, you will want to pick up five of your size 8/0 core beads and hold them so that they are stacked vertically and your needle is coming out the top (A).
Then pick up one 15/0, one 11/0, one 8/0, one 6/0, one 8/0, one 11/0, and one 15/0. Once you have that sequence picked up, go back through your stack of five core beads from bottom to top, making a loop. (B).
Now, slide your loop over from the left of your stack to the right (C). This will be important later, to keep your loops in the correct order to spiral.
Then pick up one of your core beads and slide it down to the top of your stack (D).
Great! Now pick up your loop sequence again – one 15/0, one 11/0, one 8/0, one 6/0, one 8/0, one 11/0, and one 15/0 and go back through five core beads including the newest one added. That means you are skipping the bottom-most core bead and just going through the top five (E).
Once again, flip your newest loop from the left side to the right to join your last loop (F).
Add another core bead and slide it down to the top of your stack (G).
Then add your sequence of one 15/0, one 11/0, one 8/0, one 6/0, one 8/0, one 11/0, and one 15/0 and go back through the top five core beads including the newest one added (H).
That’s really about it! Each time you will add a core bead, add your loop, and then slide it to the side and do it all again! For the clasp, I usually make a loop of about six 11/0’s to attach it. Just make sure to reinforce to keep it nice and strong.
It’s a simple pattern, but it looks great and the opportunities for creative color combinations are infinite!
Keep checking back on this blog for more similar tutorials. I’ve got two more go-to graduated spirals that I use a lot, and I’m sure I’ll get posts up about them eventually! So, keep watch for Versions B and C!
In the mean time, whip up some spirals to show me! What colors will you choose?
Note: I know you guys are super great about giving designers the credit they deserve. So please do not just save the diagrams and give them to your friends or post them on facebook or pinterest without a link to me. I definitely want you to tell your friends, but if you do, please link them to this website. Here is the permanent link you can give them:
Thanks a bunch, friends! I really appreciate the traffic!
Edit 4/3/15: Good news! My friend, Tina, was kind enough to make a video of this free pattern! She has a great beadweaving tutorial channel here that you should definitely subscribe to. It’s a great visual bonus for beaders who want step-by-step instructions.
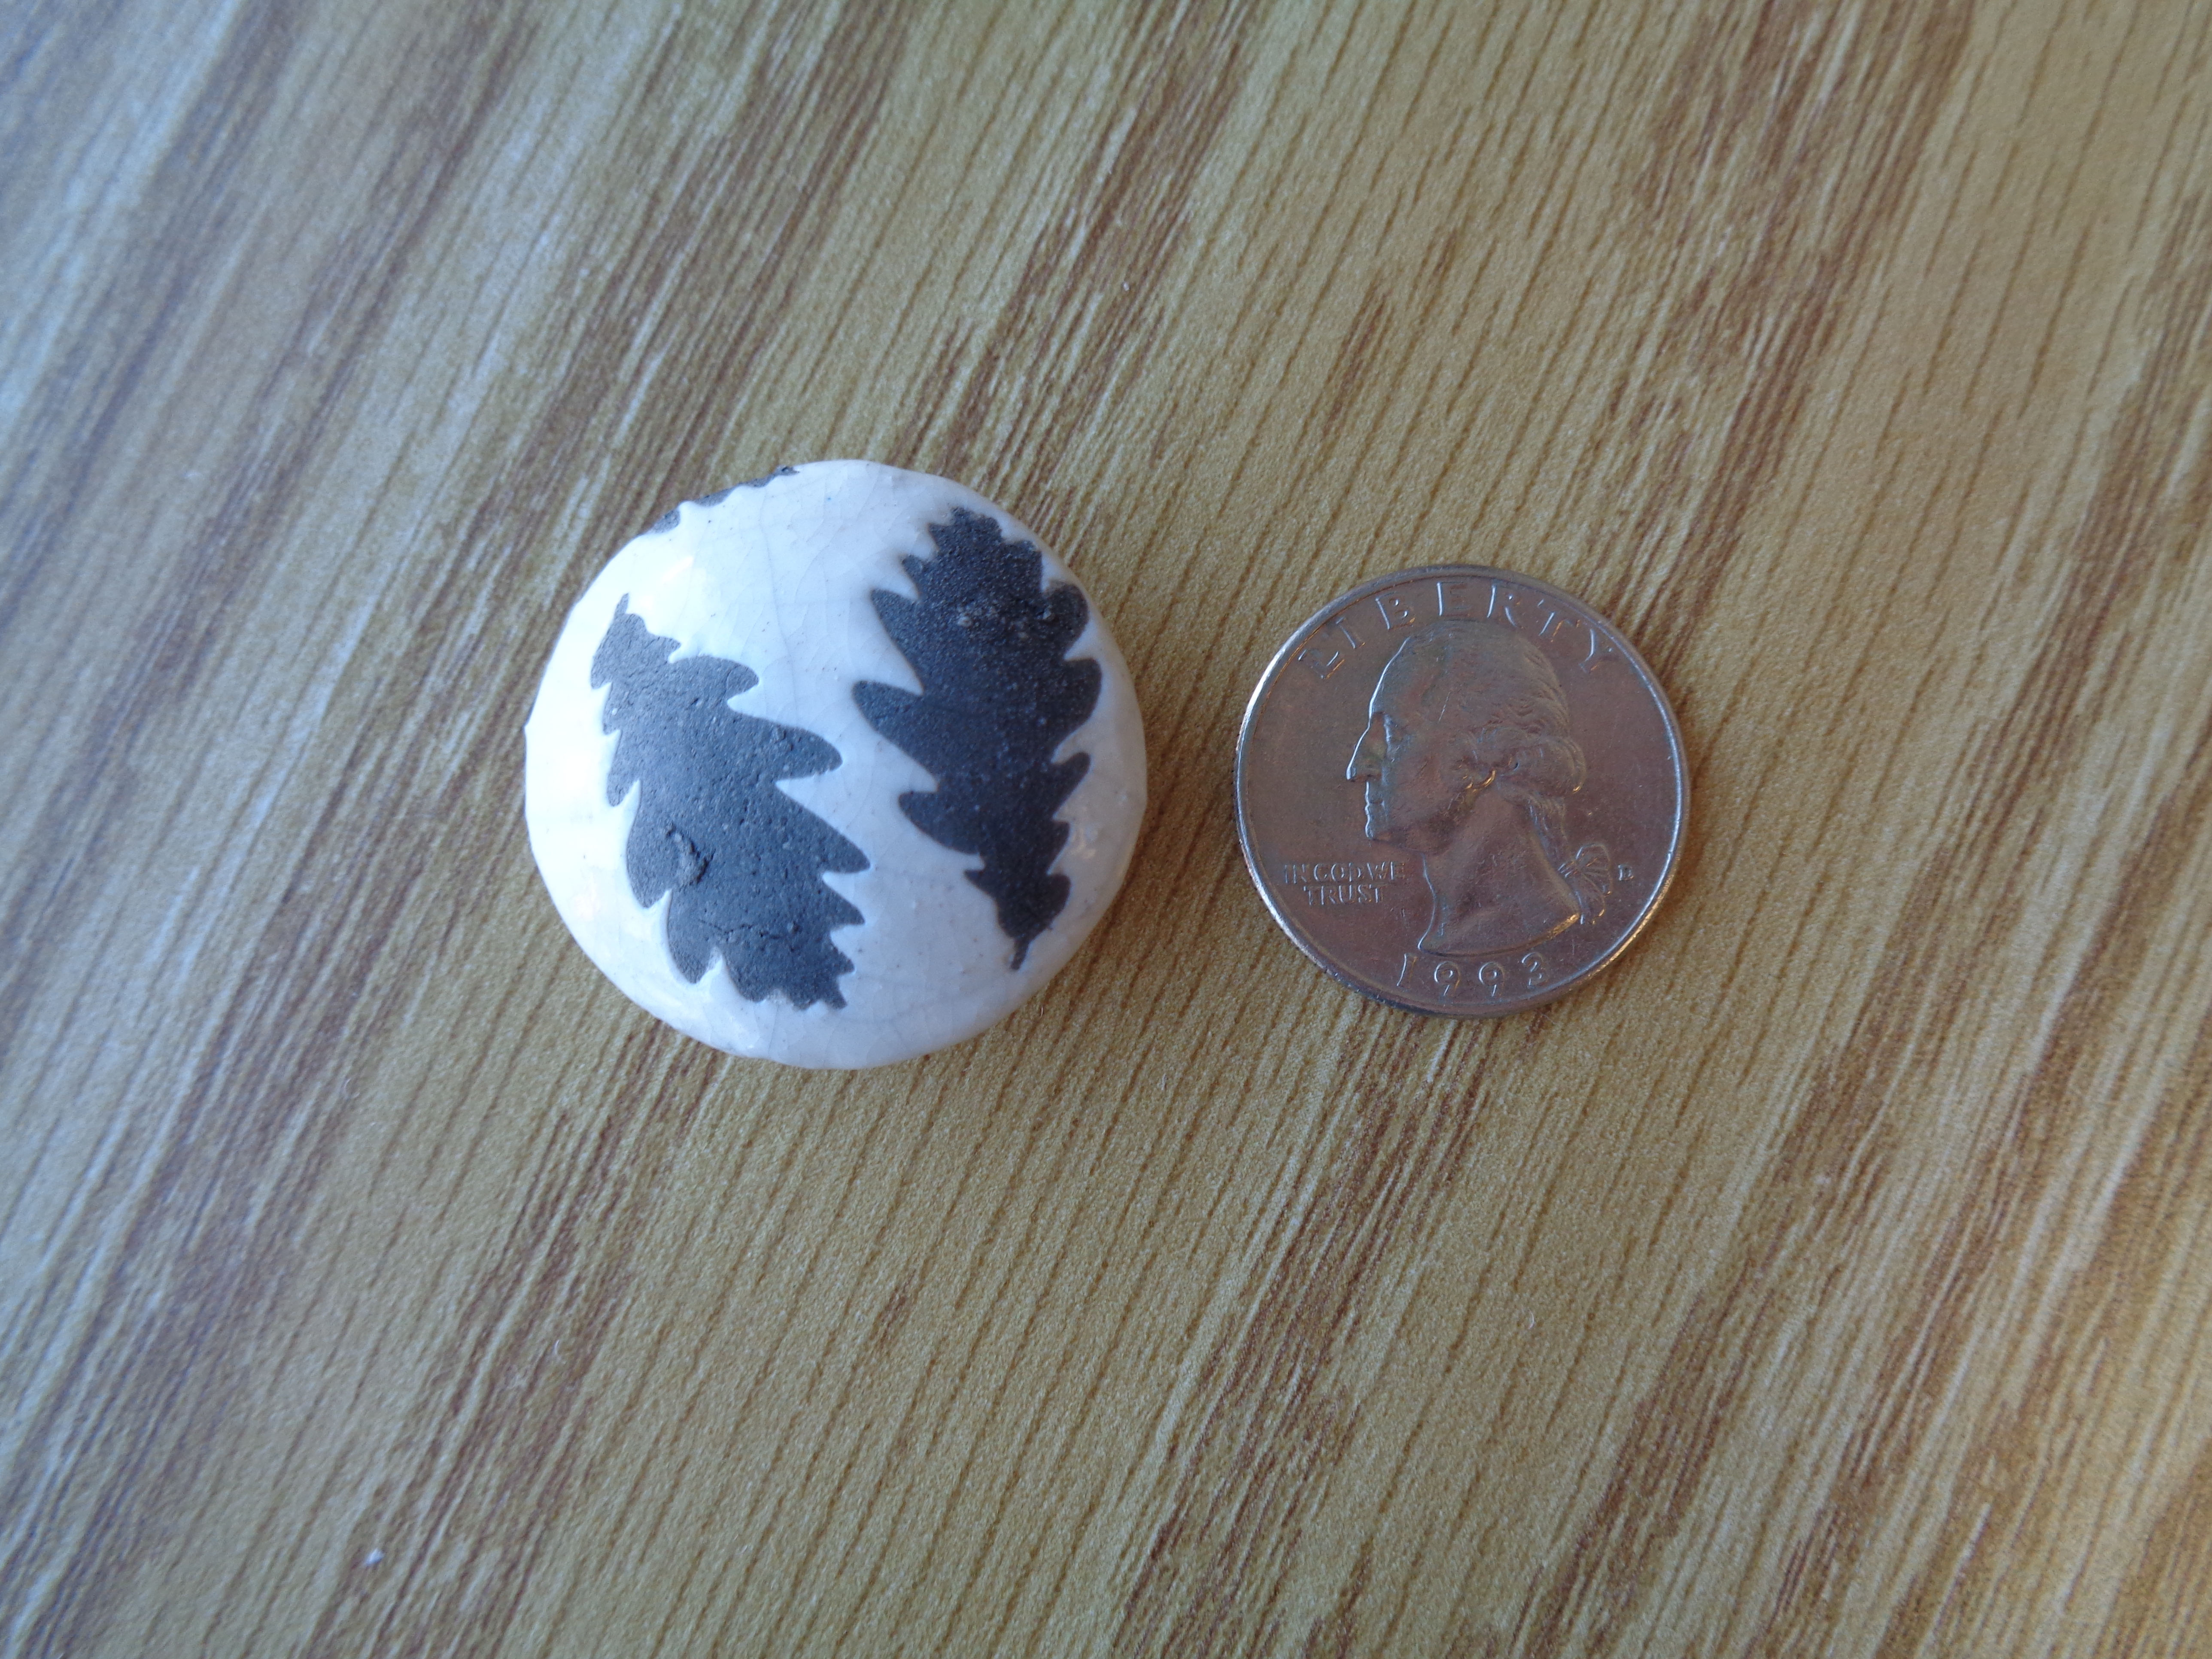
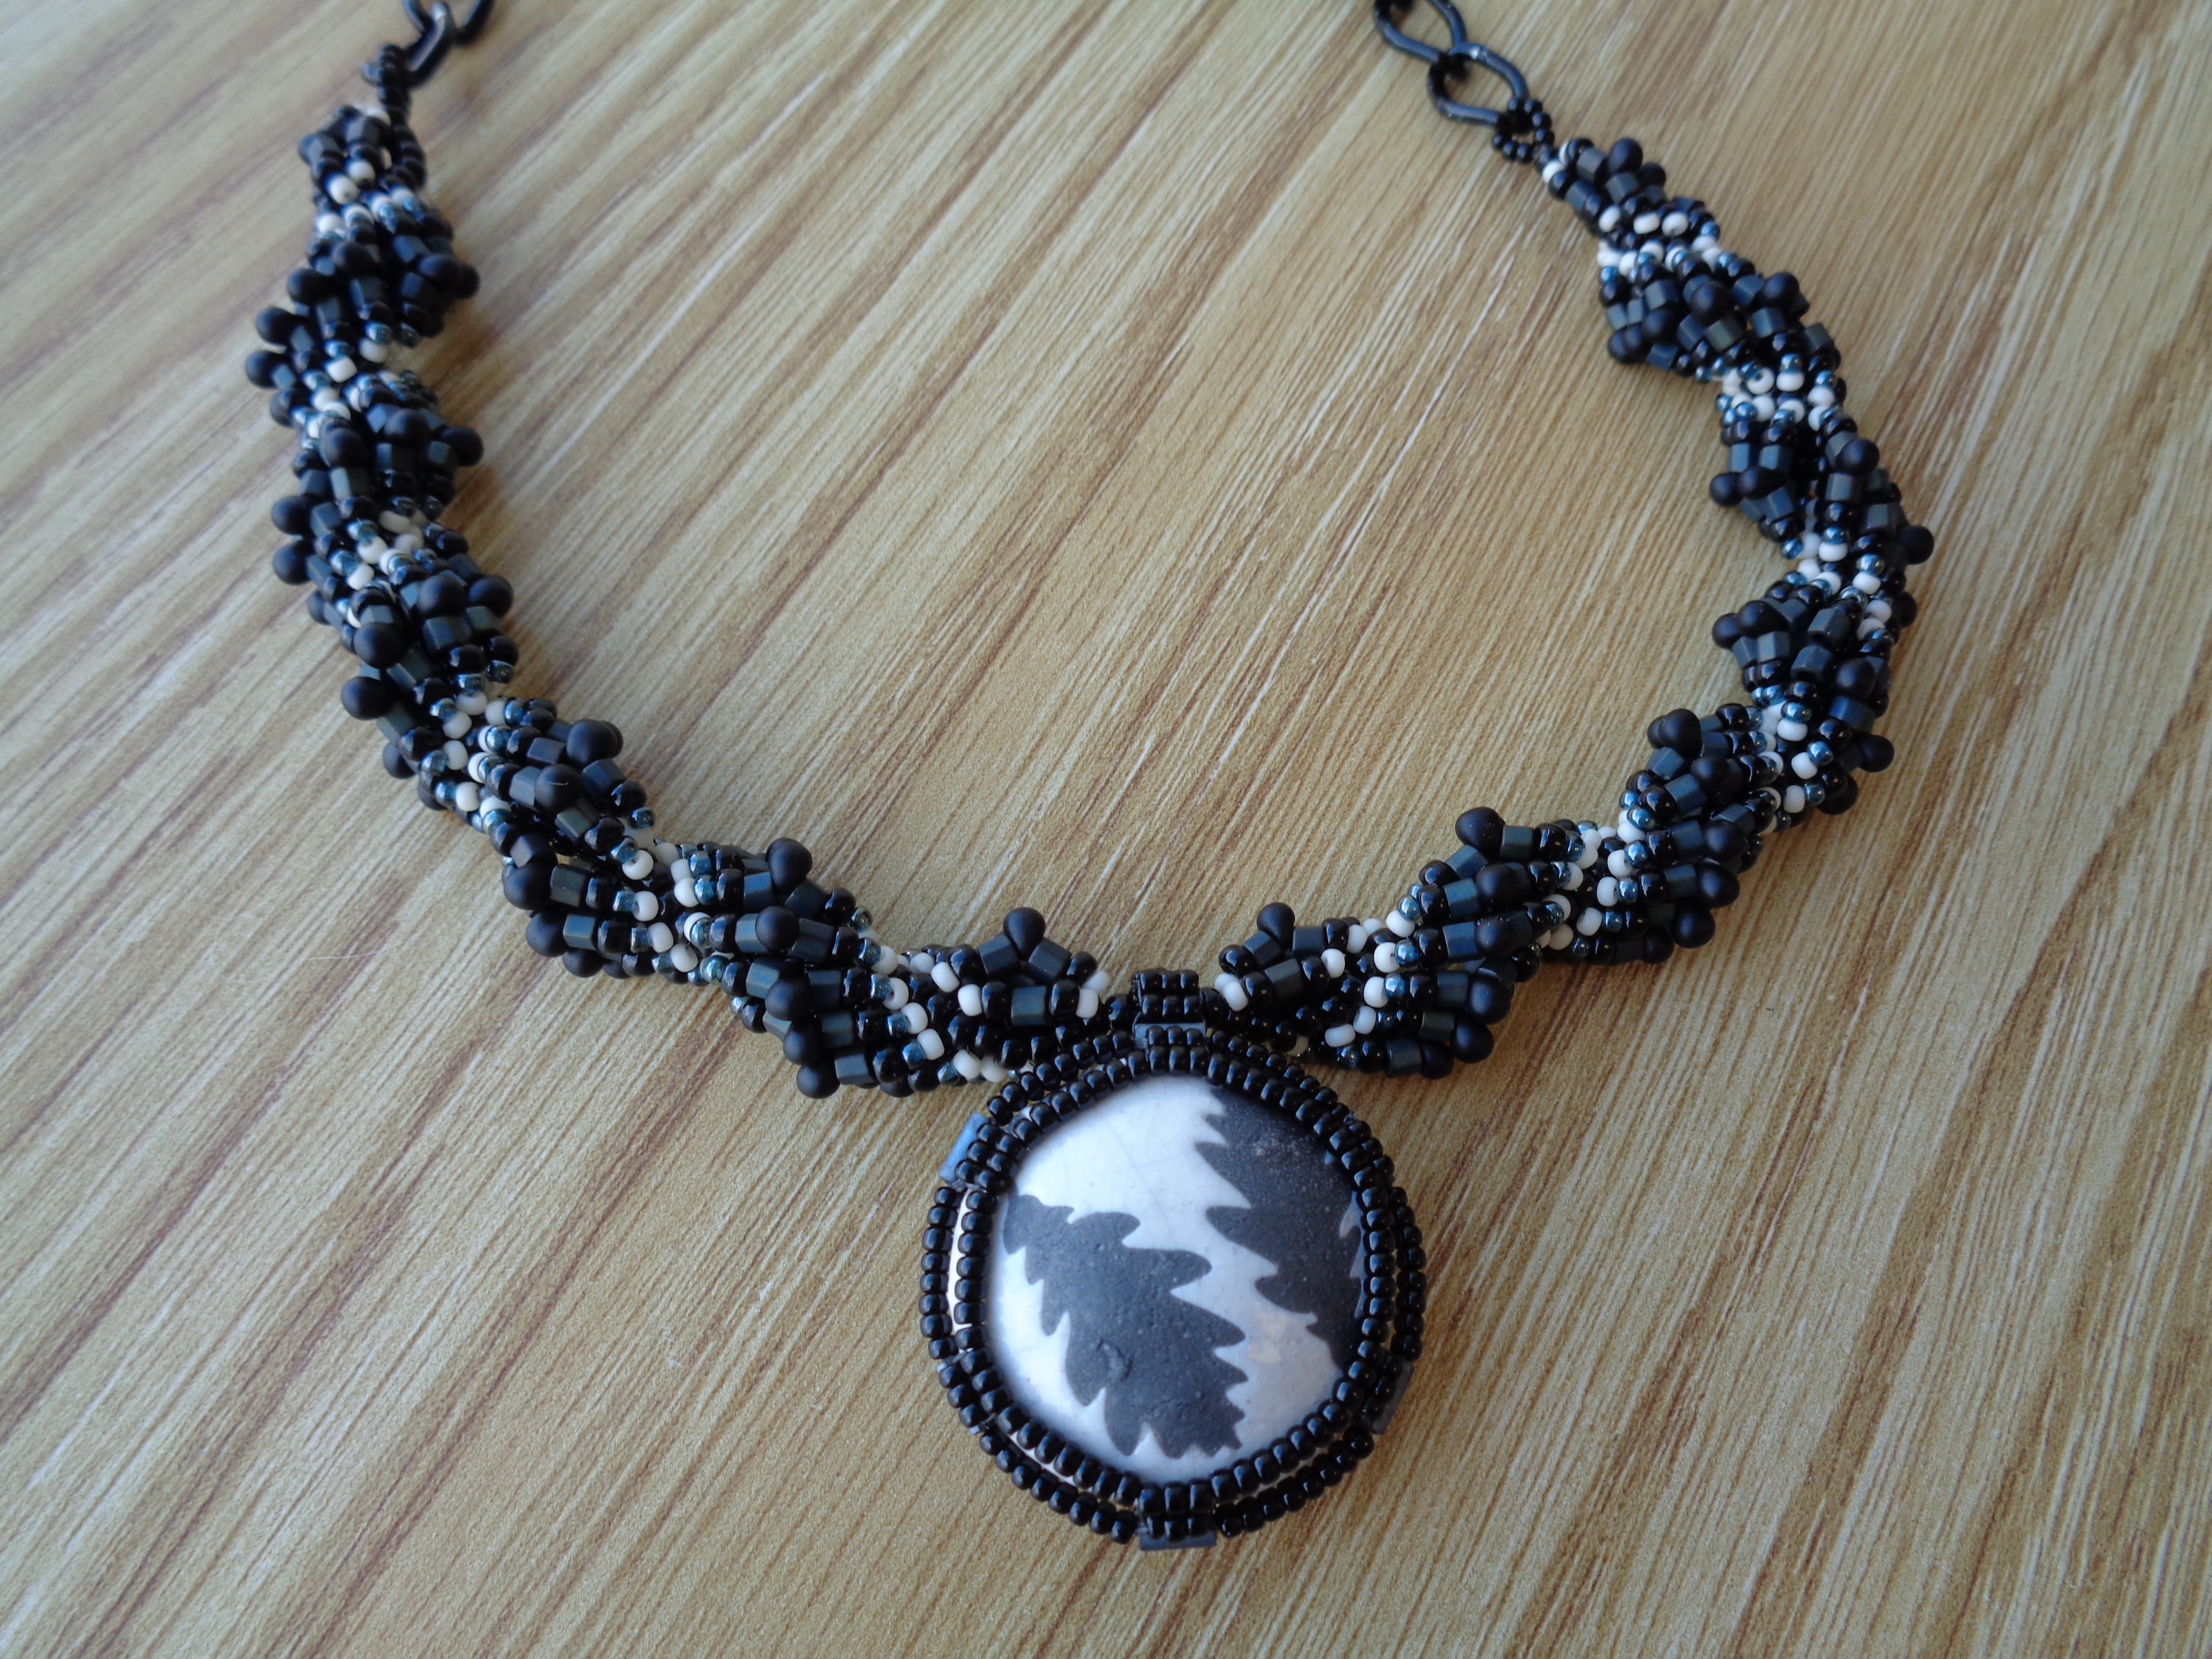
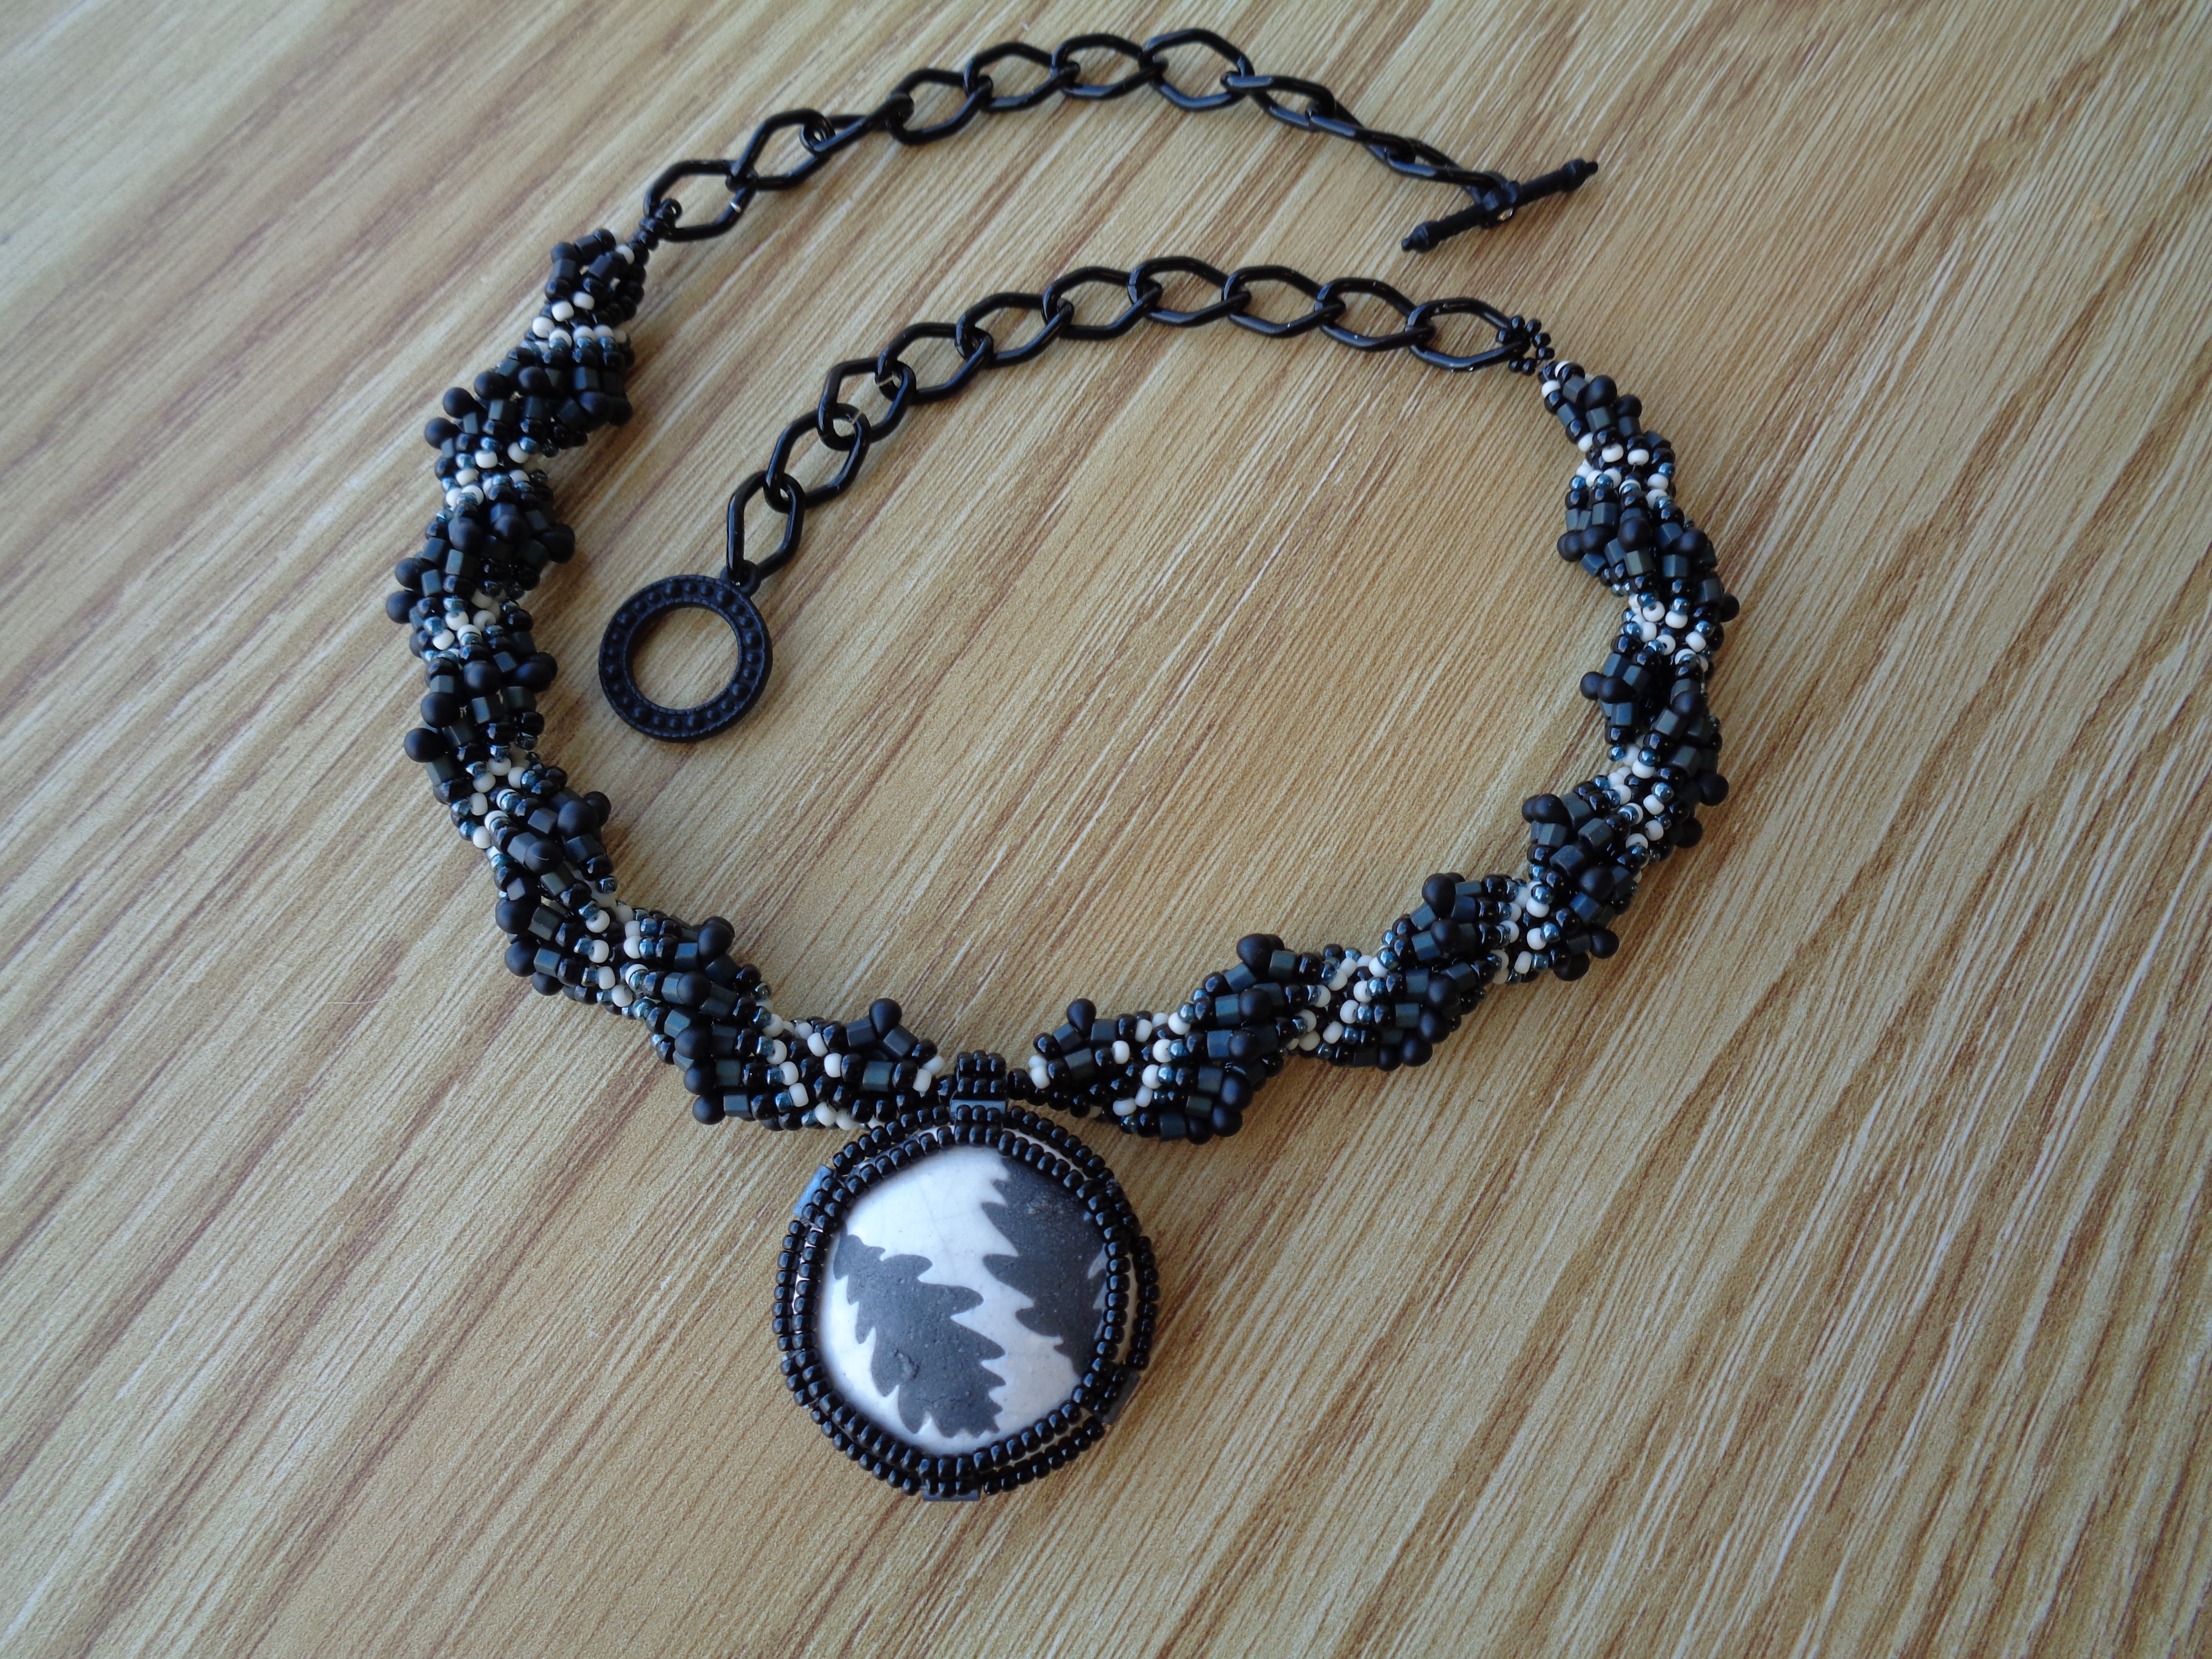
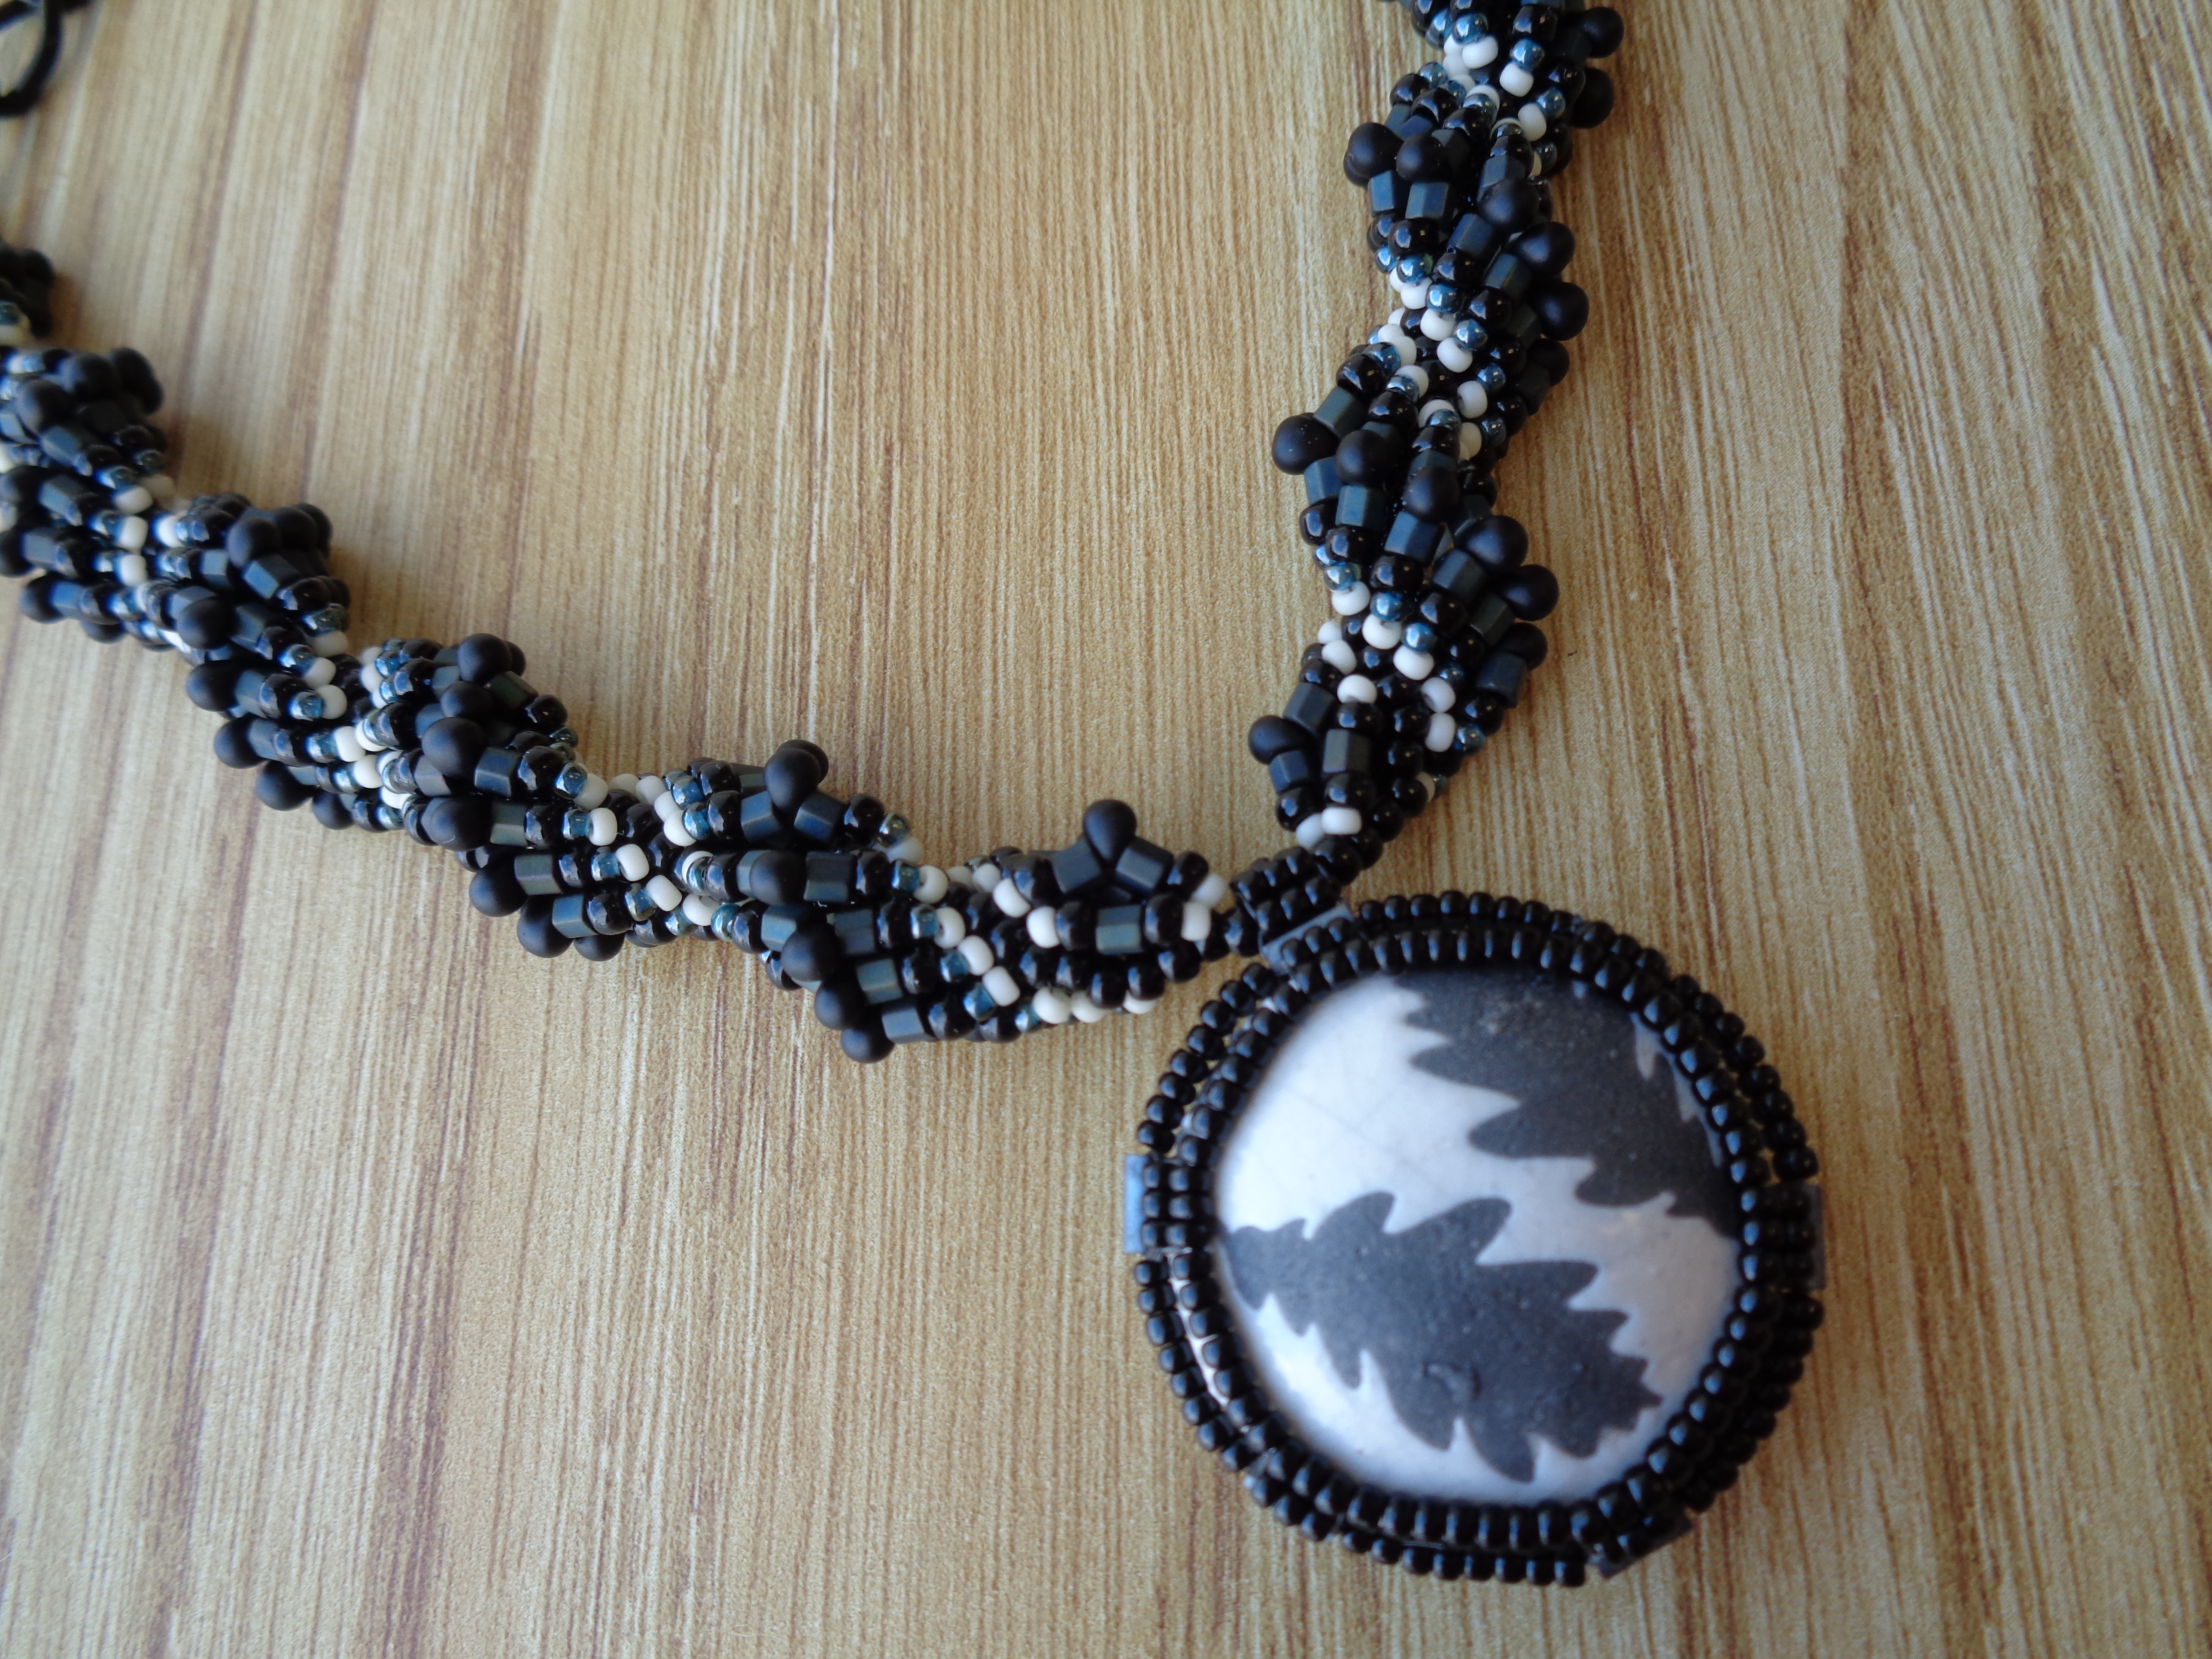
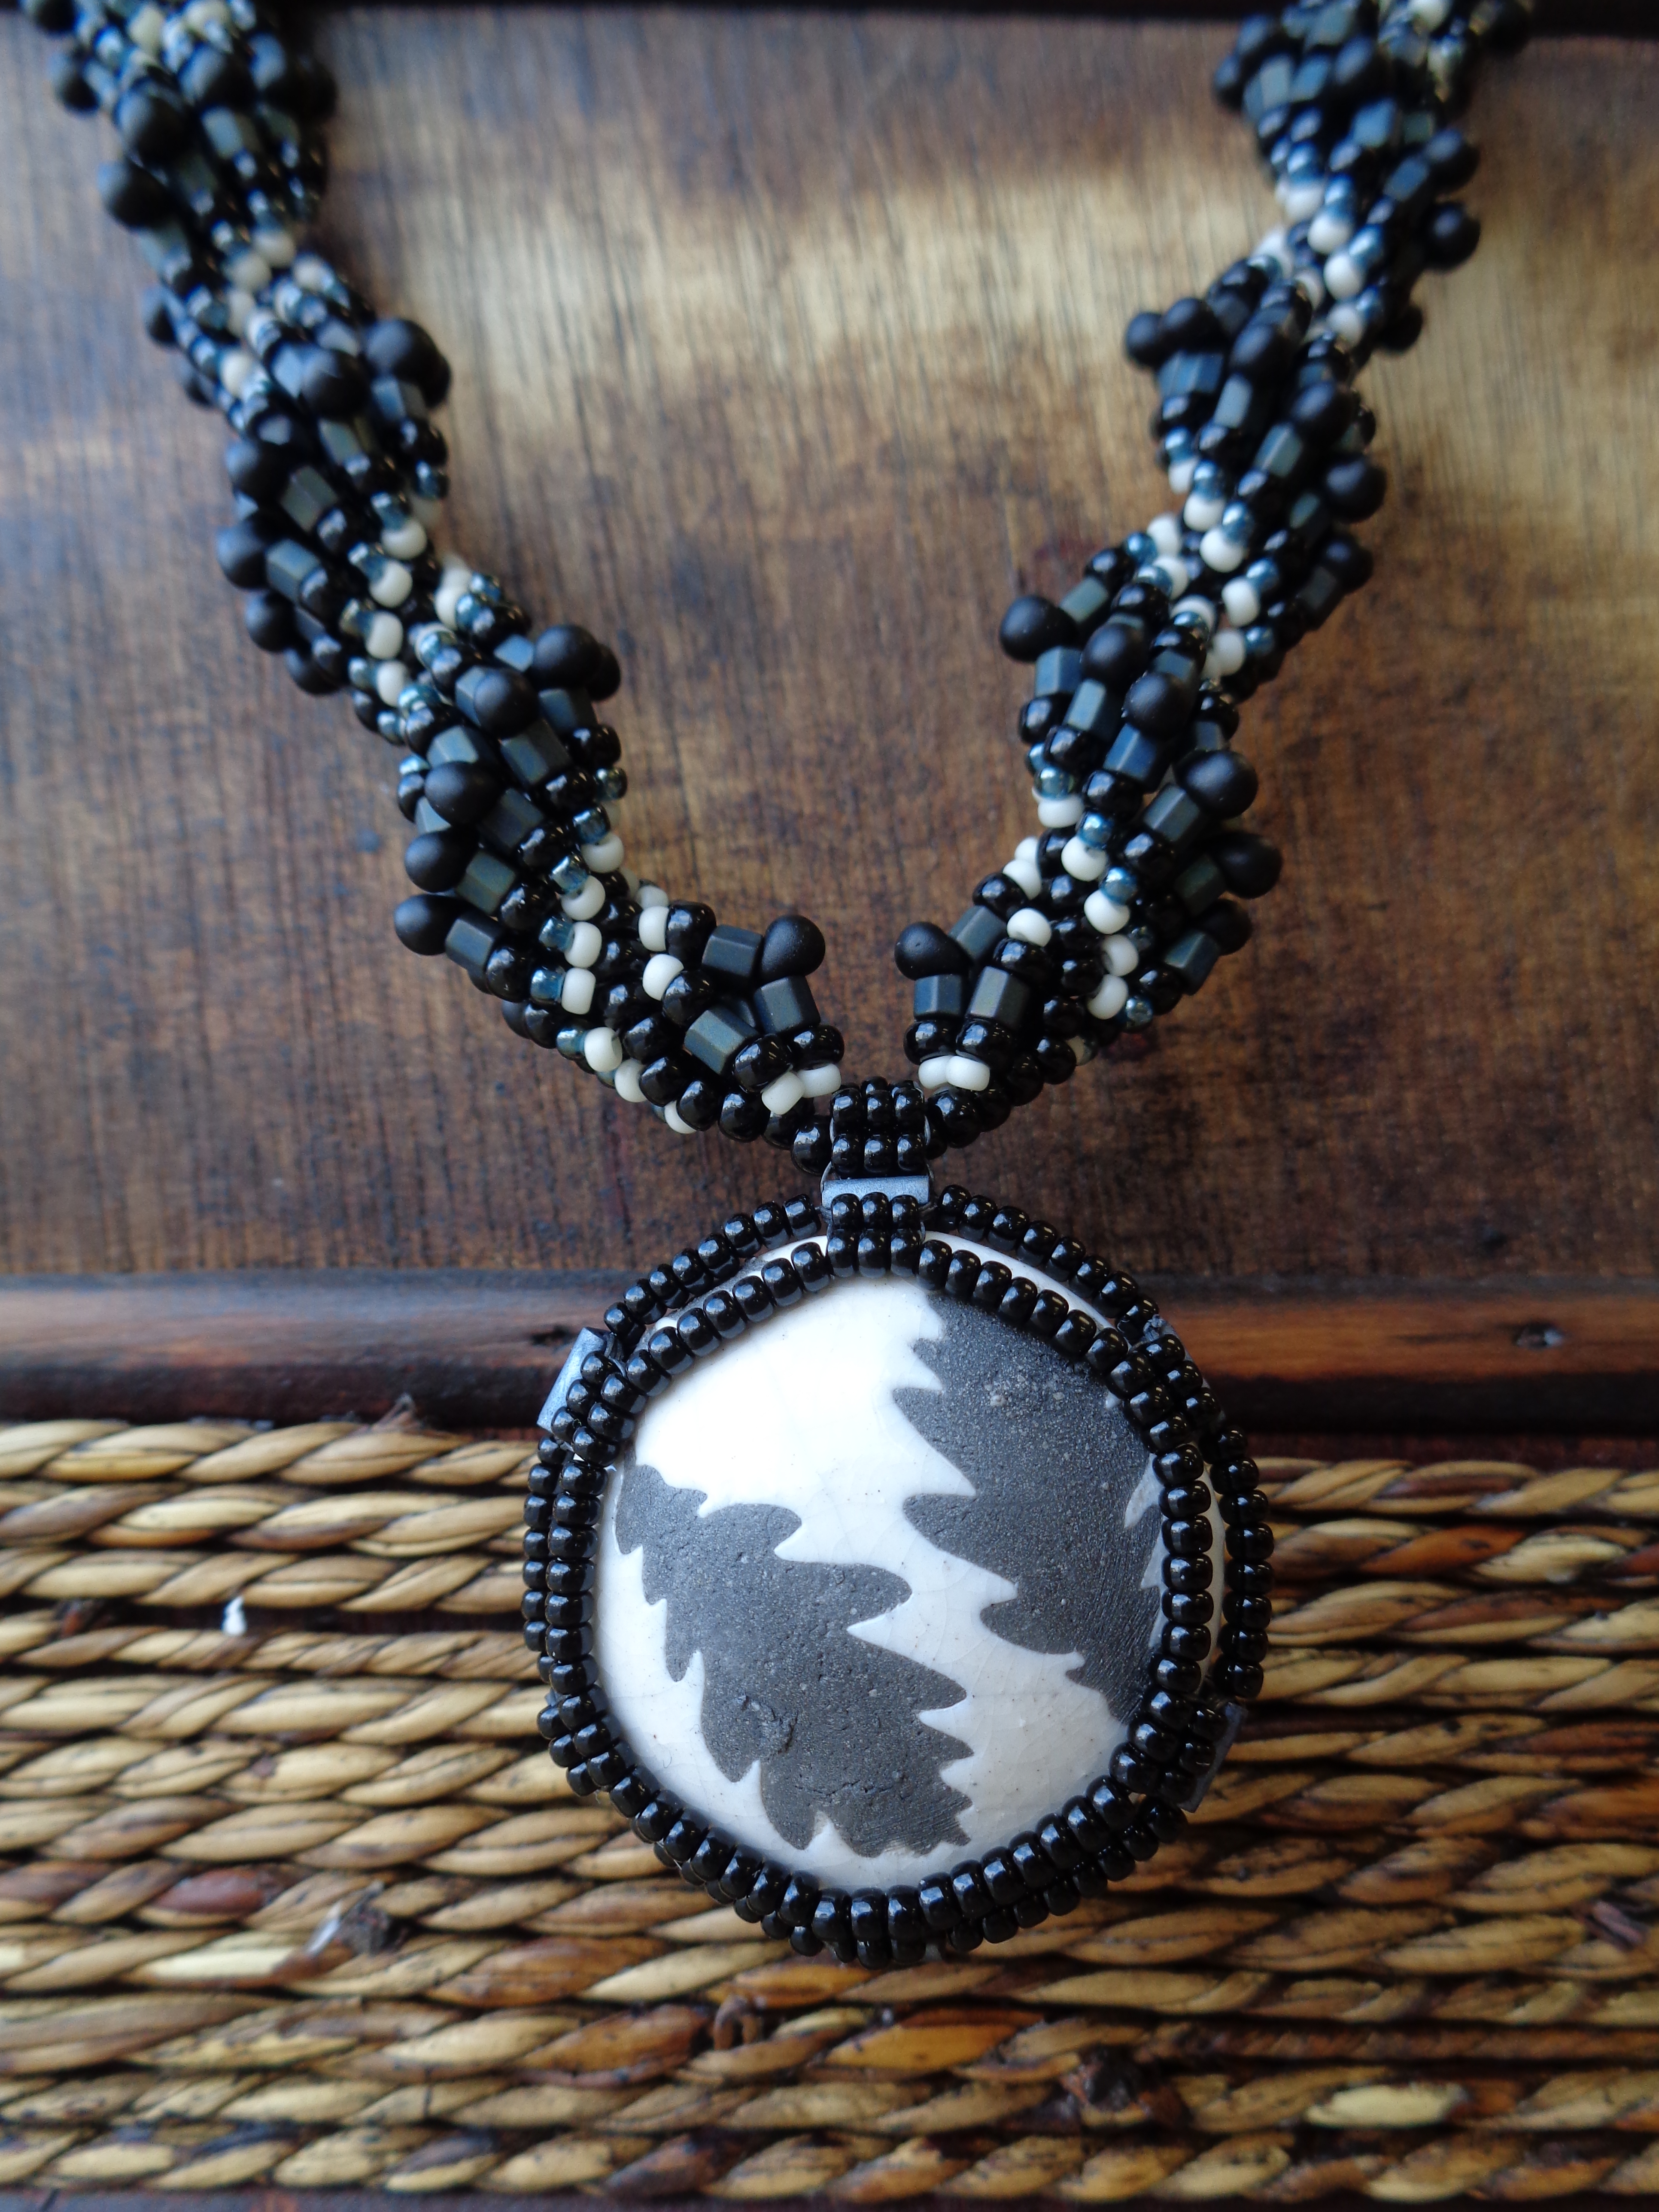
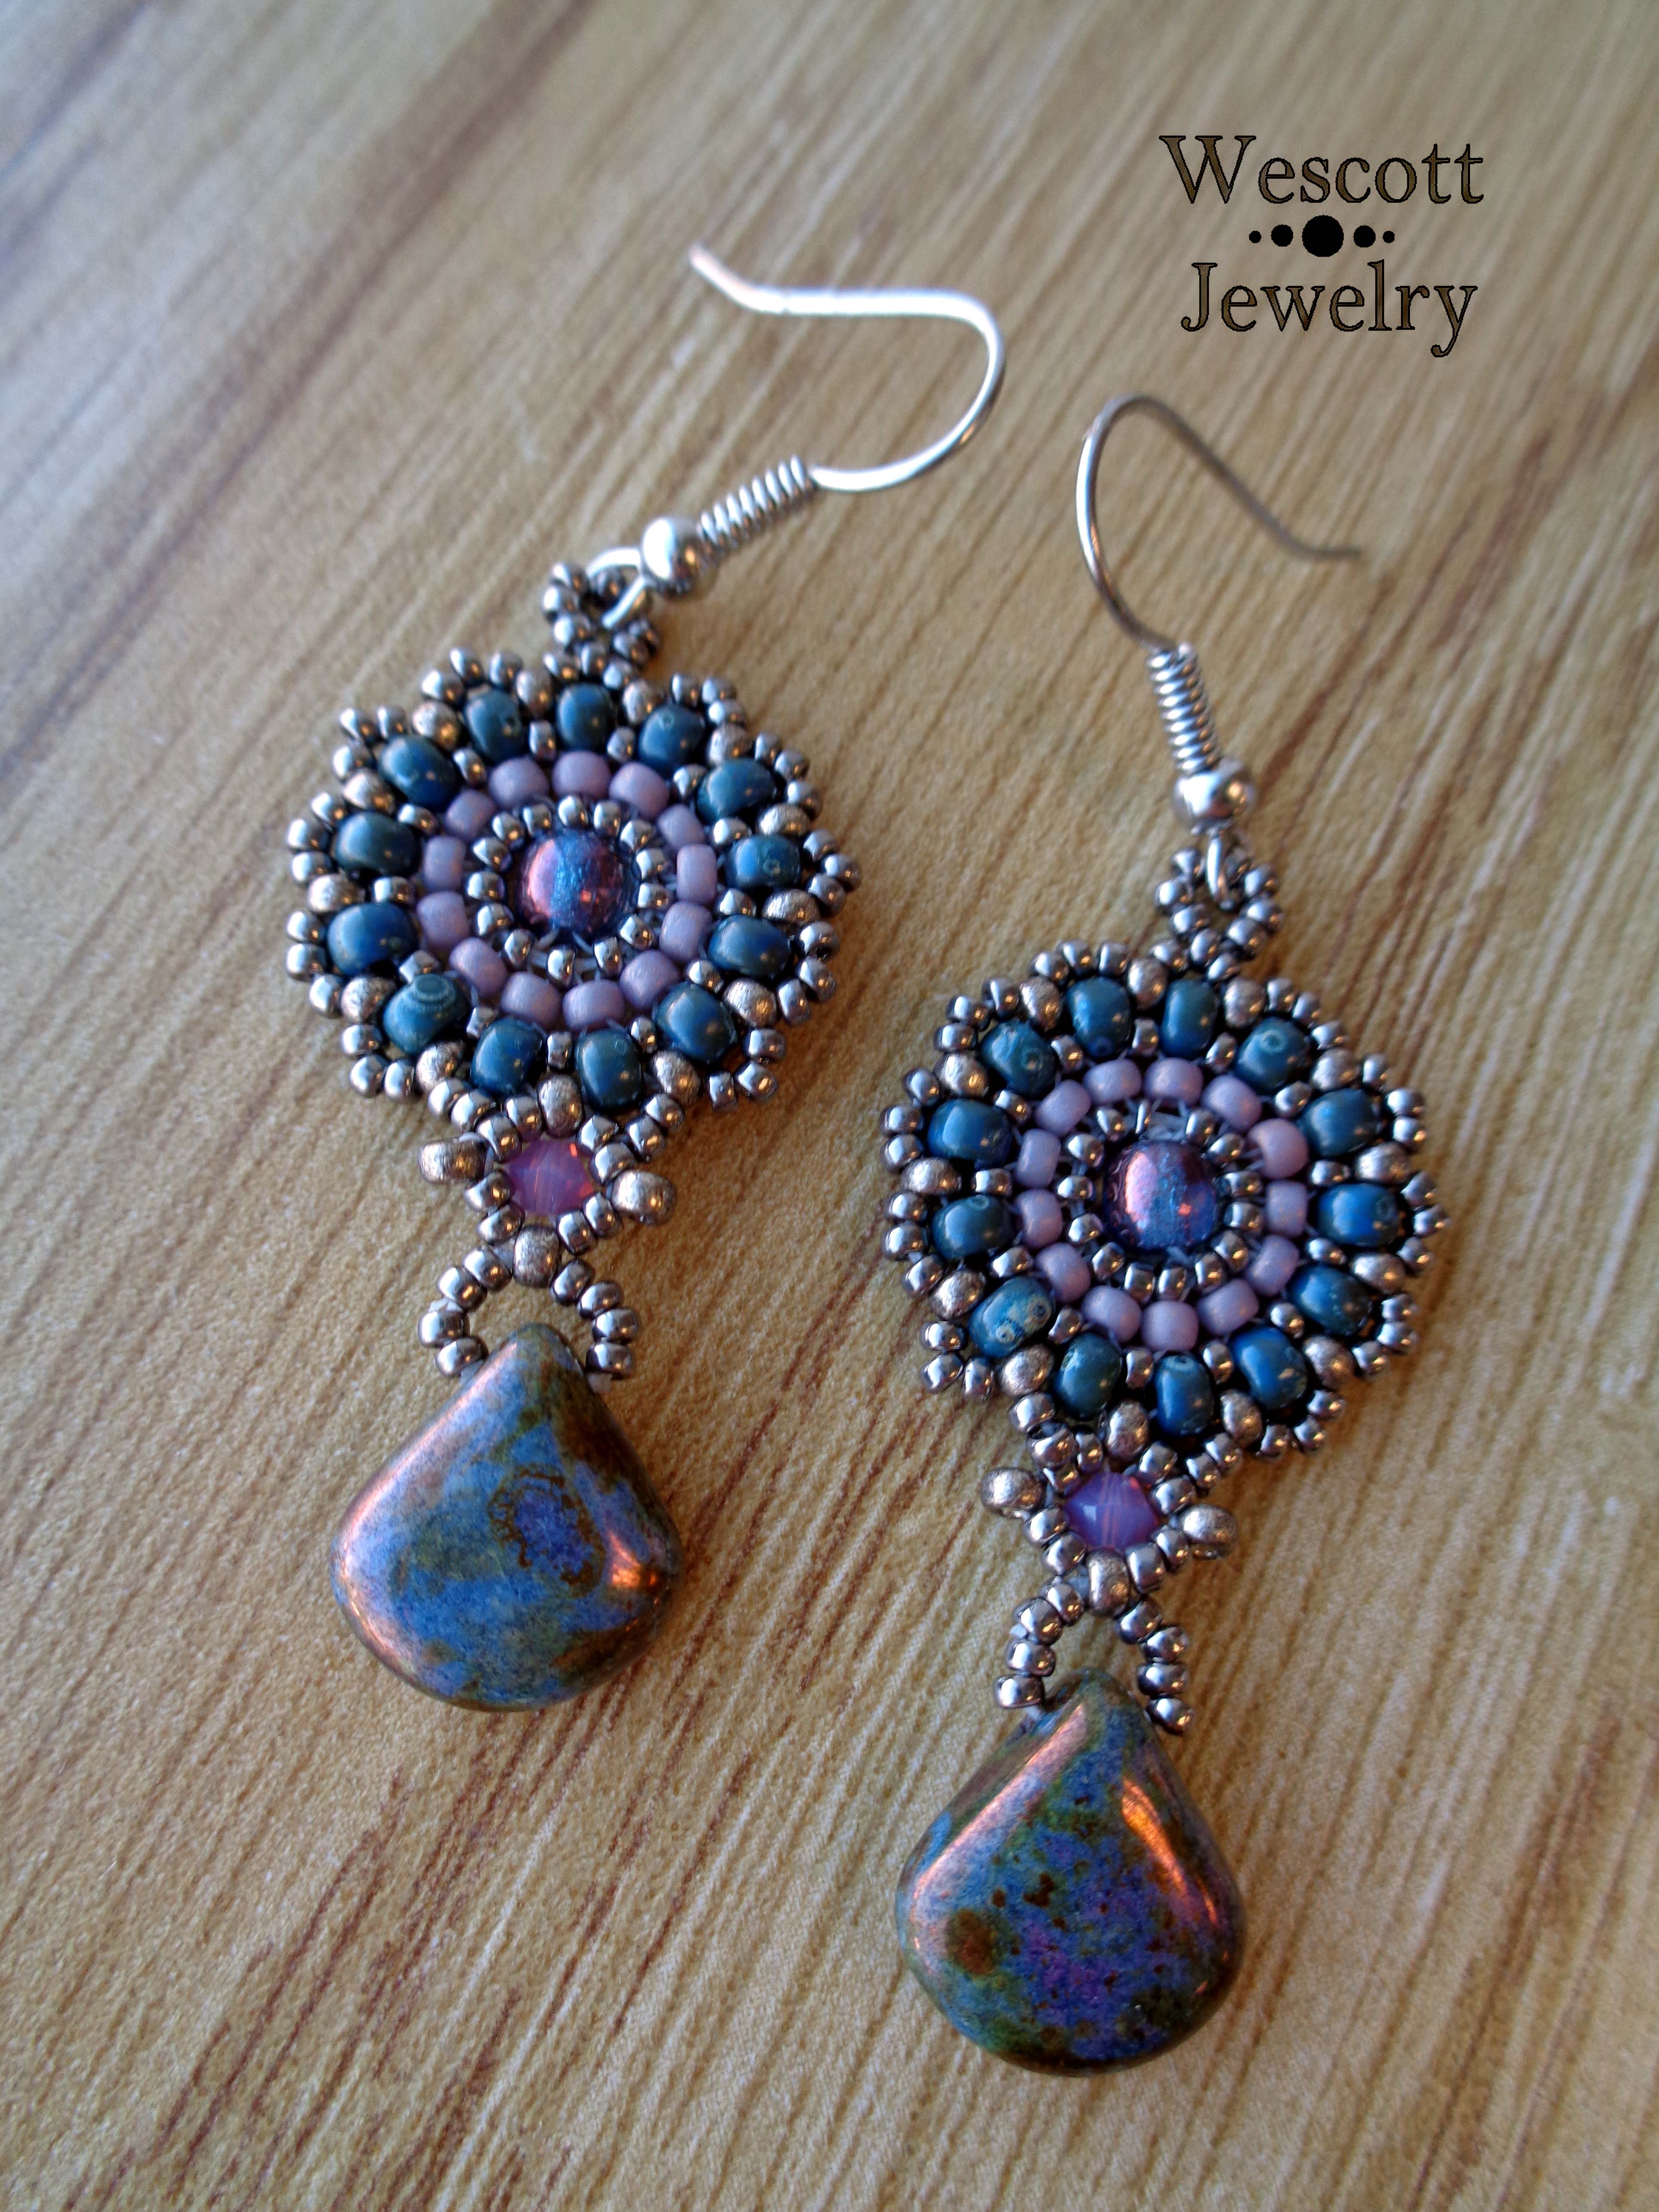
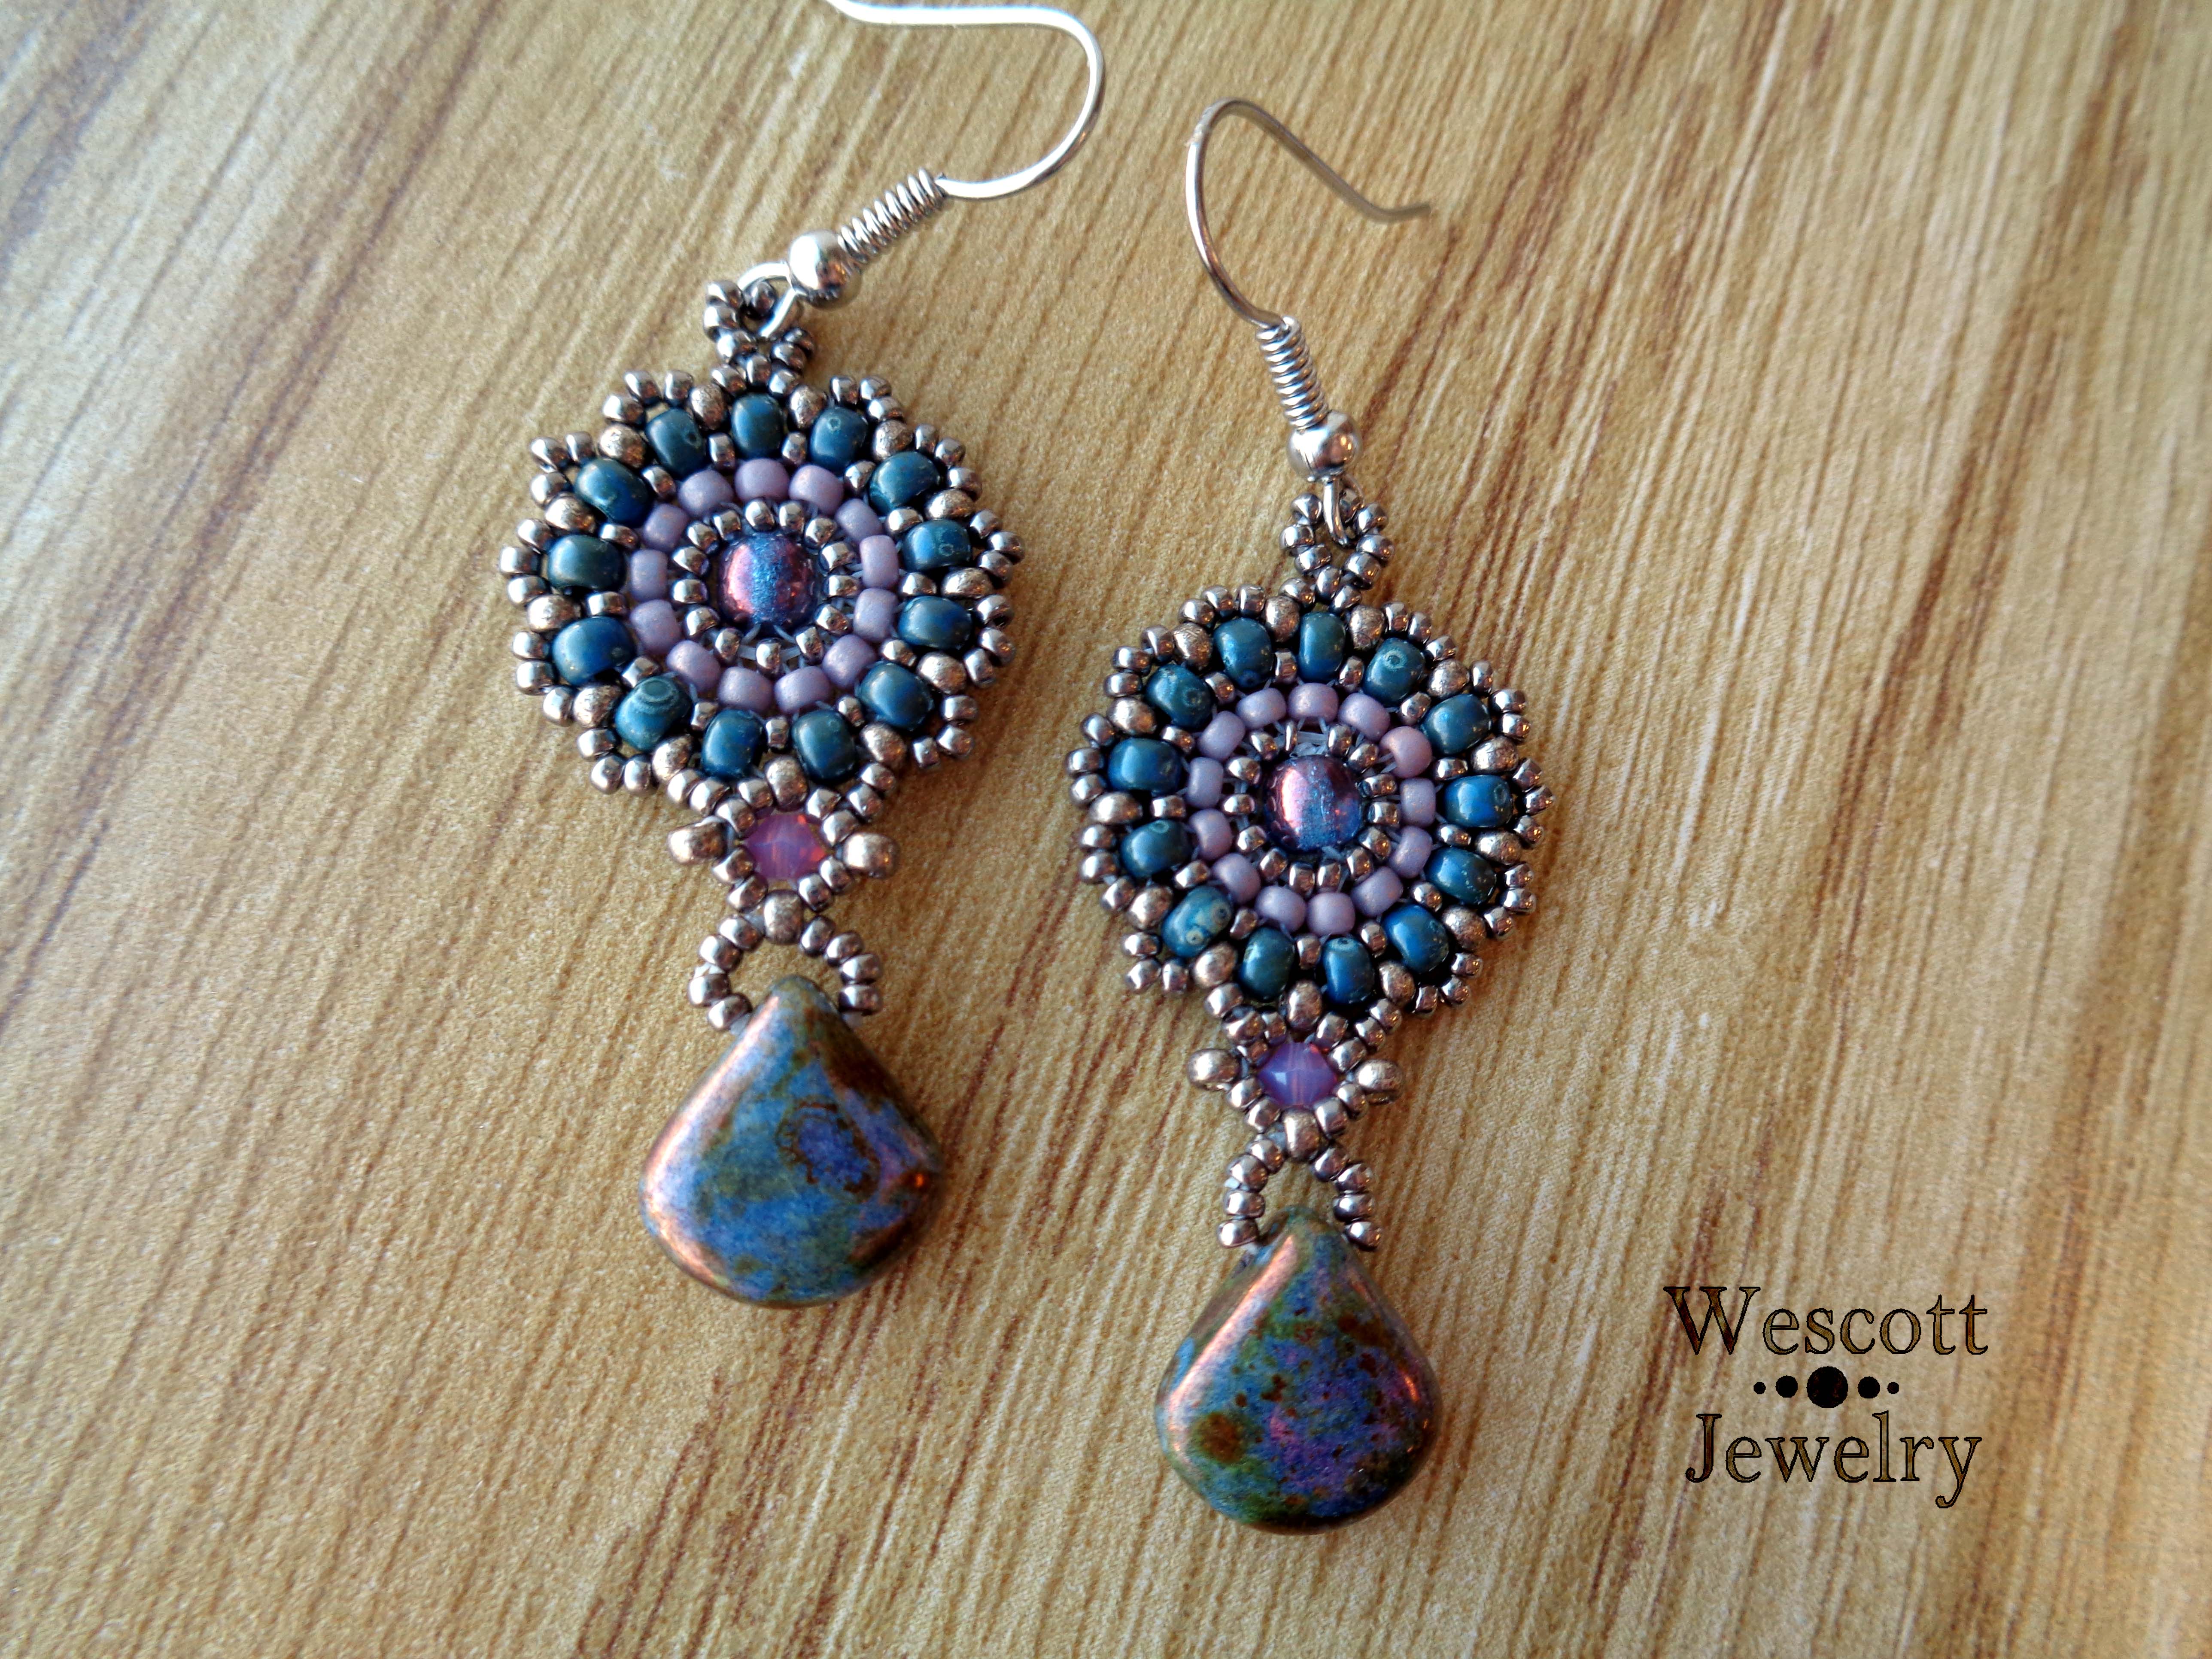
So, I was lucky enough to be selected as one of the winners to participate in the Art Jewelry Elements Blog’s January Component of the Month Challenge! I was sent a secret handmade component by Caroline Dewison of BlueberriBeads. When it arrived in the mail, I was so excited about how lovely it was! The leaves are so crisp and pretty!
However, I was a bit concerned because it was so much bigger than the beads I usually work with…
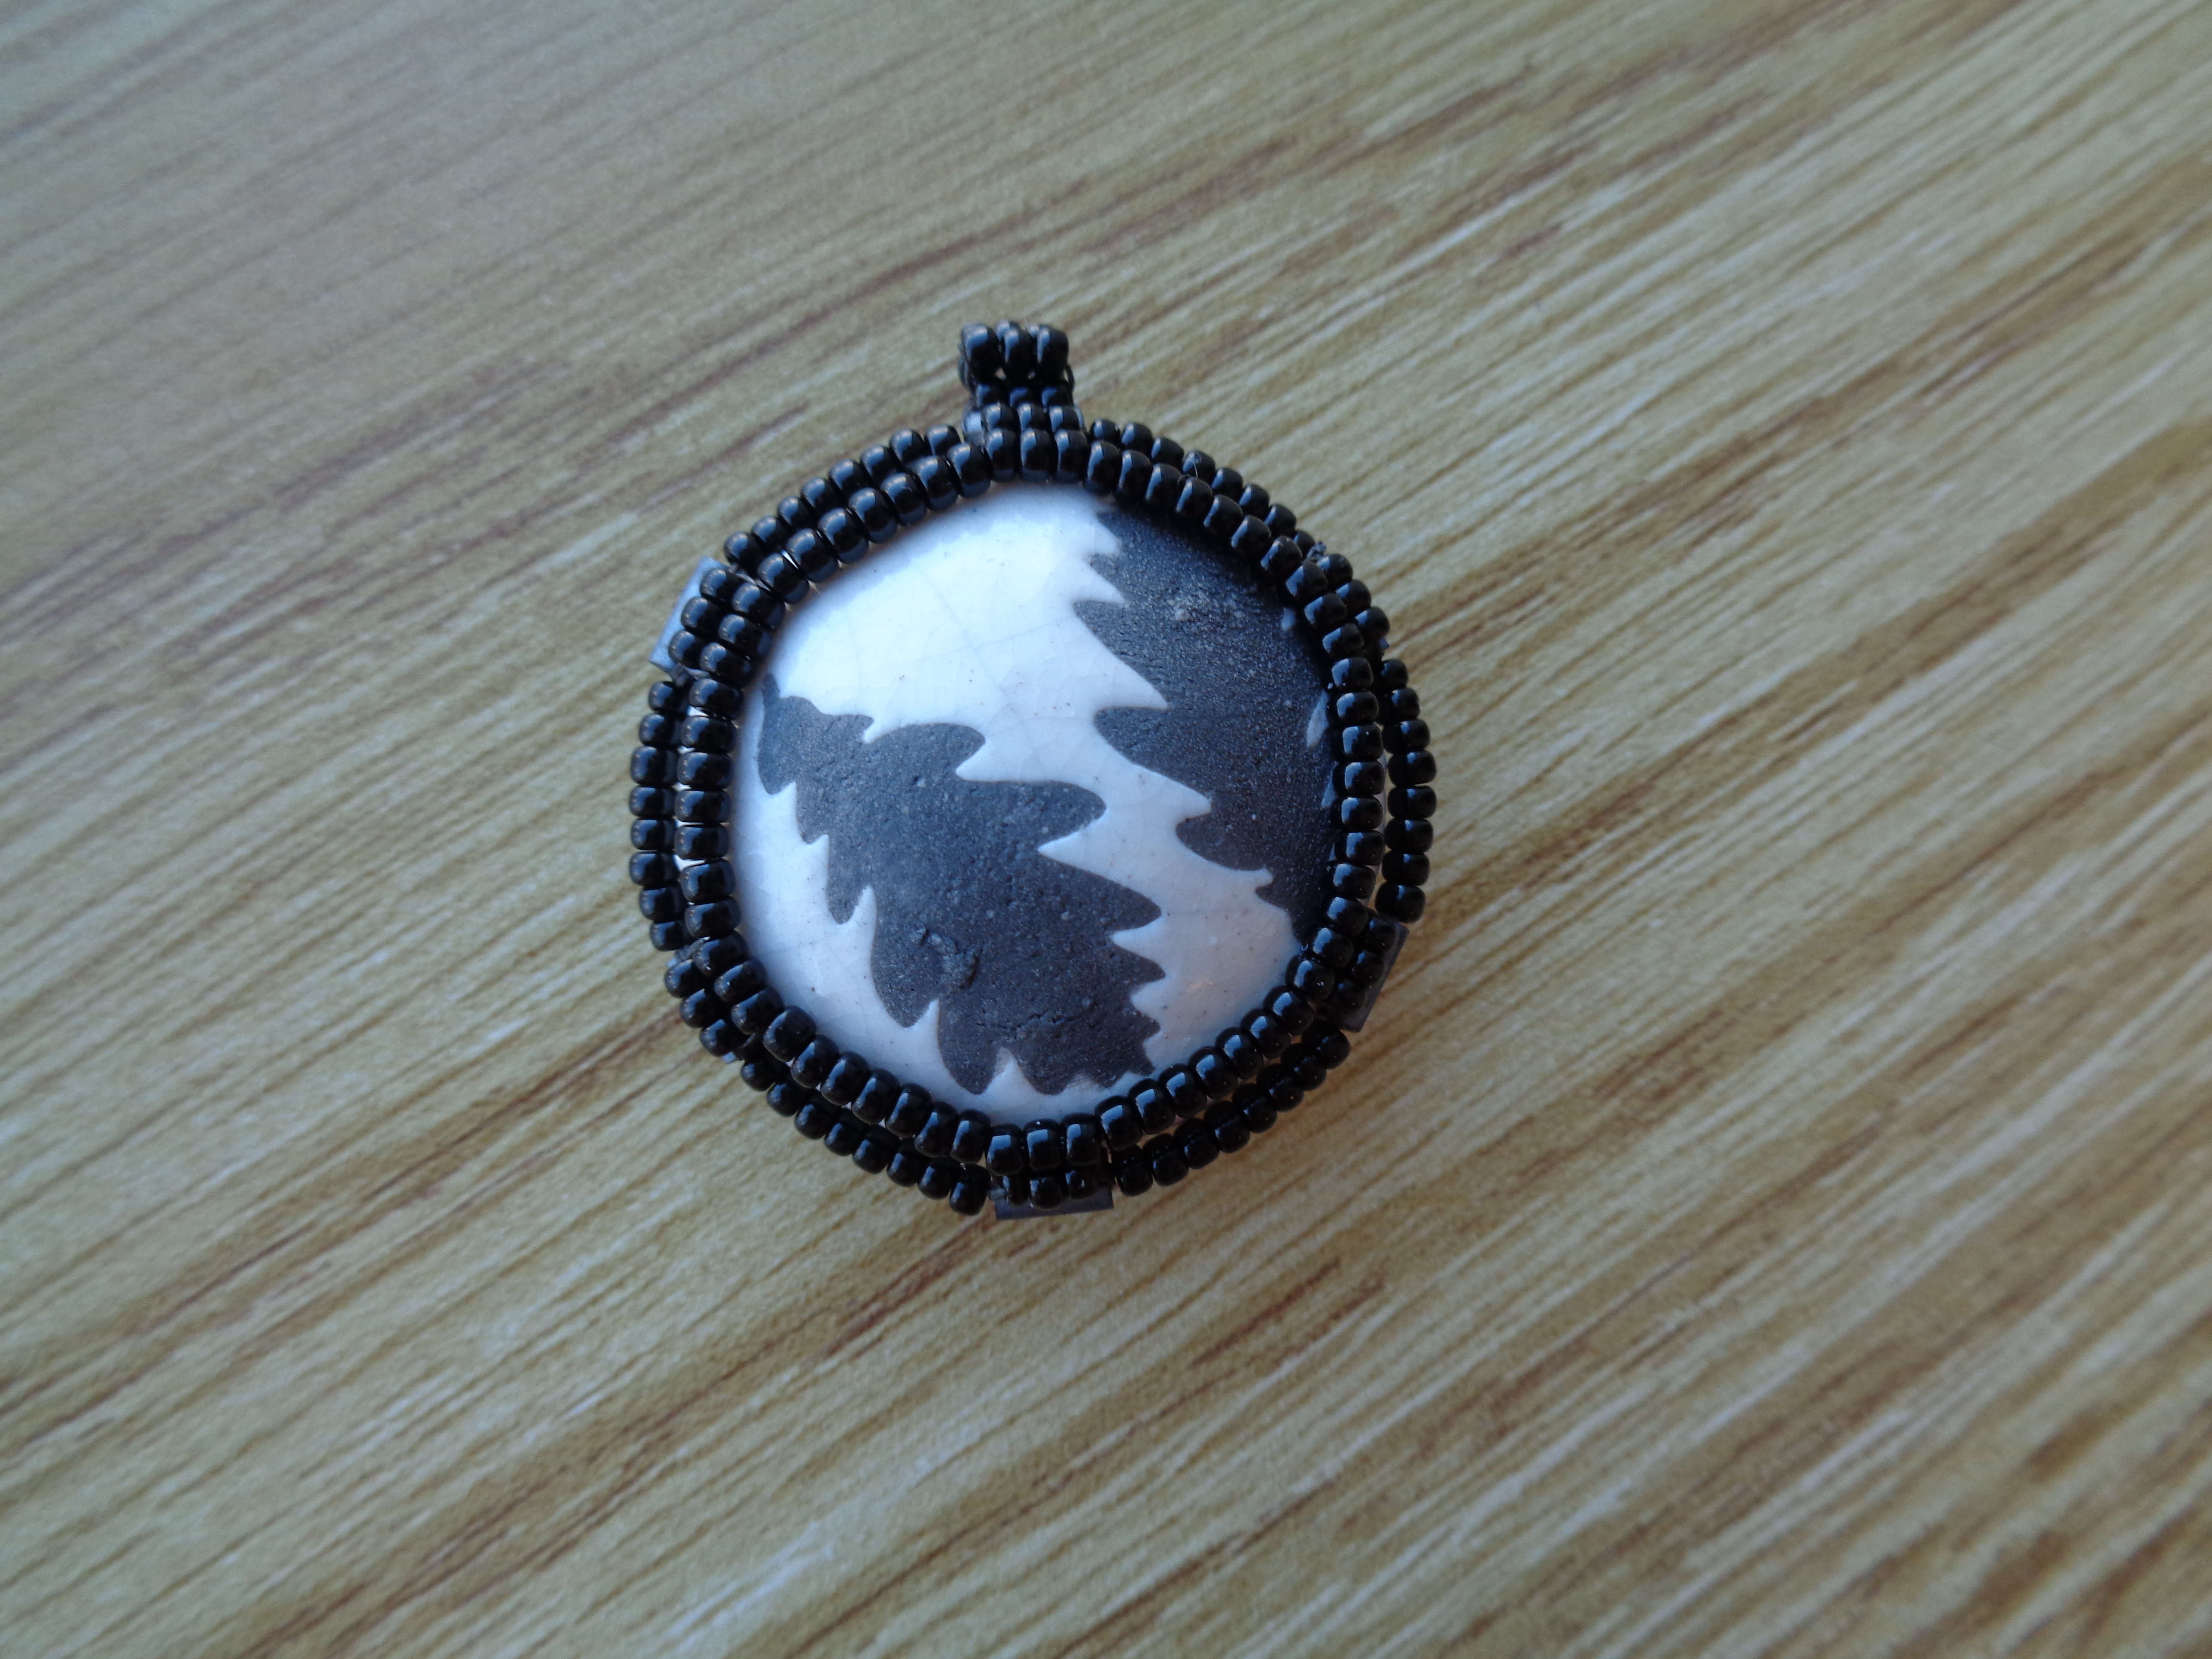
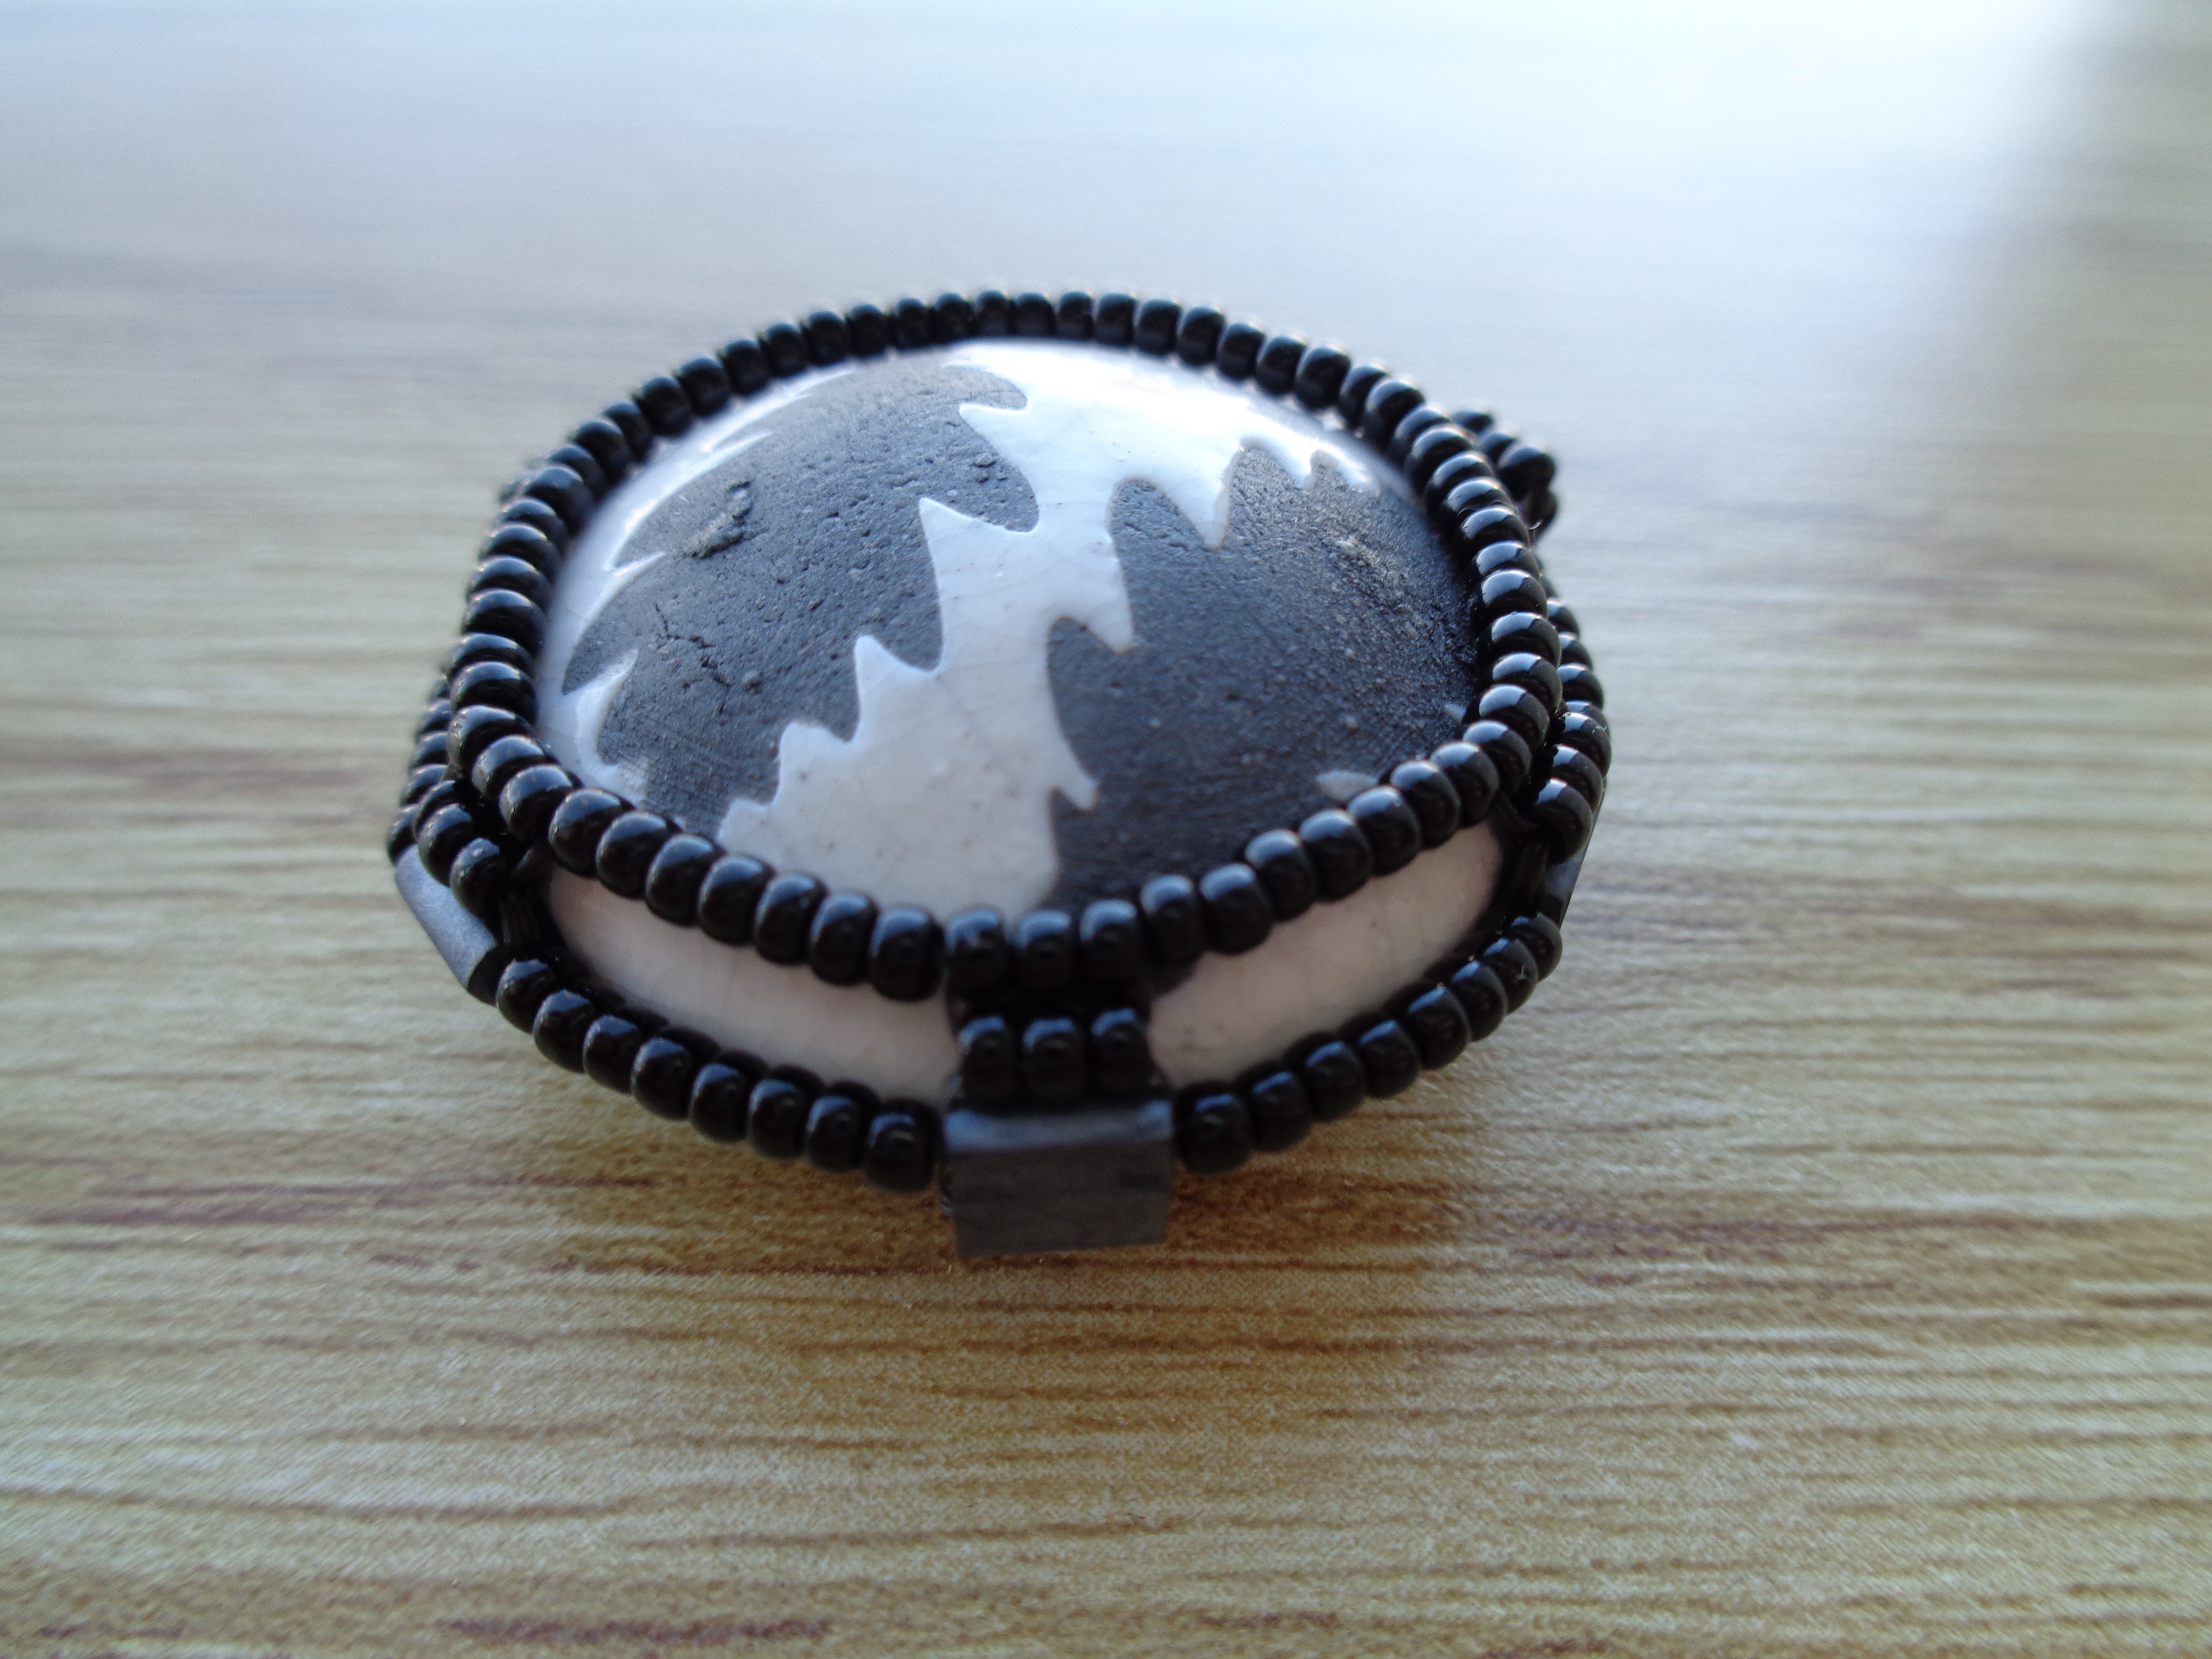
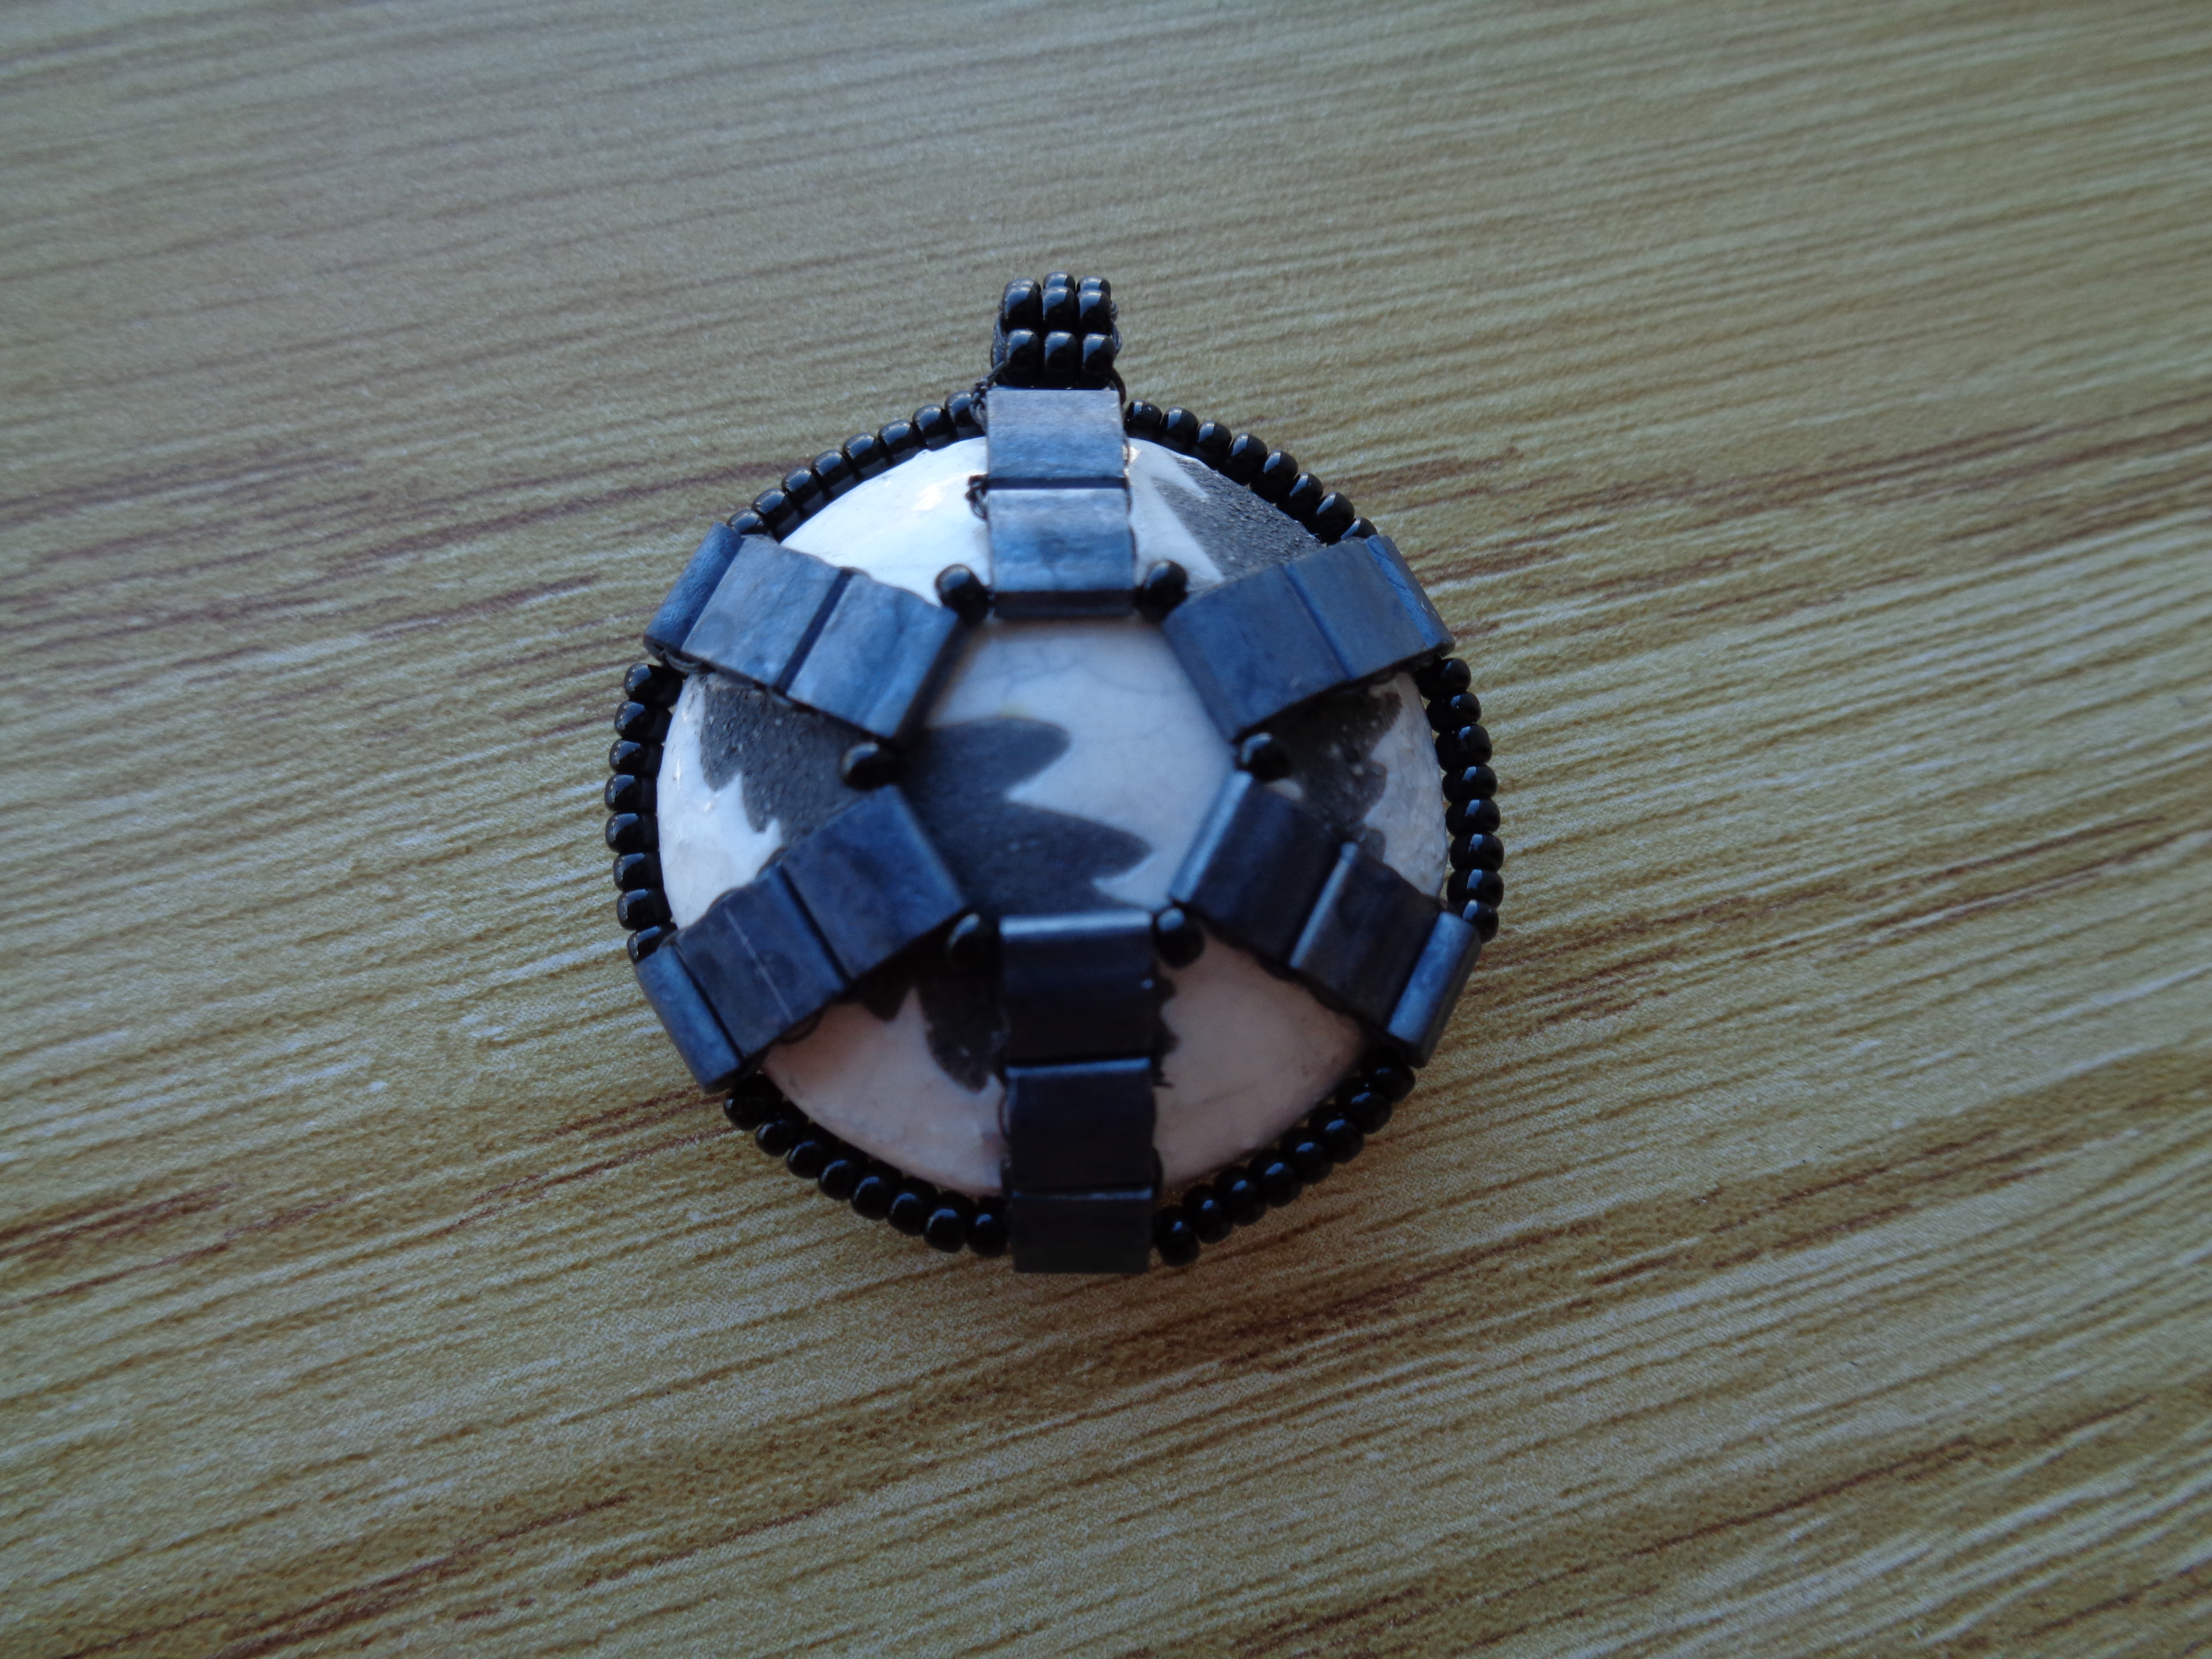
I needed inspiration, so I went to visit my local bead stores. I knew I wanted to bezel the lentil, but didn’t want to cover up too much of the design with beads. Luckily, my friend Carole Ohl suggested using Tila beads to make an openwork frame. Bezel? Check!
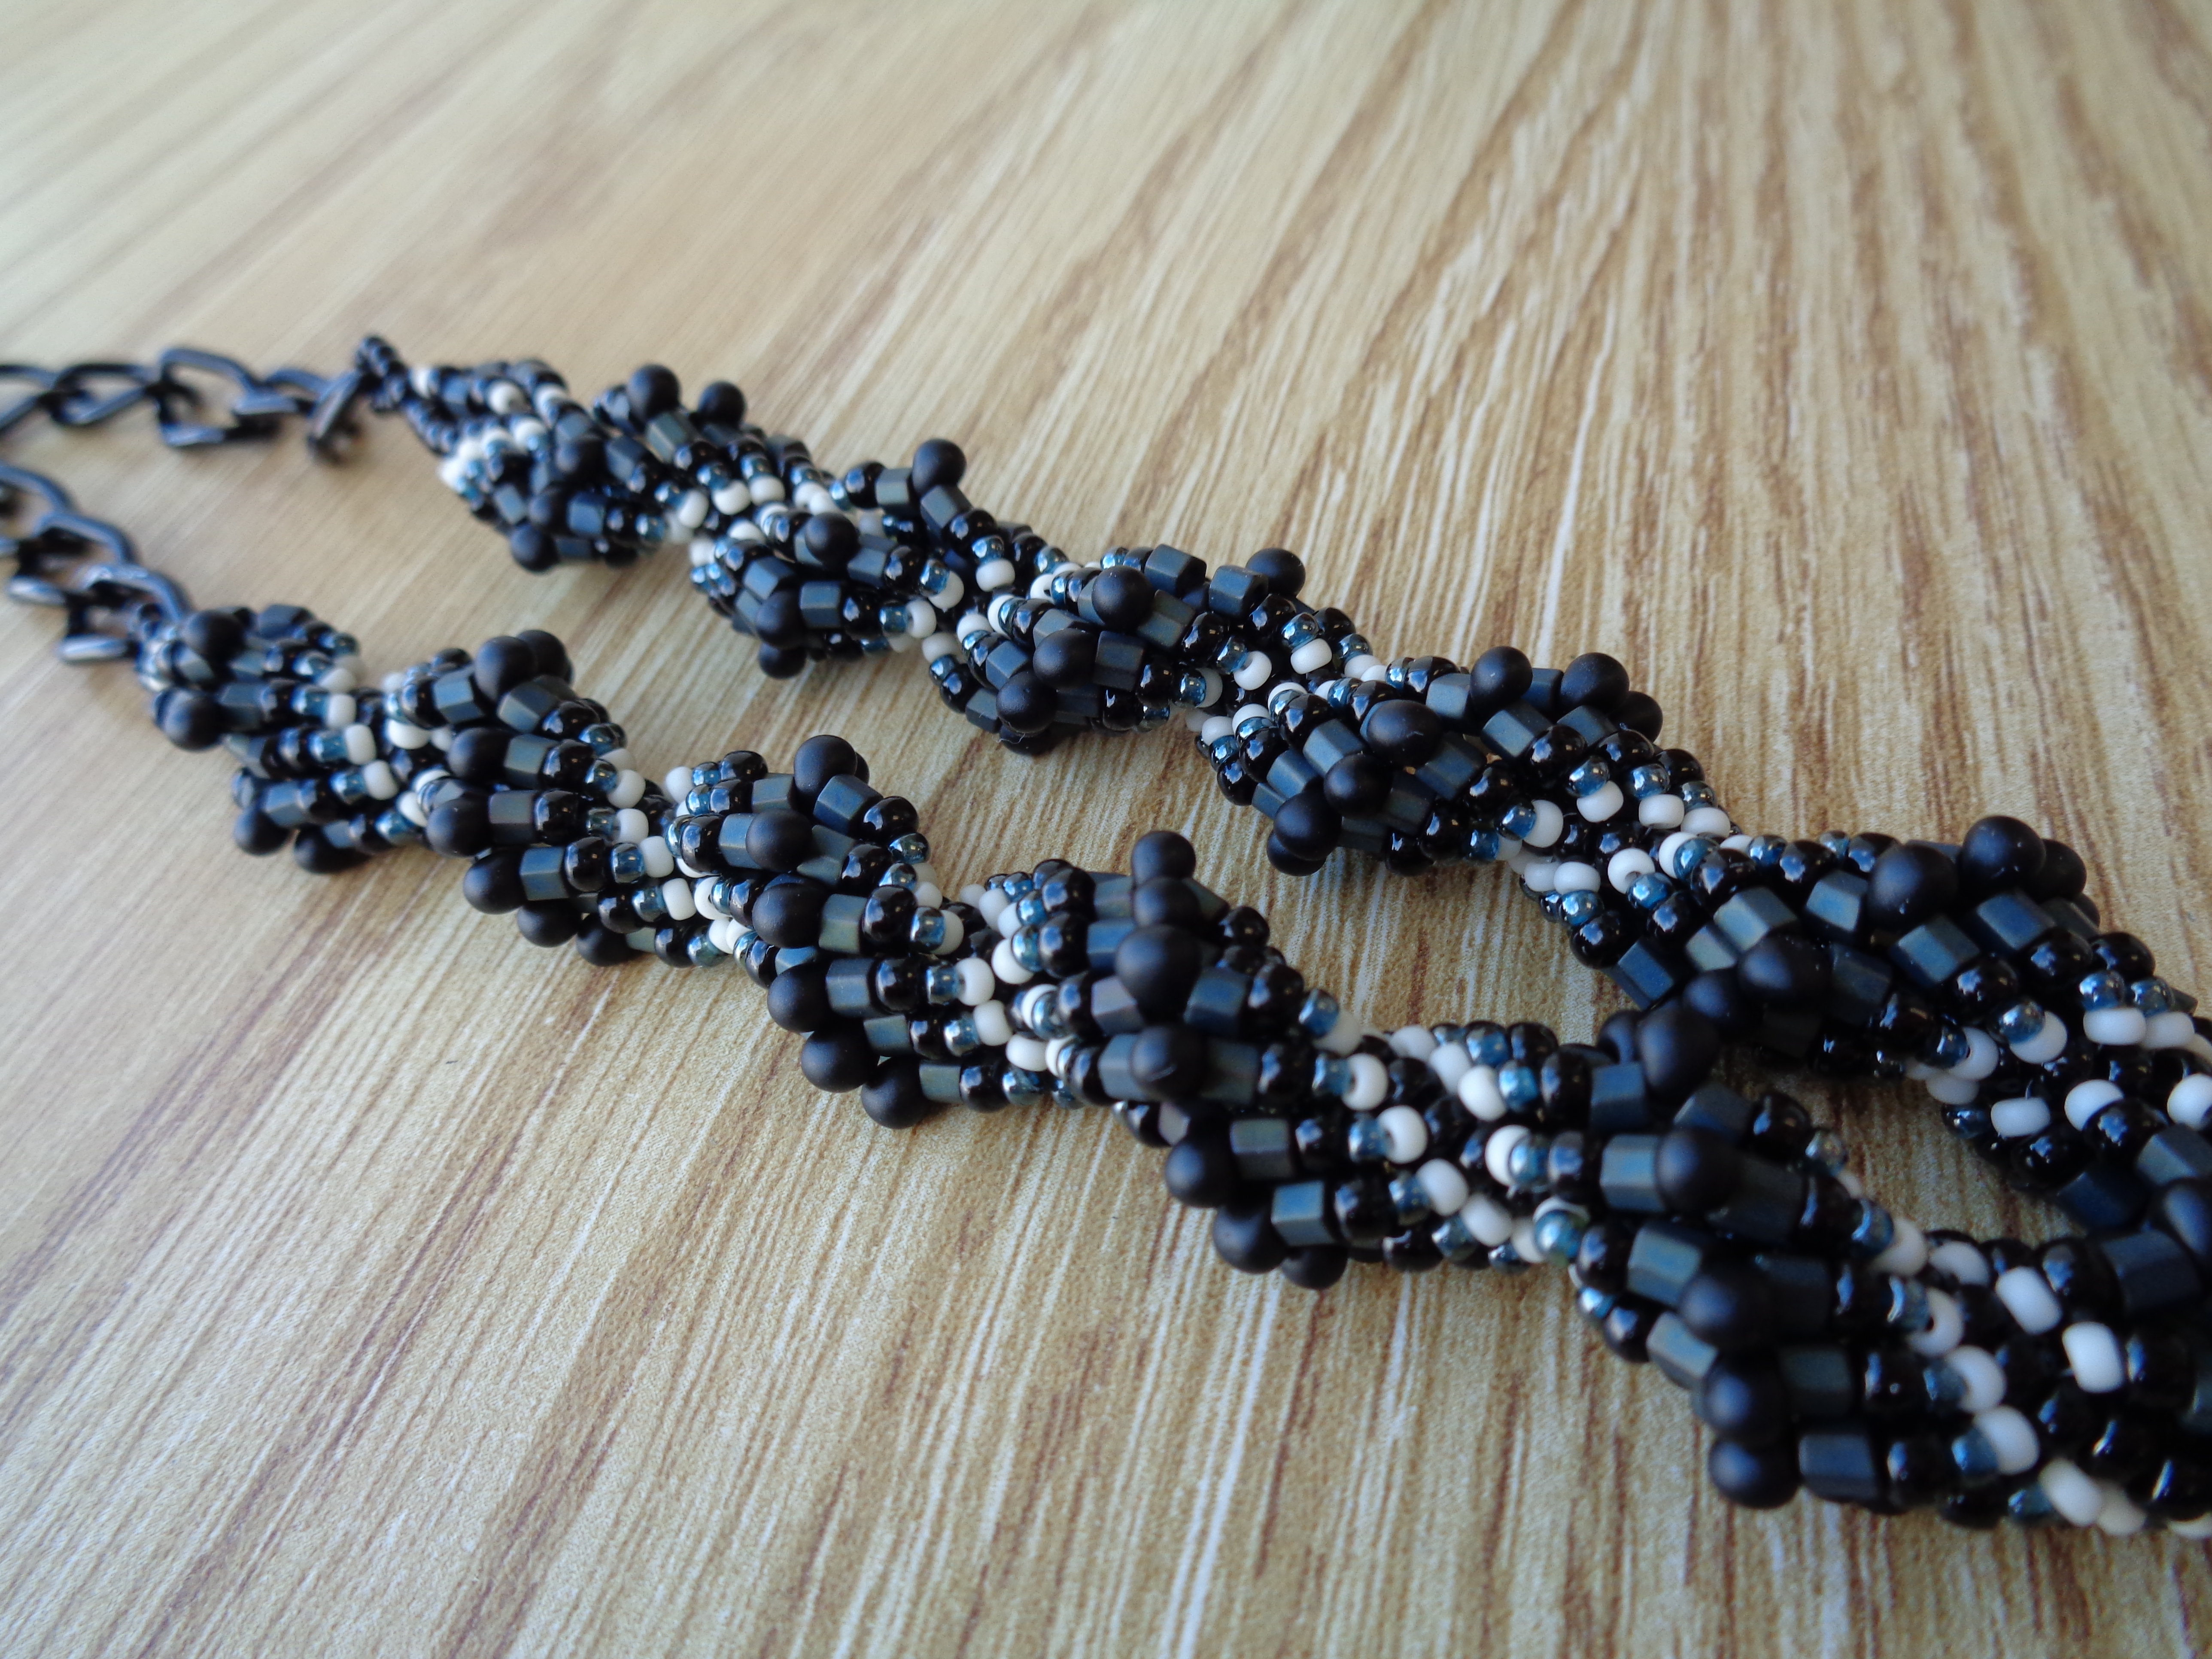
I wanted to add some color somewhere, so I used the blue/gray Tila beads. I tried to incorporate that blue in the necklace to keep the piece from being too washed out. I decided on a spiral rope using blue/green iris hex beads, matte black drops, and seed beads in black, matte off-white, and reflective blue. I then finished it off with a black toggle set.
I am really happy with the finished result.
Thanks so much to the AJE team for letting me participate and thanks to Caroline Dewison in particular for sending me such a pretty piece! :D
Now for the “hop” part of this blog hop! Check out what everyone made in this glorious stash-busting event!
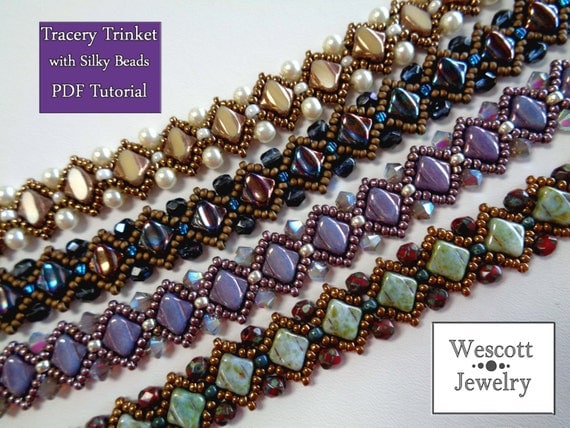
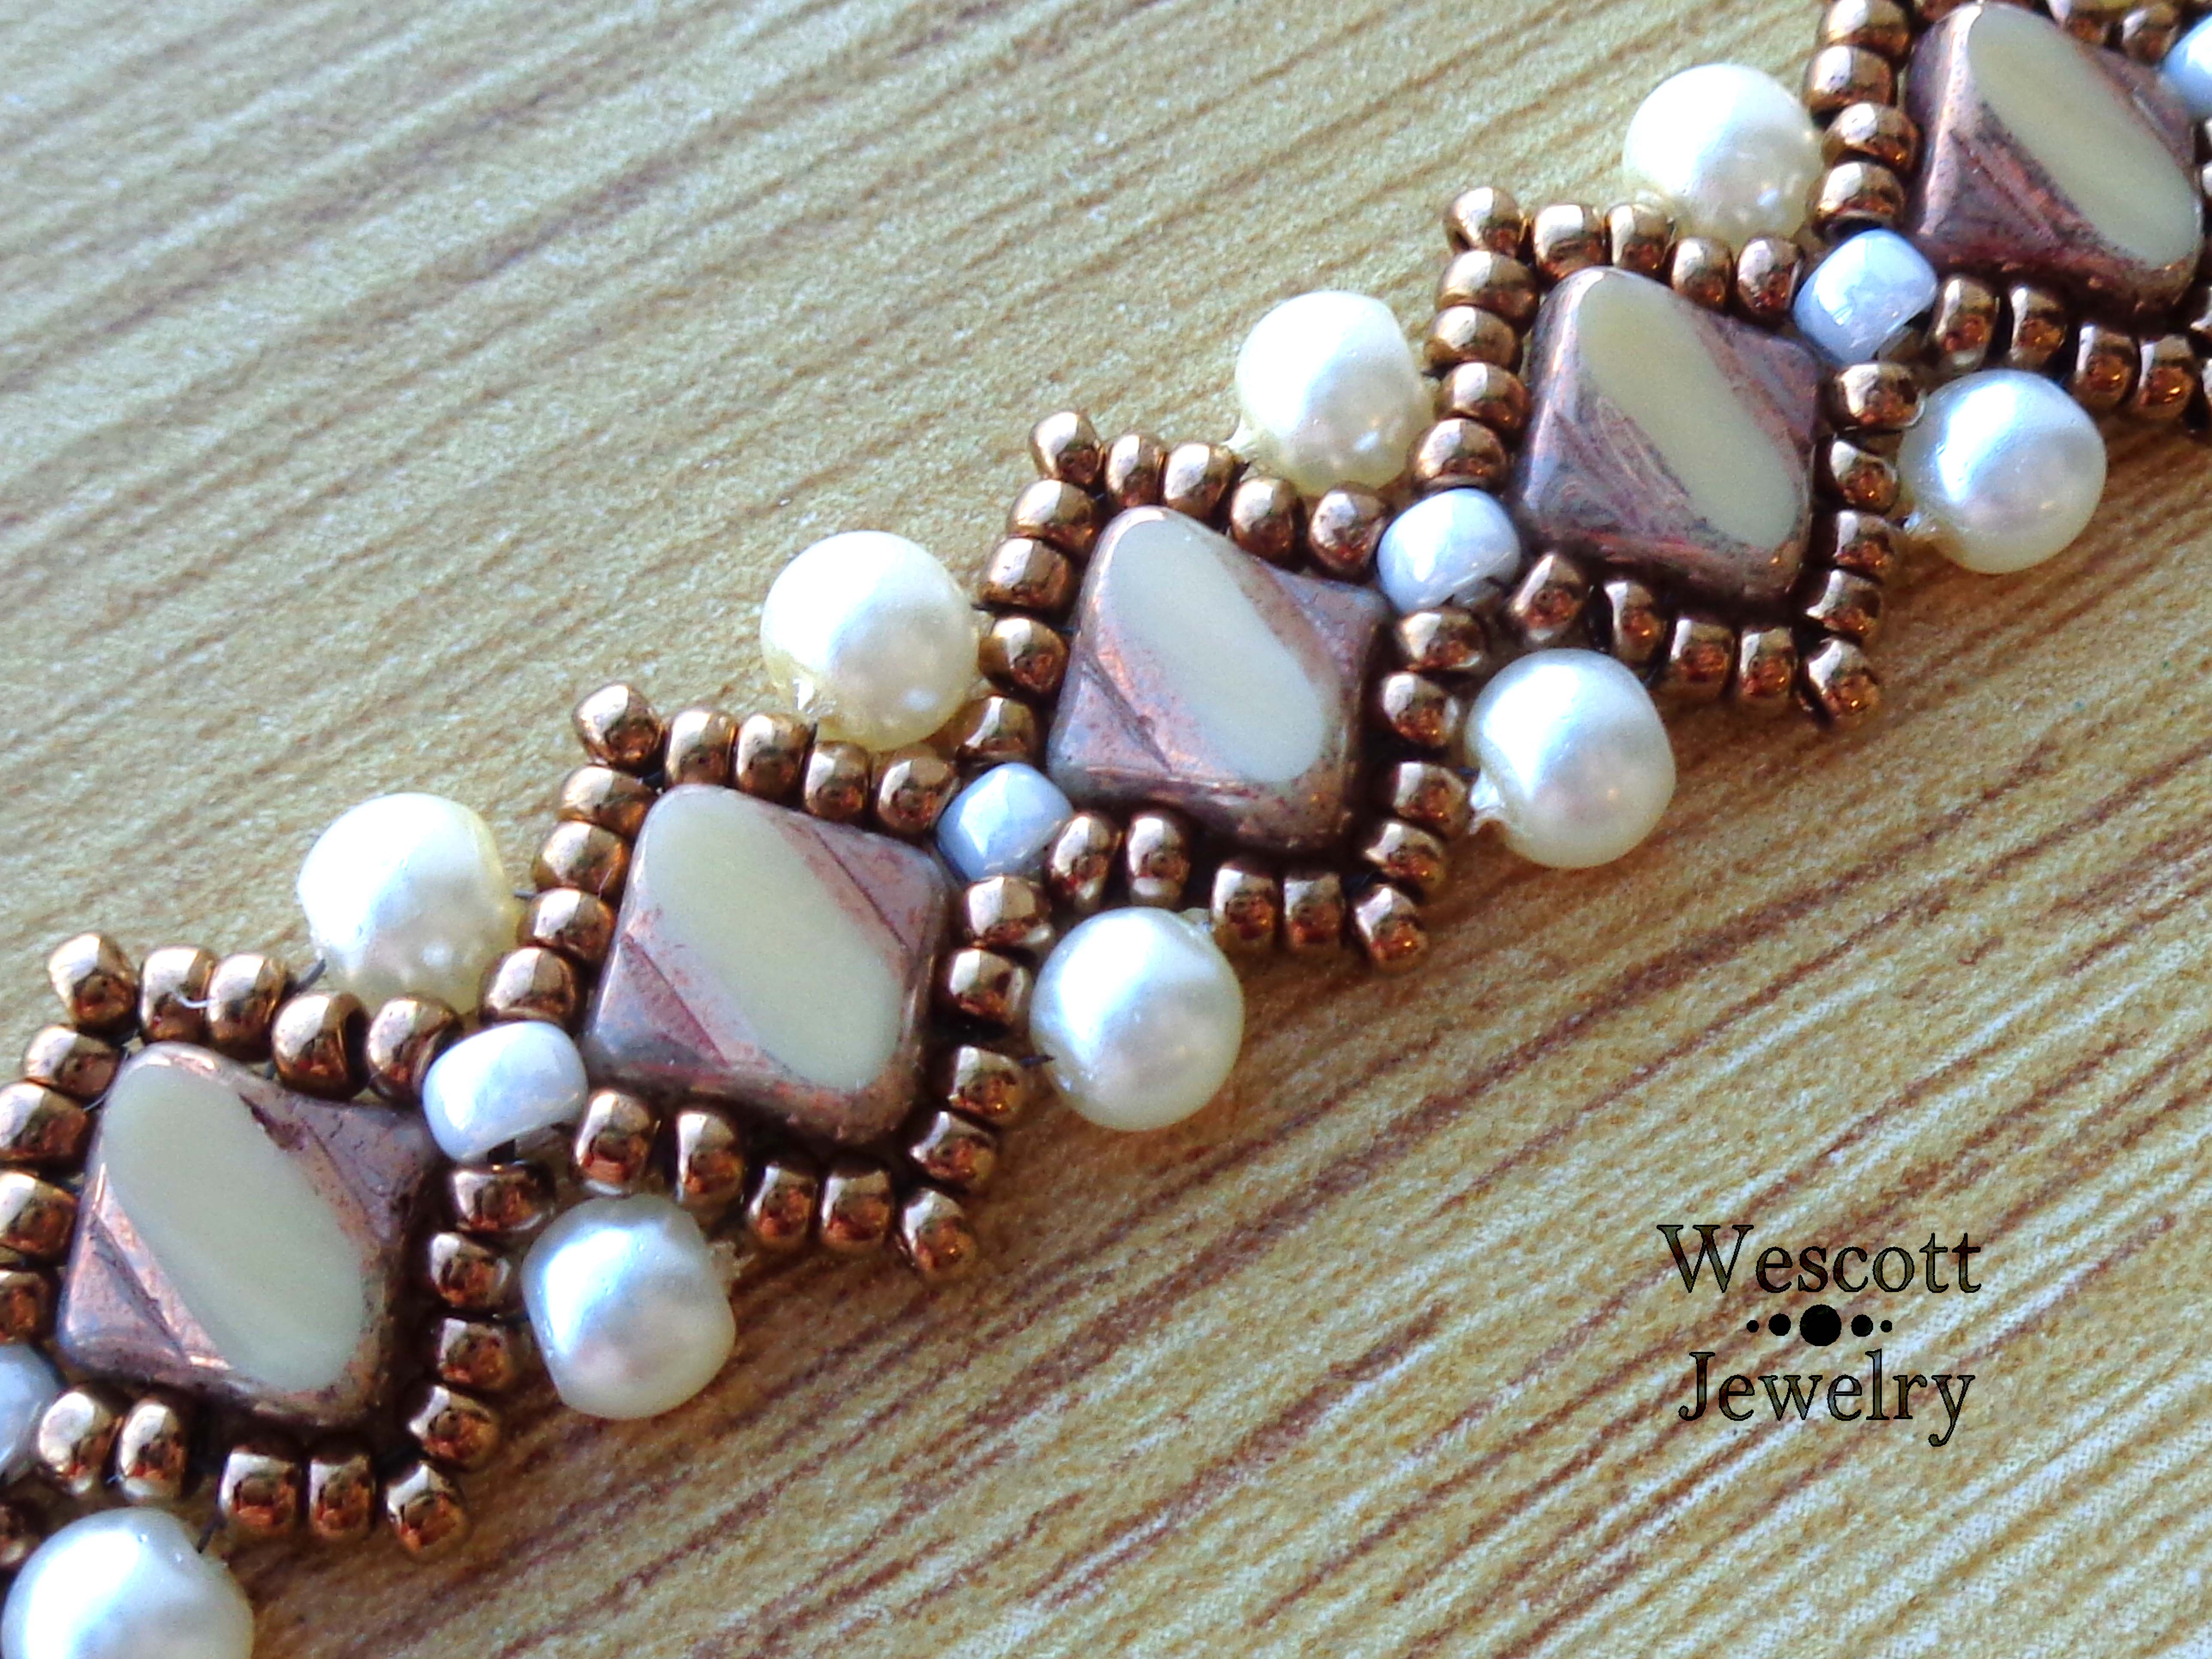
Well, after a long design dry spell, I am finally ready to debut a new pattern! I enjoyed using Silky beads so much in my Diadem Bracelet, that I decided to keep working with them. After much trial, error, and Jane Austen movies on Netflix, I finally developed this-
Exciting, huh? I used the Silky beads again and tried to keep the bracelets slim. It’s really tempting to make a big, wide cuff with a bajillion Silky beads, but I think the more narrow bracelets are a bit more wearable (at least for a fashion-timid gal like me). And they are totally stackable!
The accent beads on sides can be all sorts of different shapes. Bicones or pearls give you a more dressy look-
Or you can go with Czech fire-polished crystal for a more casual bracelet.
It’s a very versatile technique and I have had a blast mixing colors and shapes. If you local bead shop still hasn’t caught up with the Silky bead trend (and who can blame them with so many new shapes to choose from?), I recommend AriaDesignStudio and GCSuppliesTexas on Etsy for Silky beads in some really pretty colors and finishes.
In other news – the deadline for the Component of the Month challenge from Art Jewelry Elements is coming up. Since I was lucky enough to win a piece, I have been frantically designing with it. Wish me luck and check back here on Saturday!
Well, this week’s YOJP theme was to Try a Tutorial. I thought about it for a while and realized that while I write tutorials for my own designs fairly frequently, I don’t follow patterns very often myself.
I taught myself bead weaving about five years ago when the company I work for had a brick-and-mortar bead shop. My coworker wanted me to give some instructions she wrote a trial run and suddenly I found myself hooked. From there, I mostly taught myself with basic technique tutorials (peyote, herringbone, brick stitch, etc) and the occasional magazine pattern that I liked.
The last year or so, though, I’ve either worked without a pattern from previous knowledge or worked on my original designs. I do still get Bead and Button and Beadwork magazines, though, so I went there for inspiration.
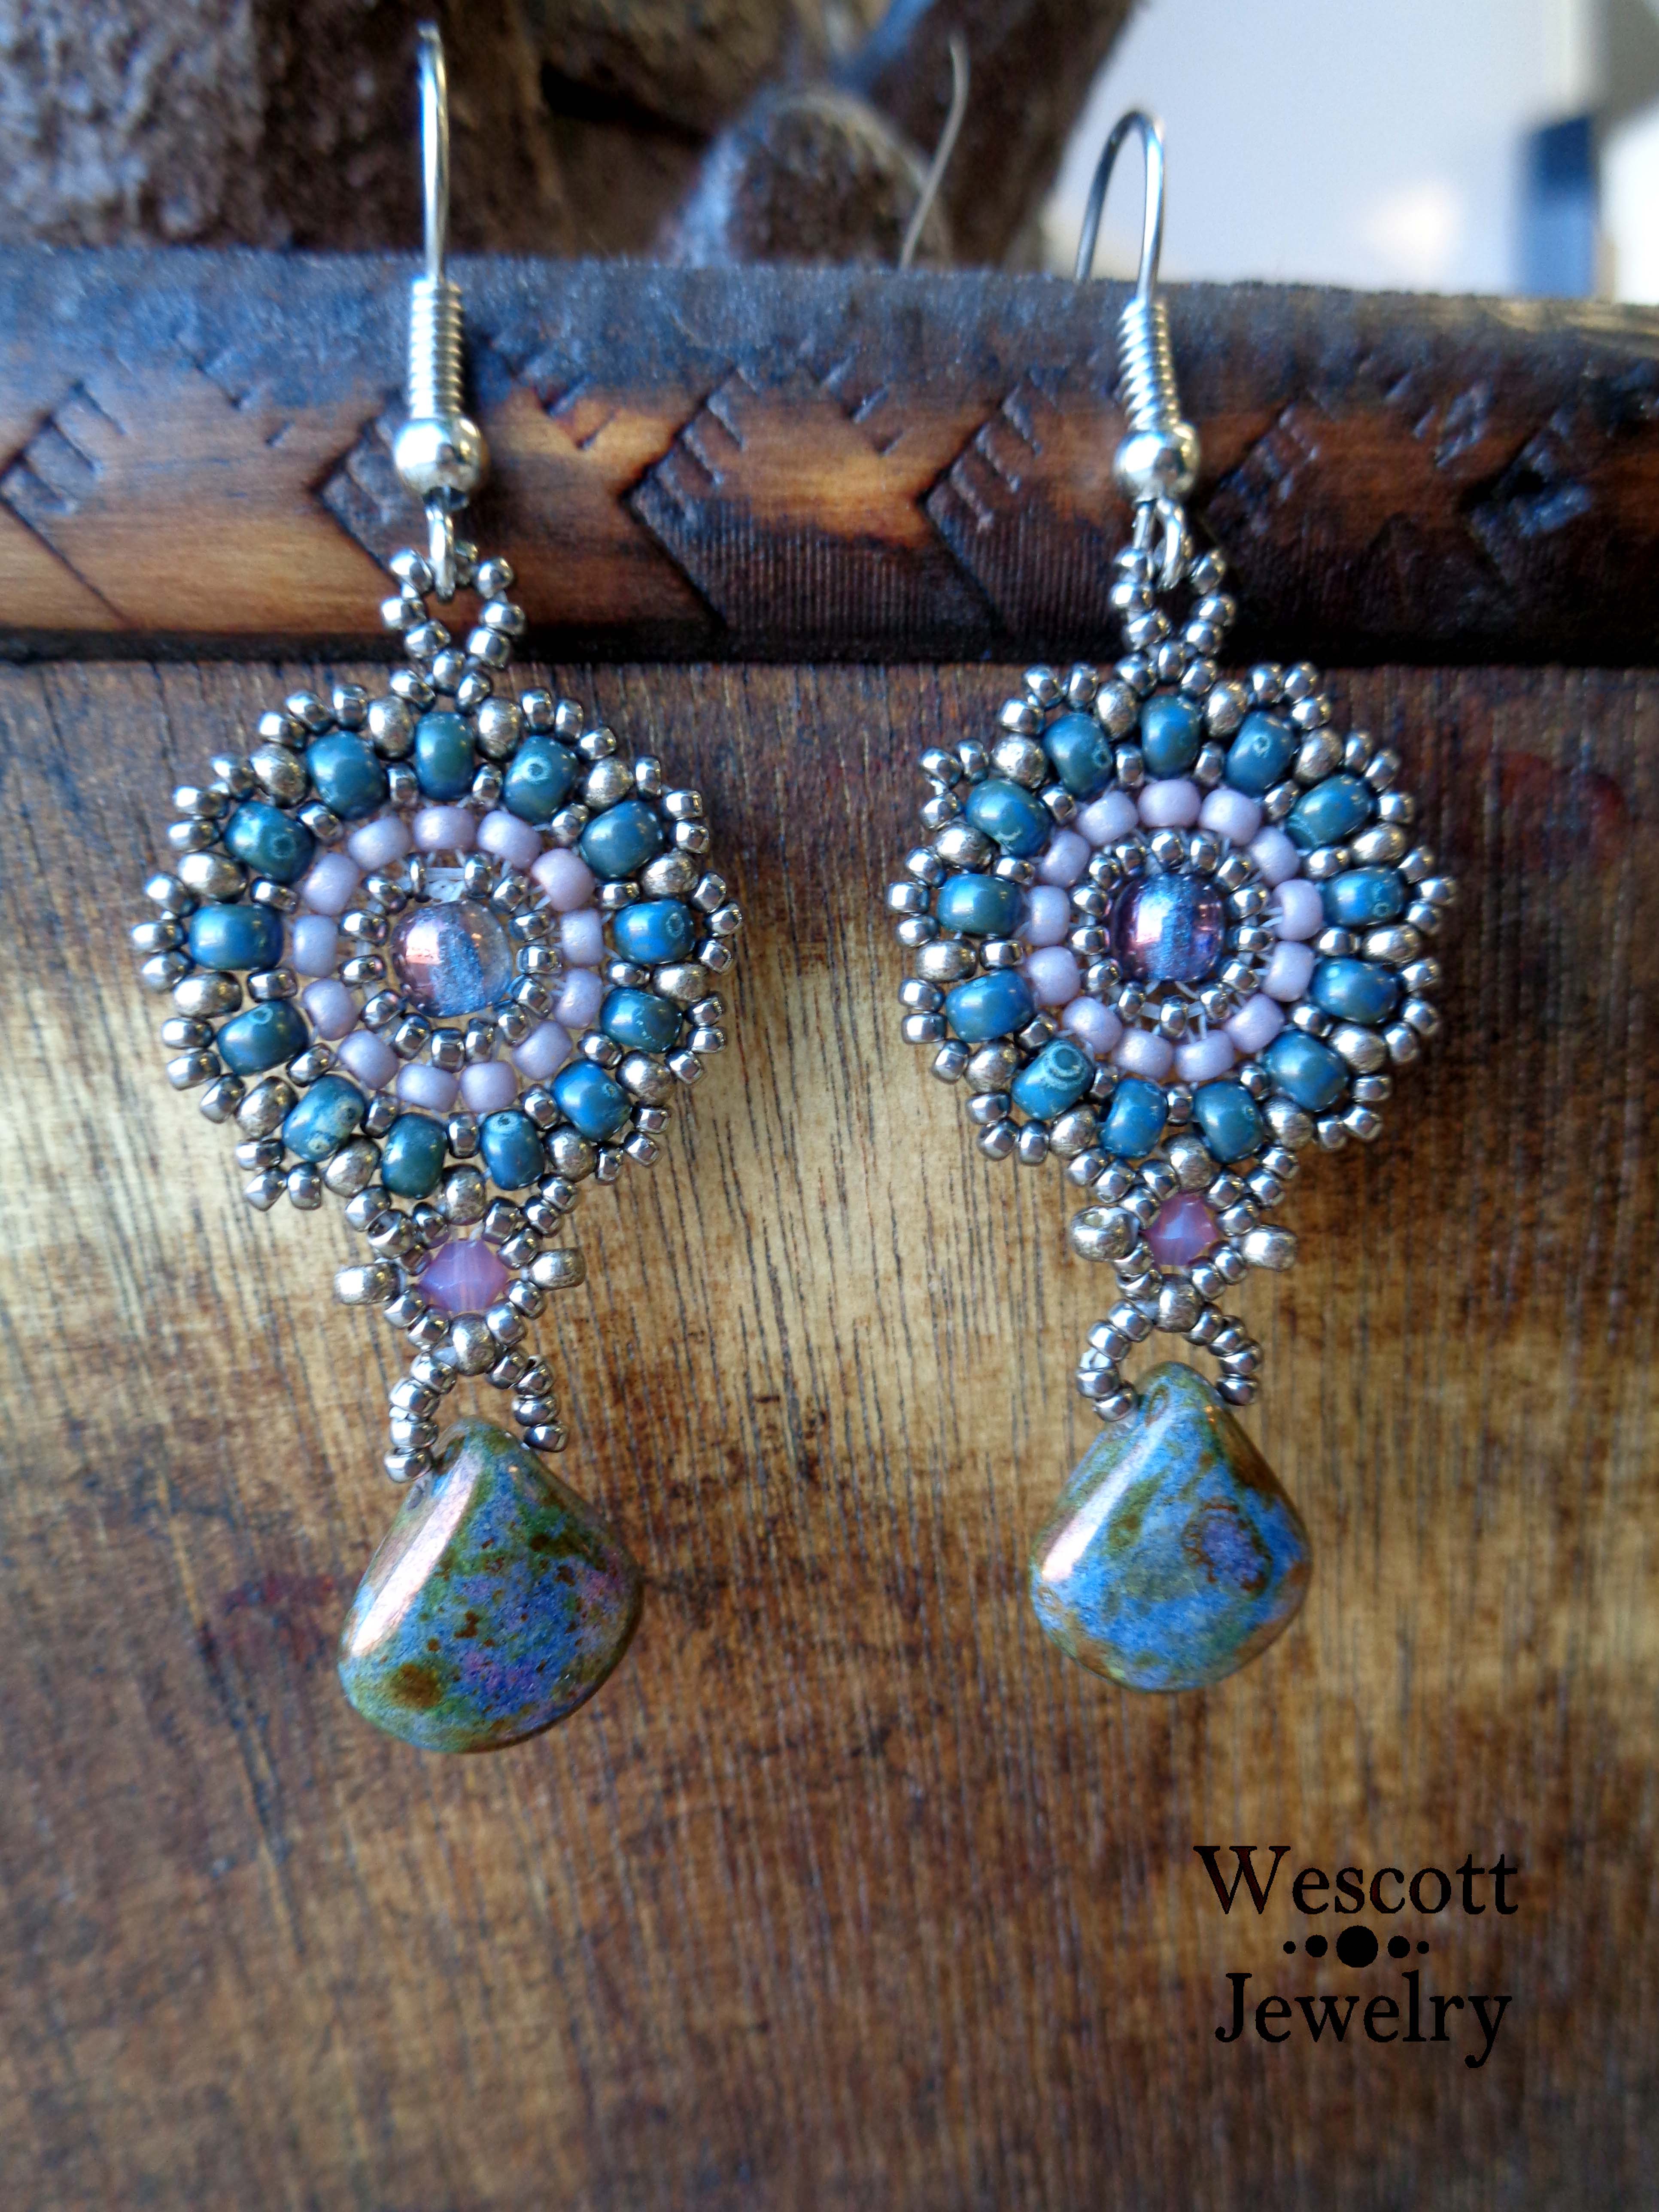
I really liked the shape of the flower medallions in this necklace. I also wanted to see how much I could change the feel of the overall piece by changing the color scheme and replacing the fancy faceted quartz drops with some casual, mottled Czech petal beads.
Well… I started out following the pattern precisely, but then I started tweaking the counts a bit and fiddling… and then earrings happened. I used the connector motif to make a dangle for the earrings, and that was that. I didn’t technically follow the tutorial, no. But I ended up with some really sweet earrings!
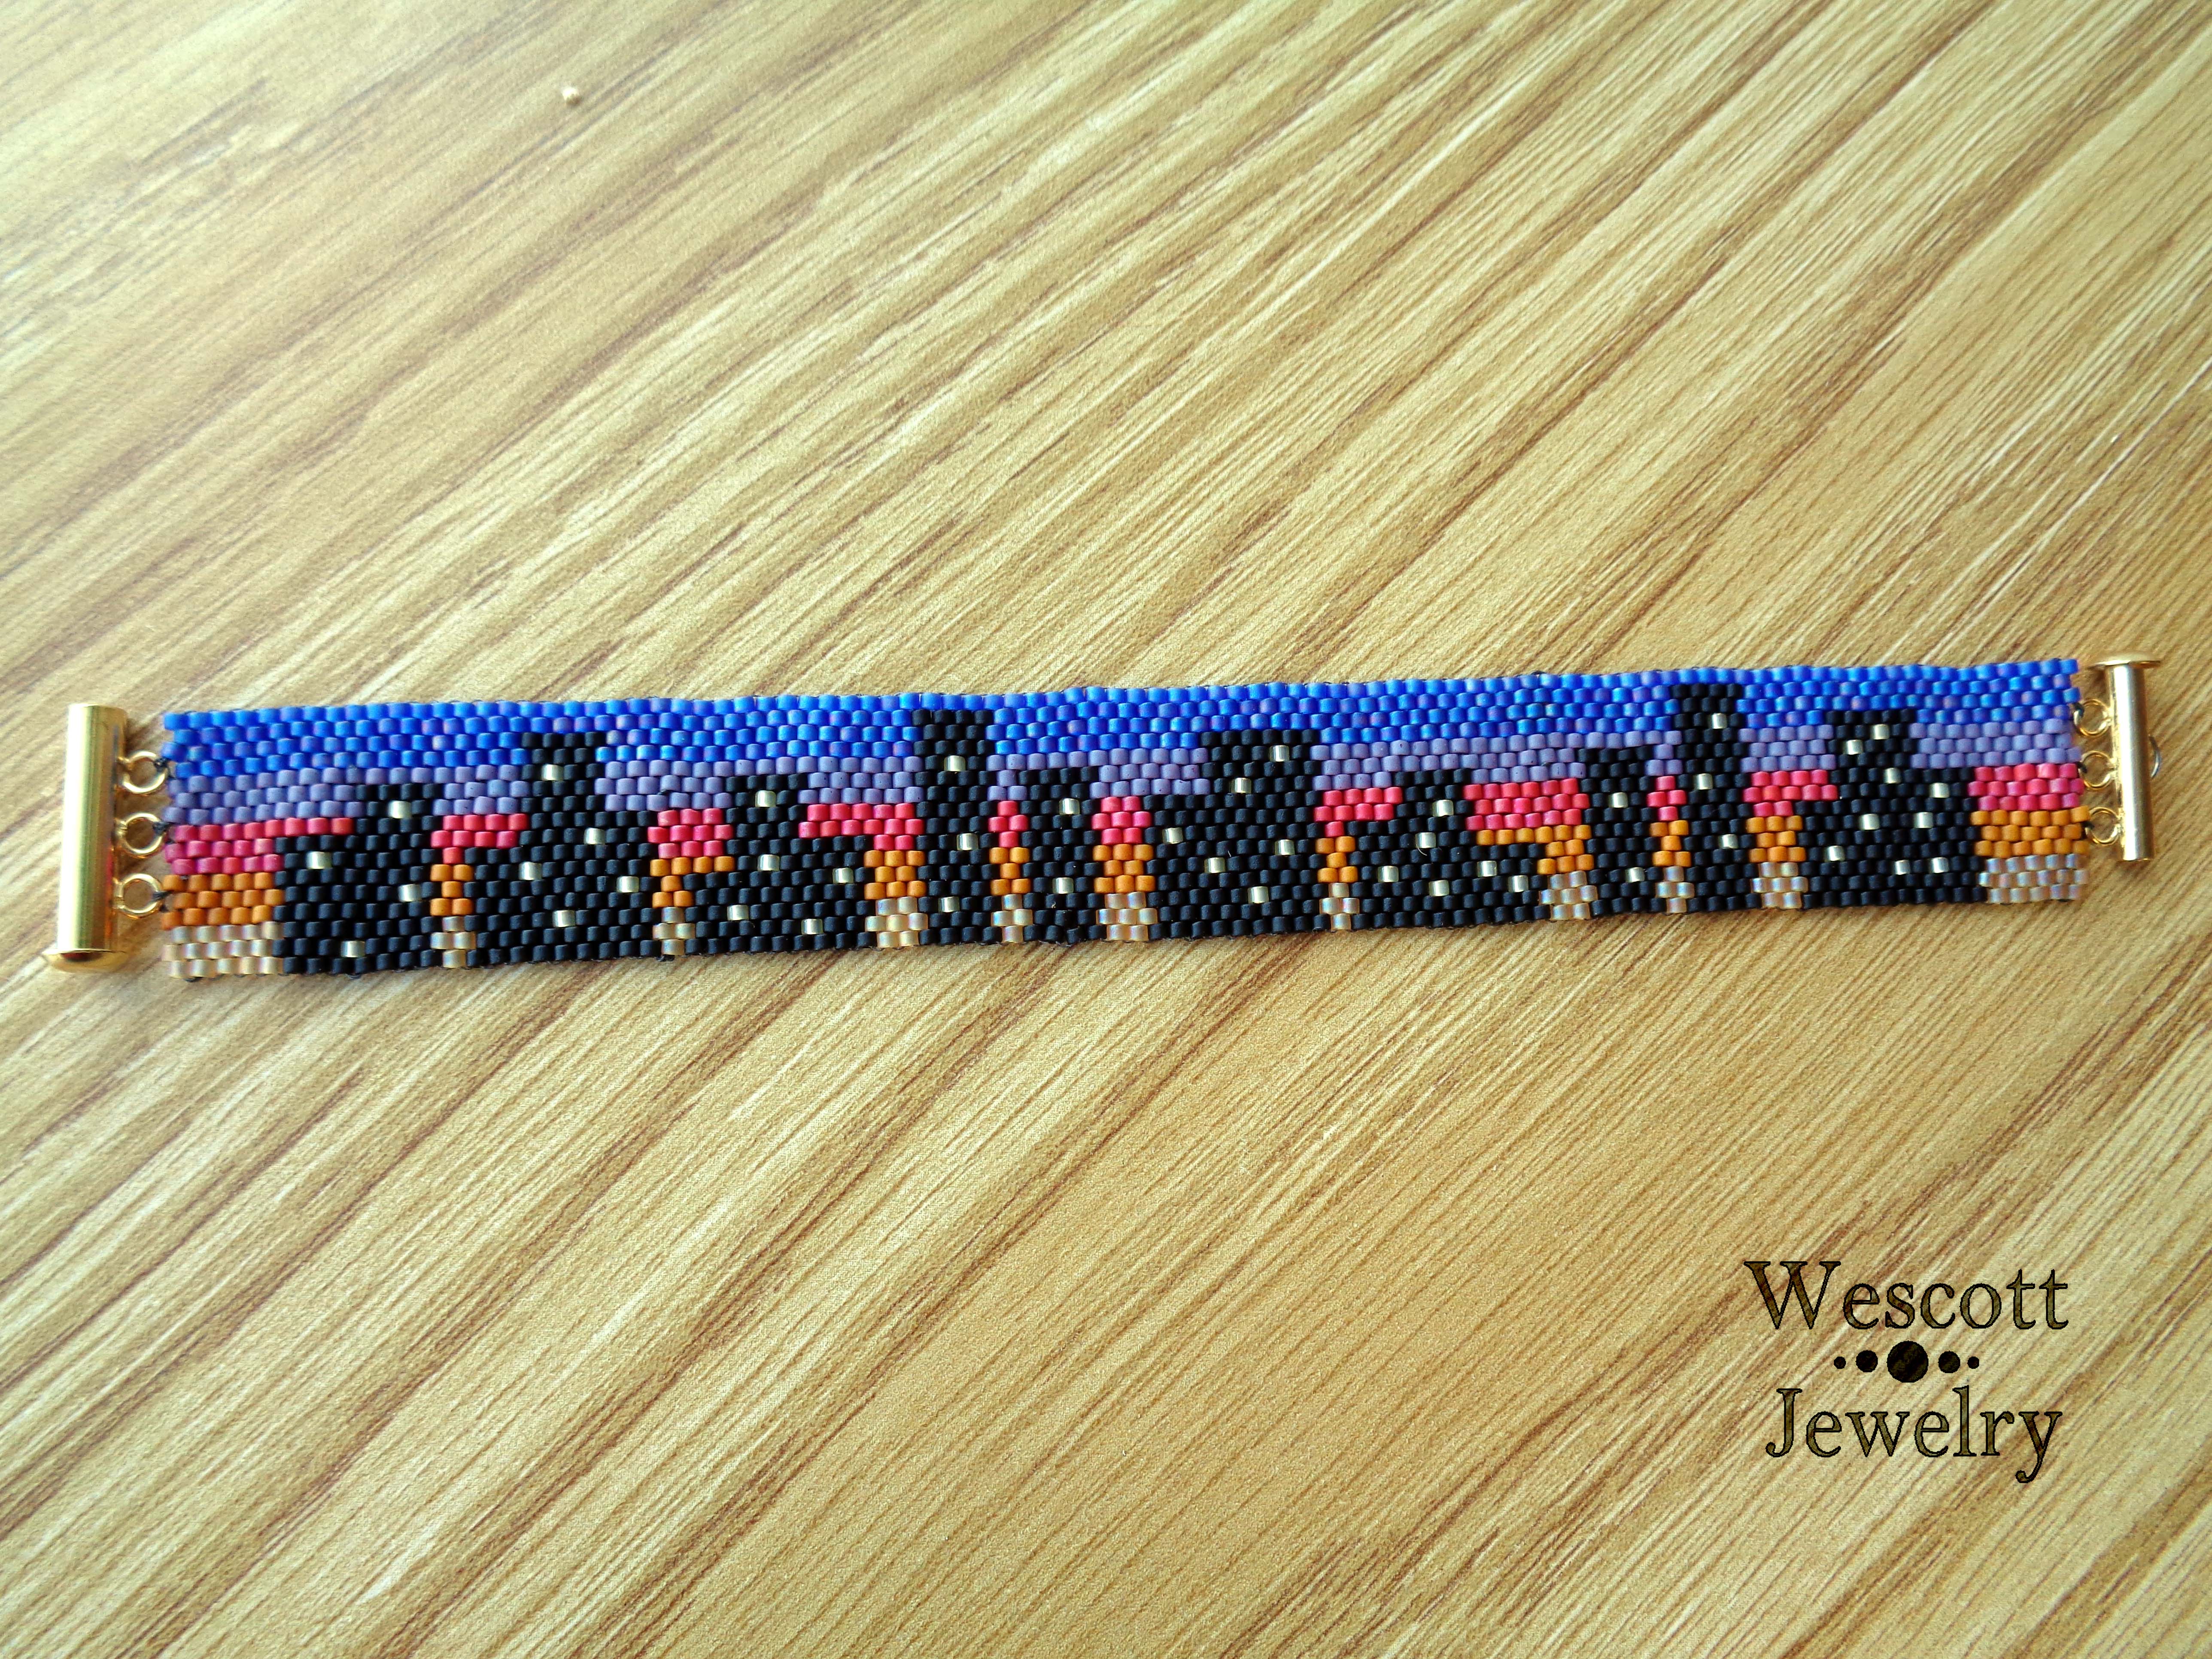
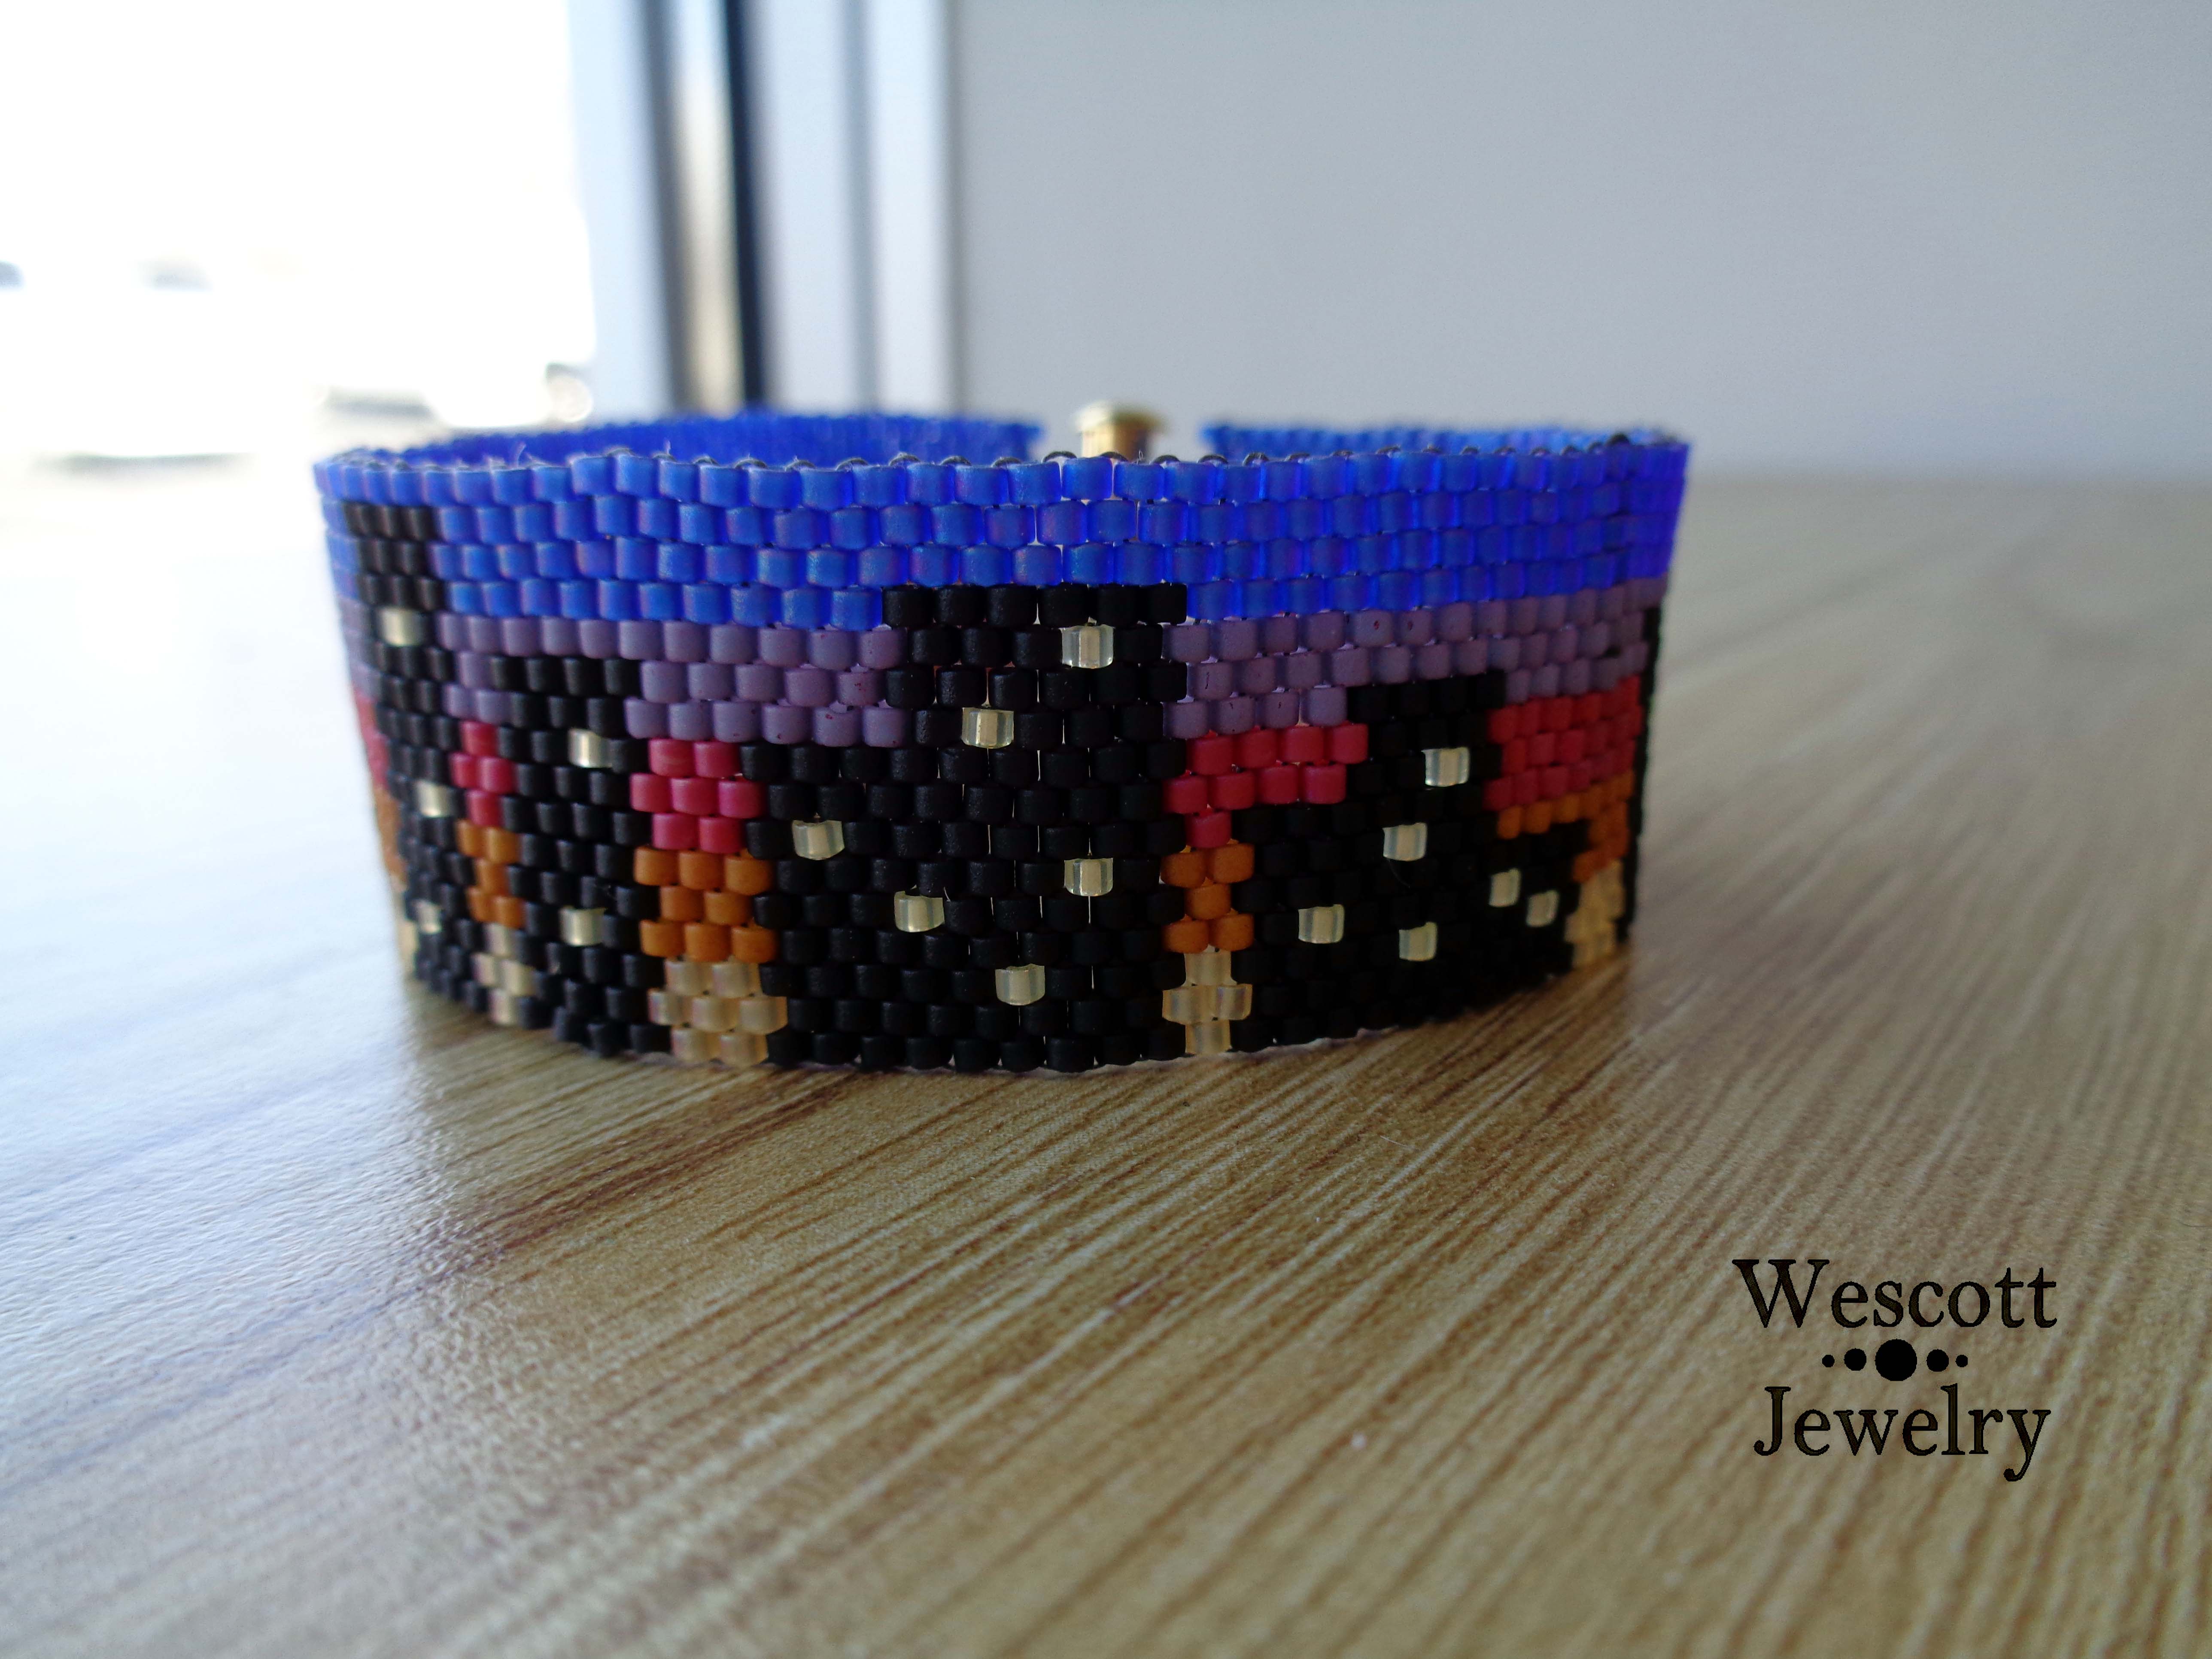
It’s time, you guys! It’s finally time for the reveal in my first ever blog hop!
You may remember a post from October where I announced my participation in this event. (I also wrote about this really cool Wonder Woman bracelet I made, so go check it out and then hurry back here and finish this post!)
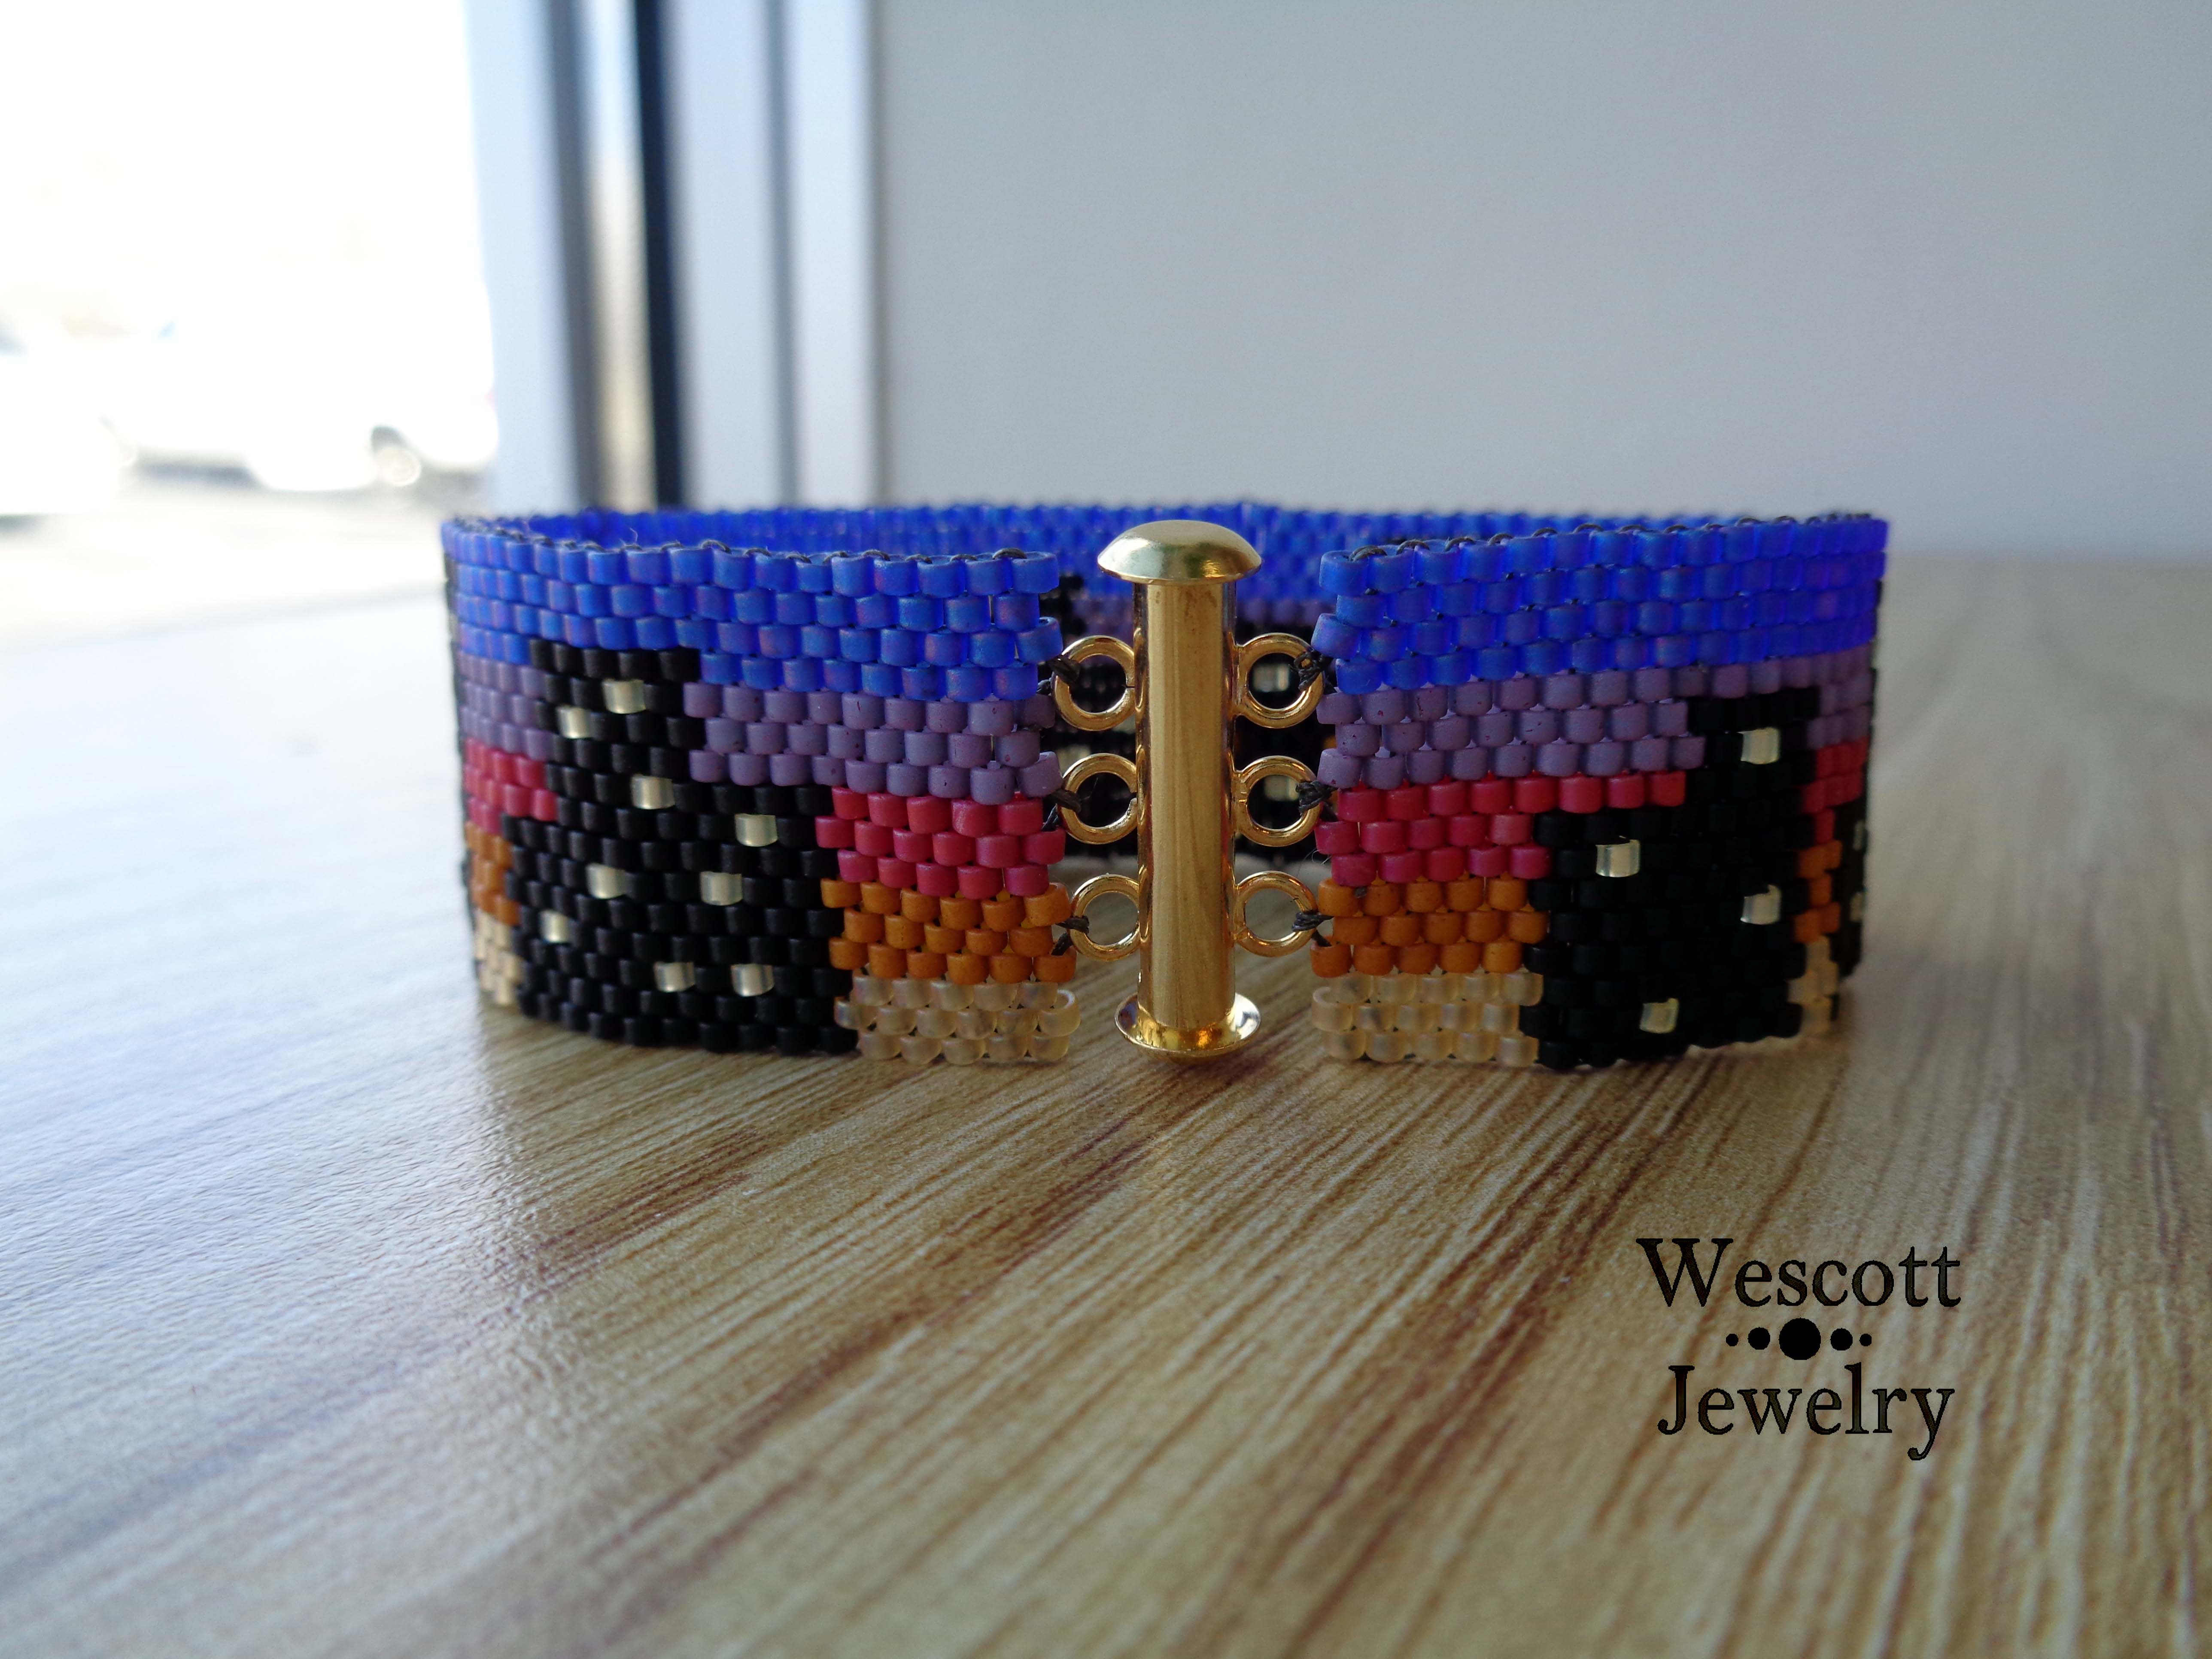
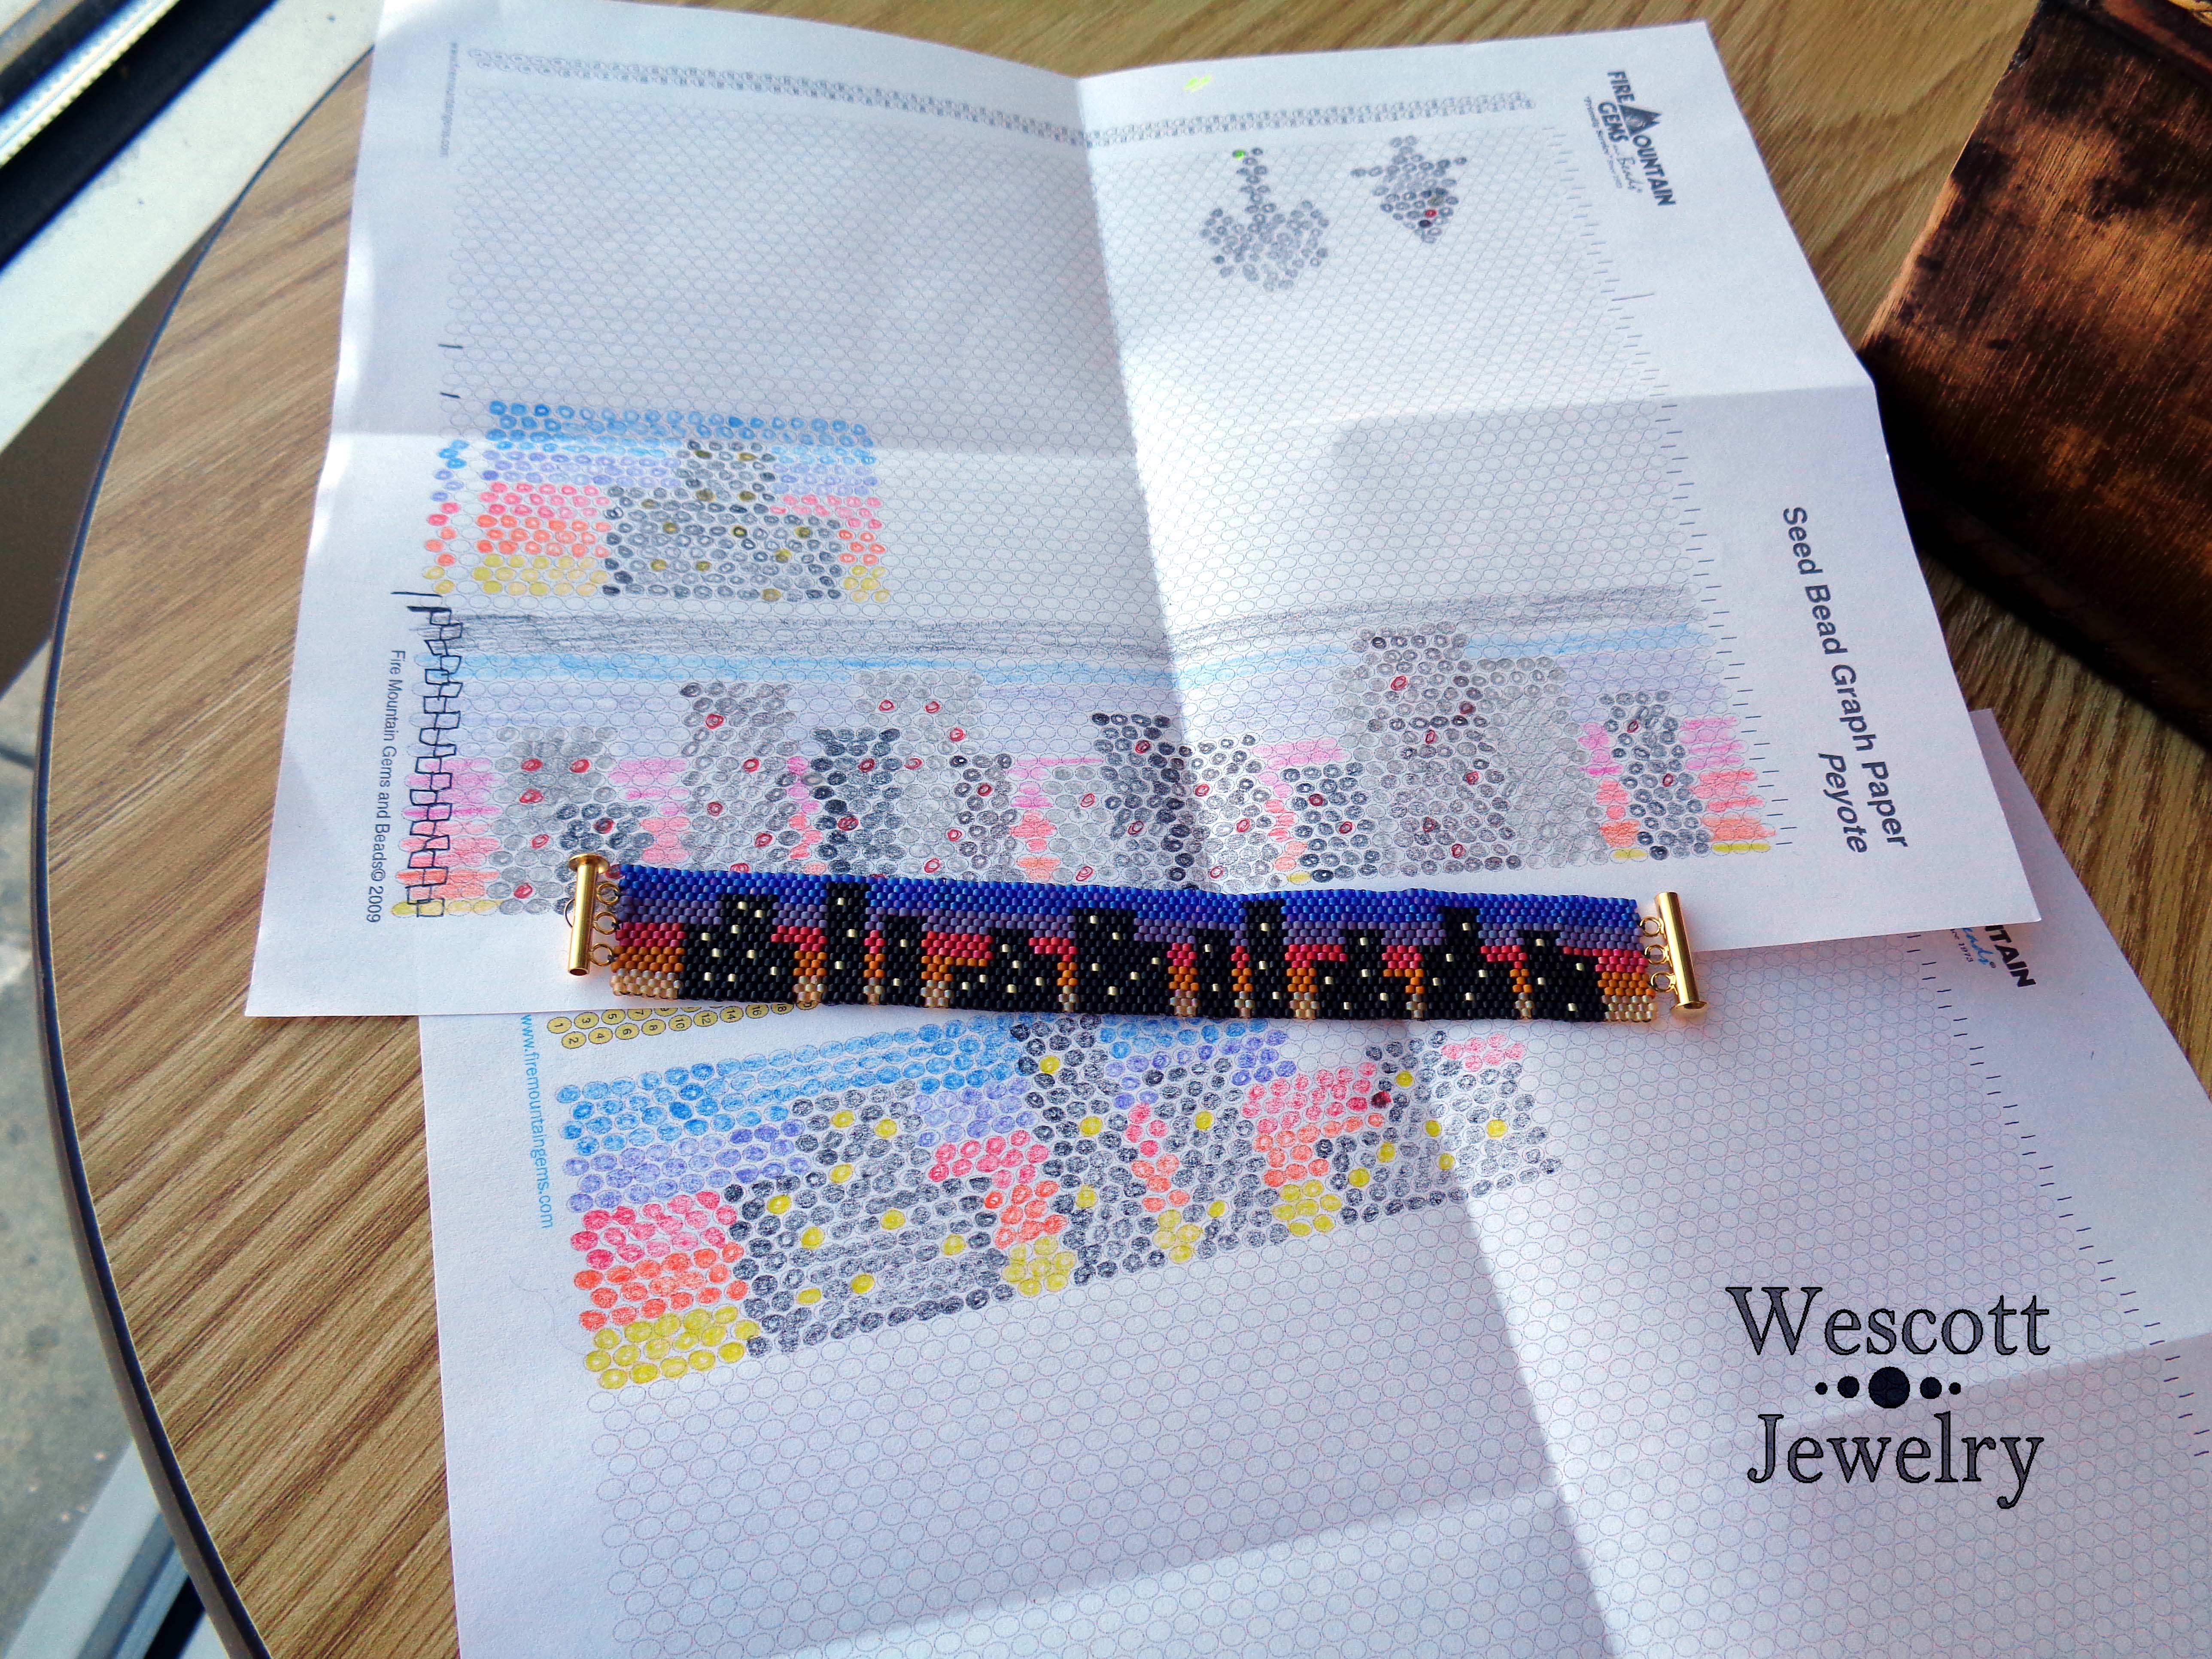
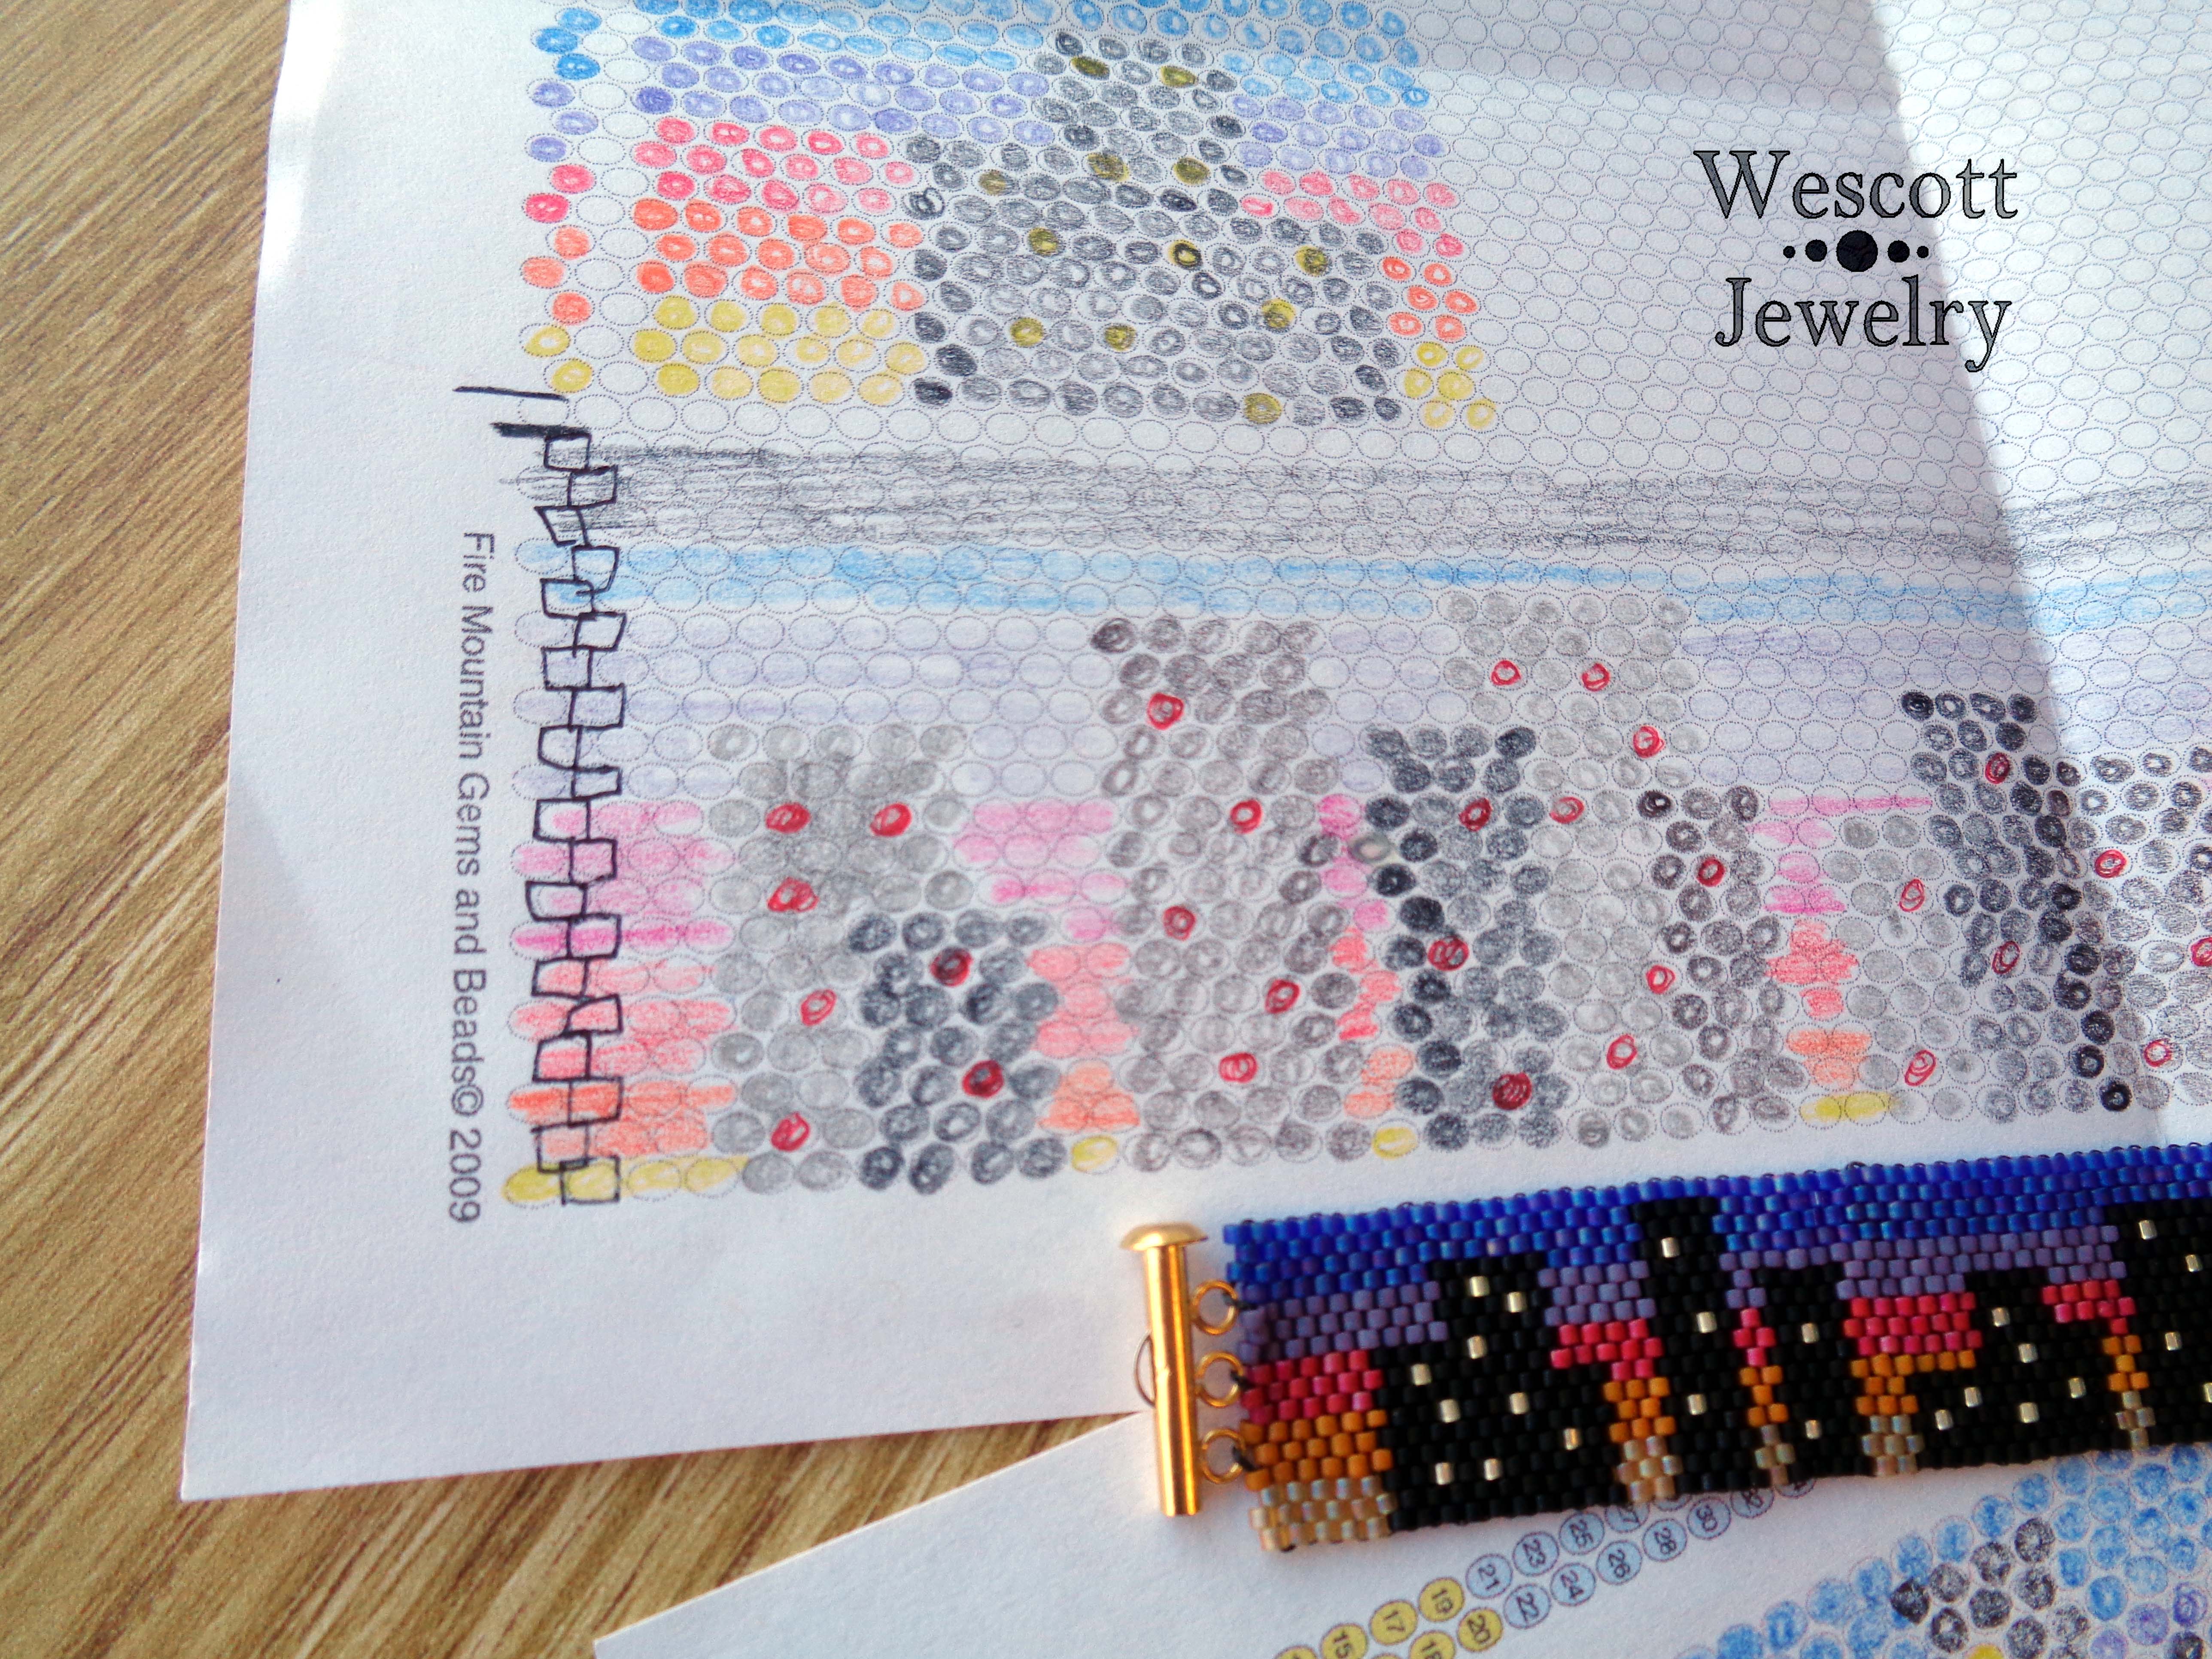
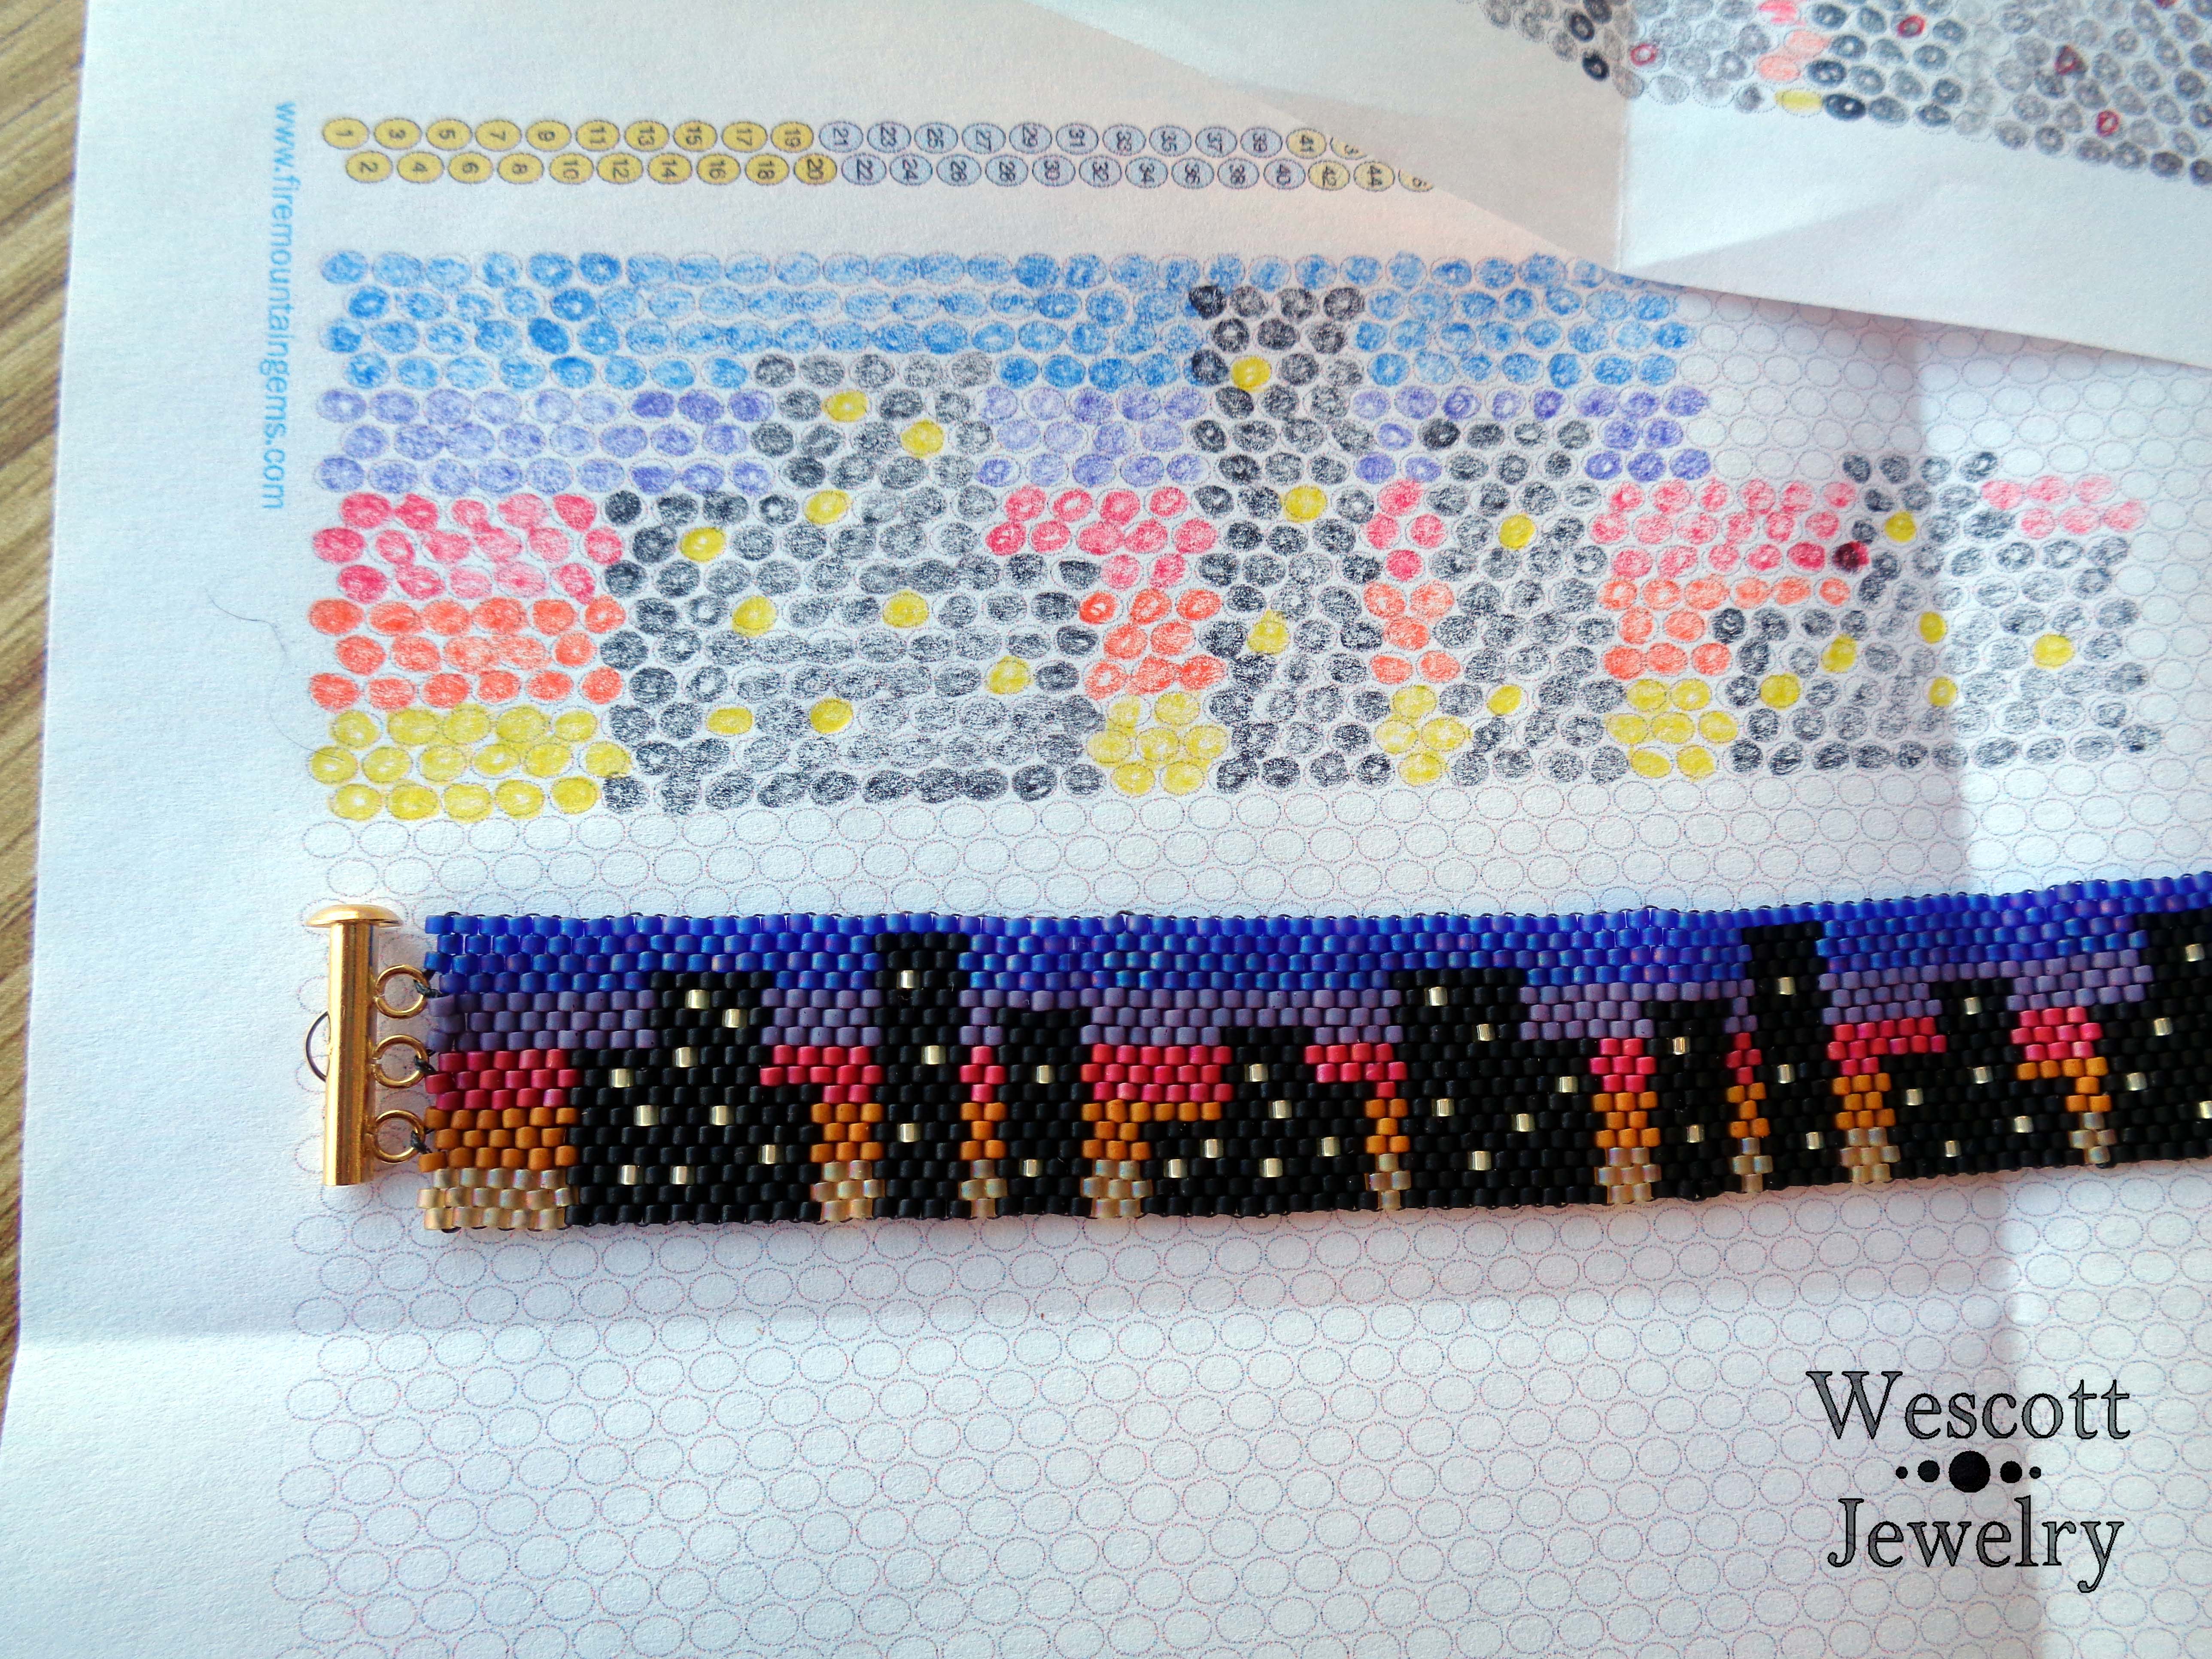
The point of this challenge was to use a graph or chart to make a stitched piece. I decided to do Peyote stitch AND to make the chart myself. This was the result!
I decided to make a city-scape! I used a variety of matte Delicass to make a sunset background and matte black Delicas for the building silhouettes. For the lights in the buildings, however, I used a silver-lined yellow Delica. The silver-lining really stands out among all the other matte beads, so they almost look like they’re really lit up!
I am really pleased with how this turned out. I used a gold-plated slide clasp, which keeps the cuff smooth and easy to wear. (I like wide clasps with wide bracelets.) I think the buildings turned out well too. I tried really hard to make them evenly spaced without being too symmetrical. Same thing with the building lights – it was really hard to make them look random, but still kinda even, (if that makes sense).
As far as the graph goes, I kinda failed to get my design in one place. I’ve got segments in a couple different spots on a couple different pages of graph paper. This happened partially because the graph paper wasn’t long enough for the whole design, but also because I get overly excited and disorganized when colored pencils are involved.
So, I wasn’t exactly organized, but I DID create my own peyote cuff chart and then I DID successfully create the bracelet. Therefore, I will call this a triumph and thank Therese Christine profusely for hosting this challenge!
Now, be sure to stop by everyone else’s blogs to see what they made!
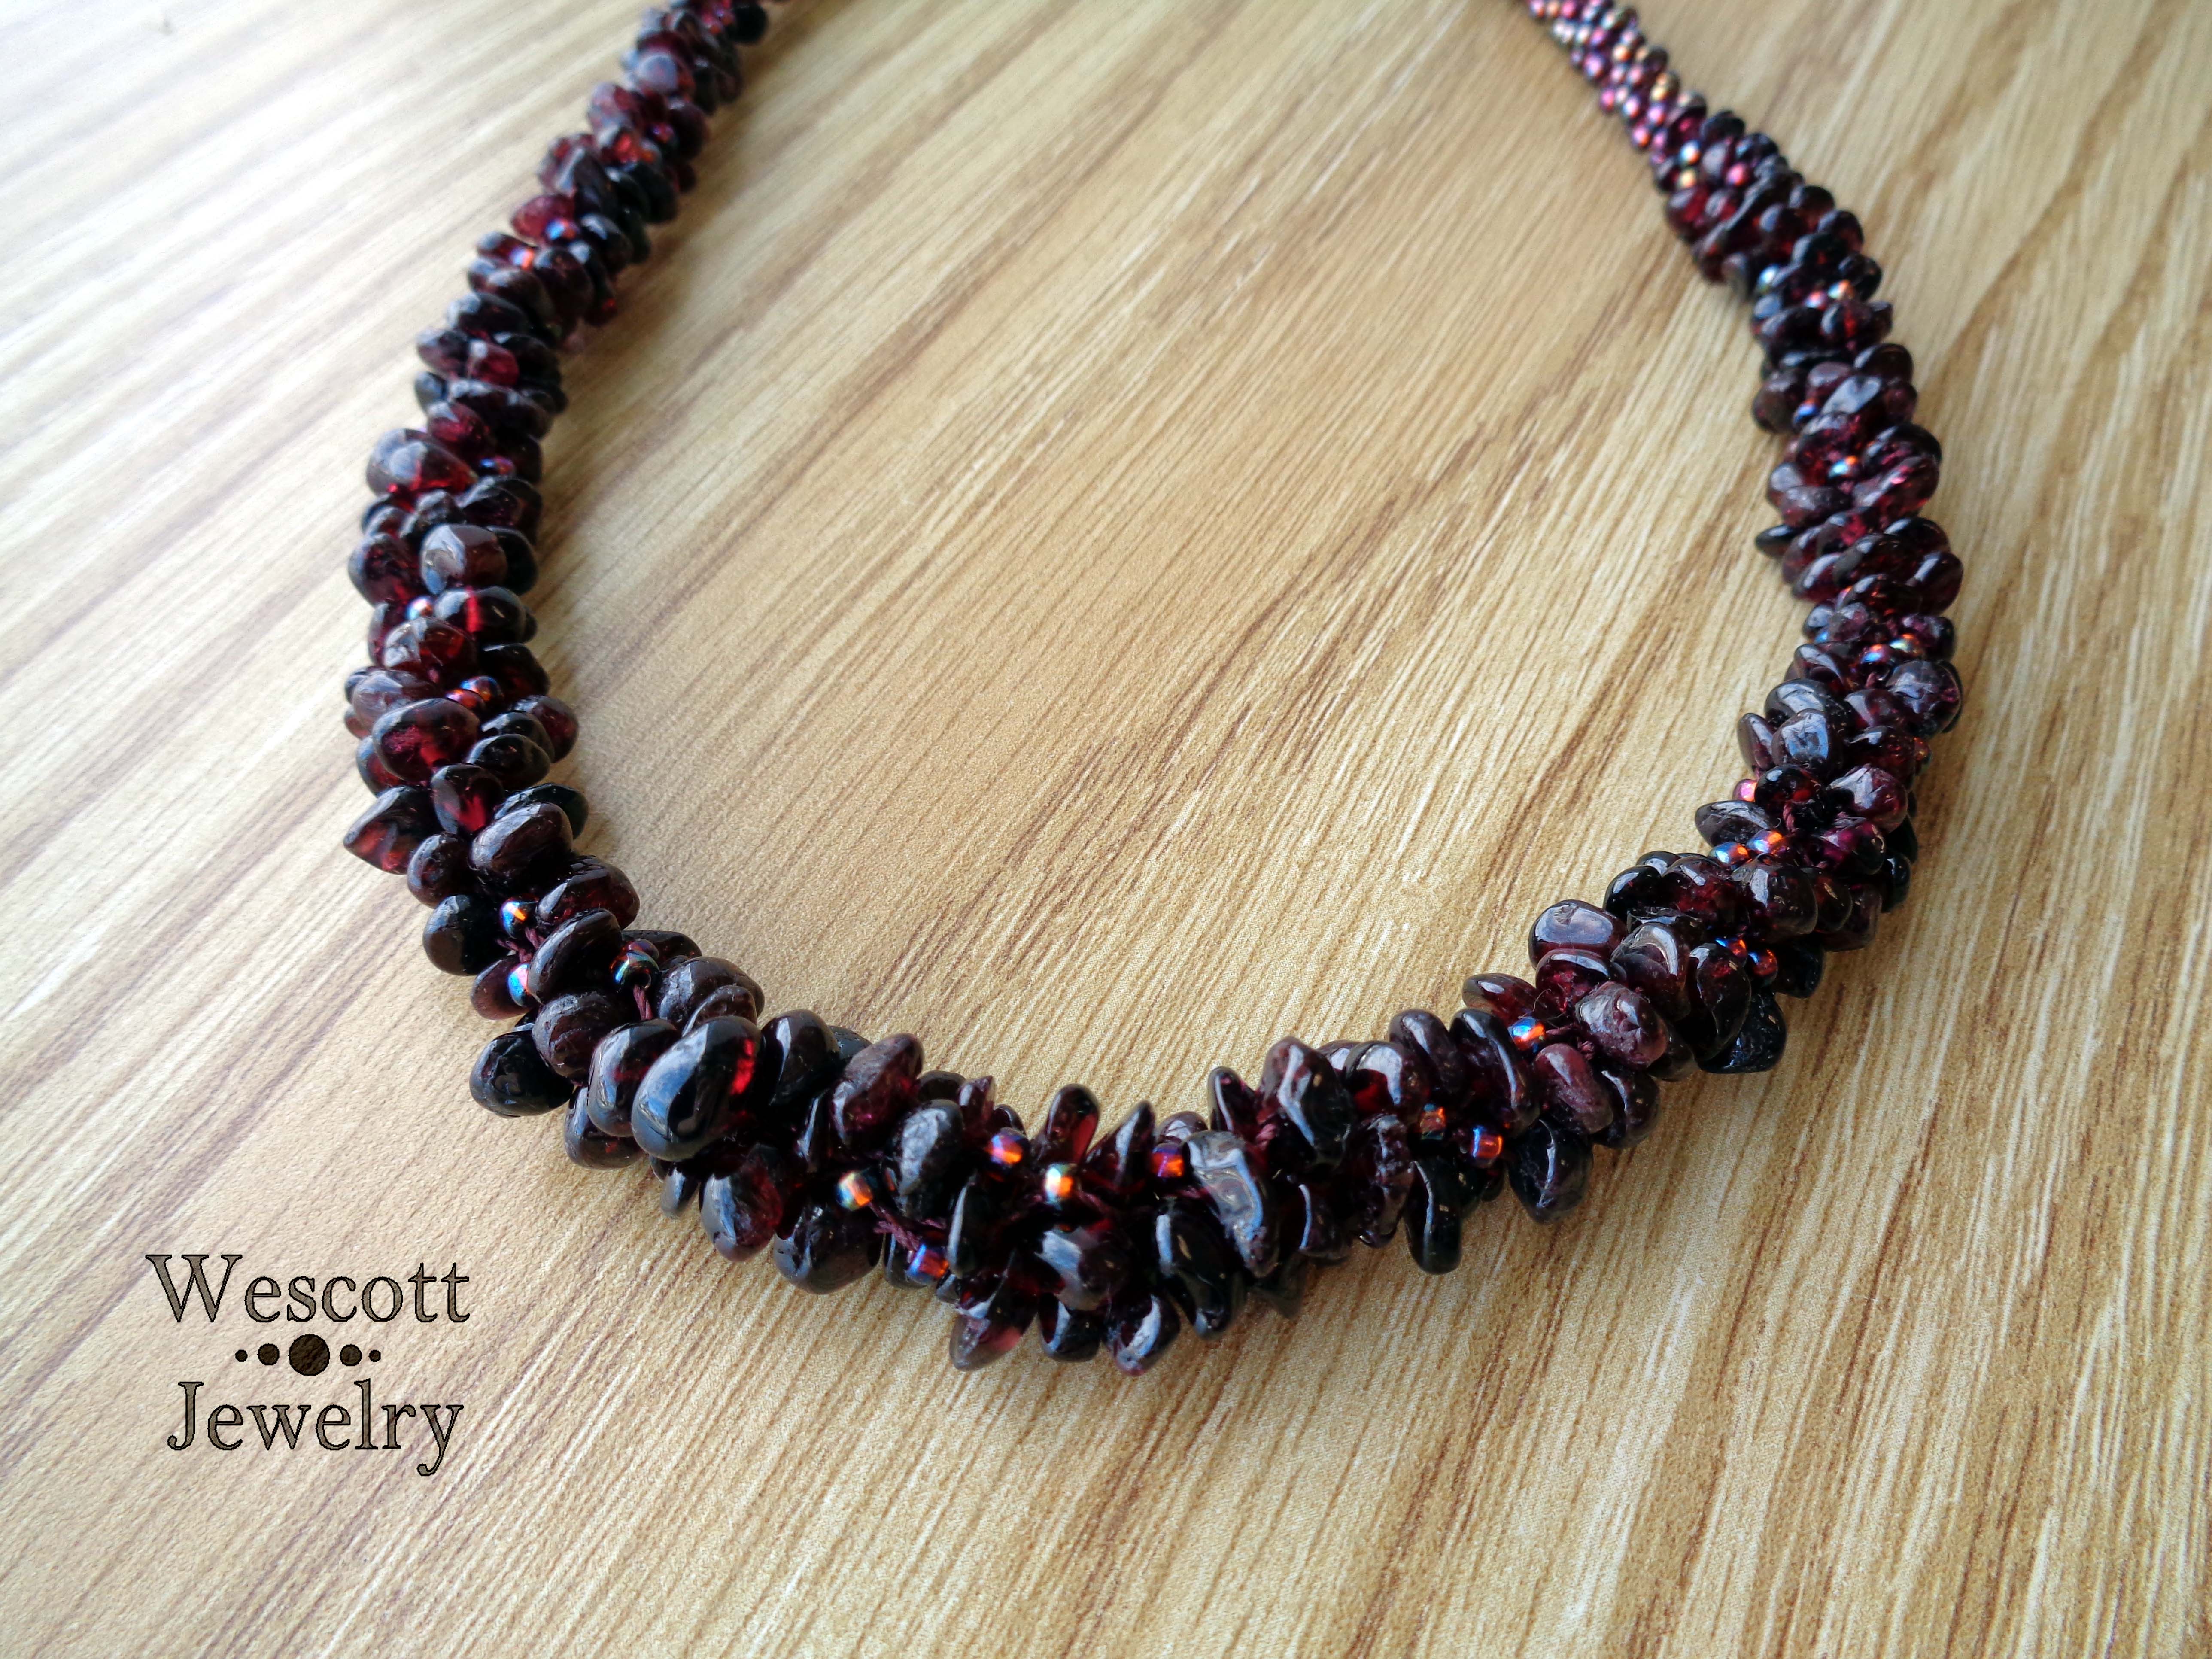
So, this week’s theme in the Year of Jewelry Project was Garnet, since it’s the birthstone for January. I was really excited about this theme, since I’ve had a bunch of pretty little garnet chips waiting mournfully in my stash for longer than I’d care to admit.
I decided to whip them up in a gently graduated Kumihimo necklace with some coordinating seed beads and leave it pretty simple – let the garnet speak for itself. I spent a good long time separating the chips into the appropriate piles for Kumihimo and trying to set them up so that they would graduate pleasantly in the finished product. This is kinda dull work, though, and to treat myself, I retrieved my unopened bottle of Glögg.
Now, Glögg is generally a type of mulled wine, but the type that I had was a non-alcoholic gift from my mother. It was supposed to be heated up and enjoyed like a sort of liquid dessert, which I thought would be a nice addition to my tedious garnet counting.
Turns out this particular brand of non-alcoholic Glögg is gross. Really gross.
I whined to my husband that my desert liquid was gross and he suggested that I add something to it to mellow out the super-sweet, sugary lemon taste I was getting. Like any respectable 22-year-old with an impending deadline, I chose rum.
Turns out this particular brand of non-alcoholic Glögg is much better when mixed with very alcoholic rum.
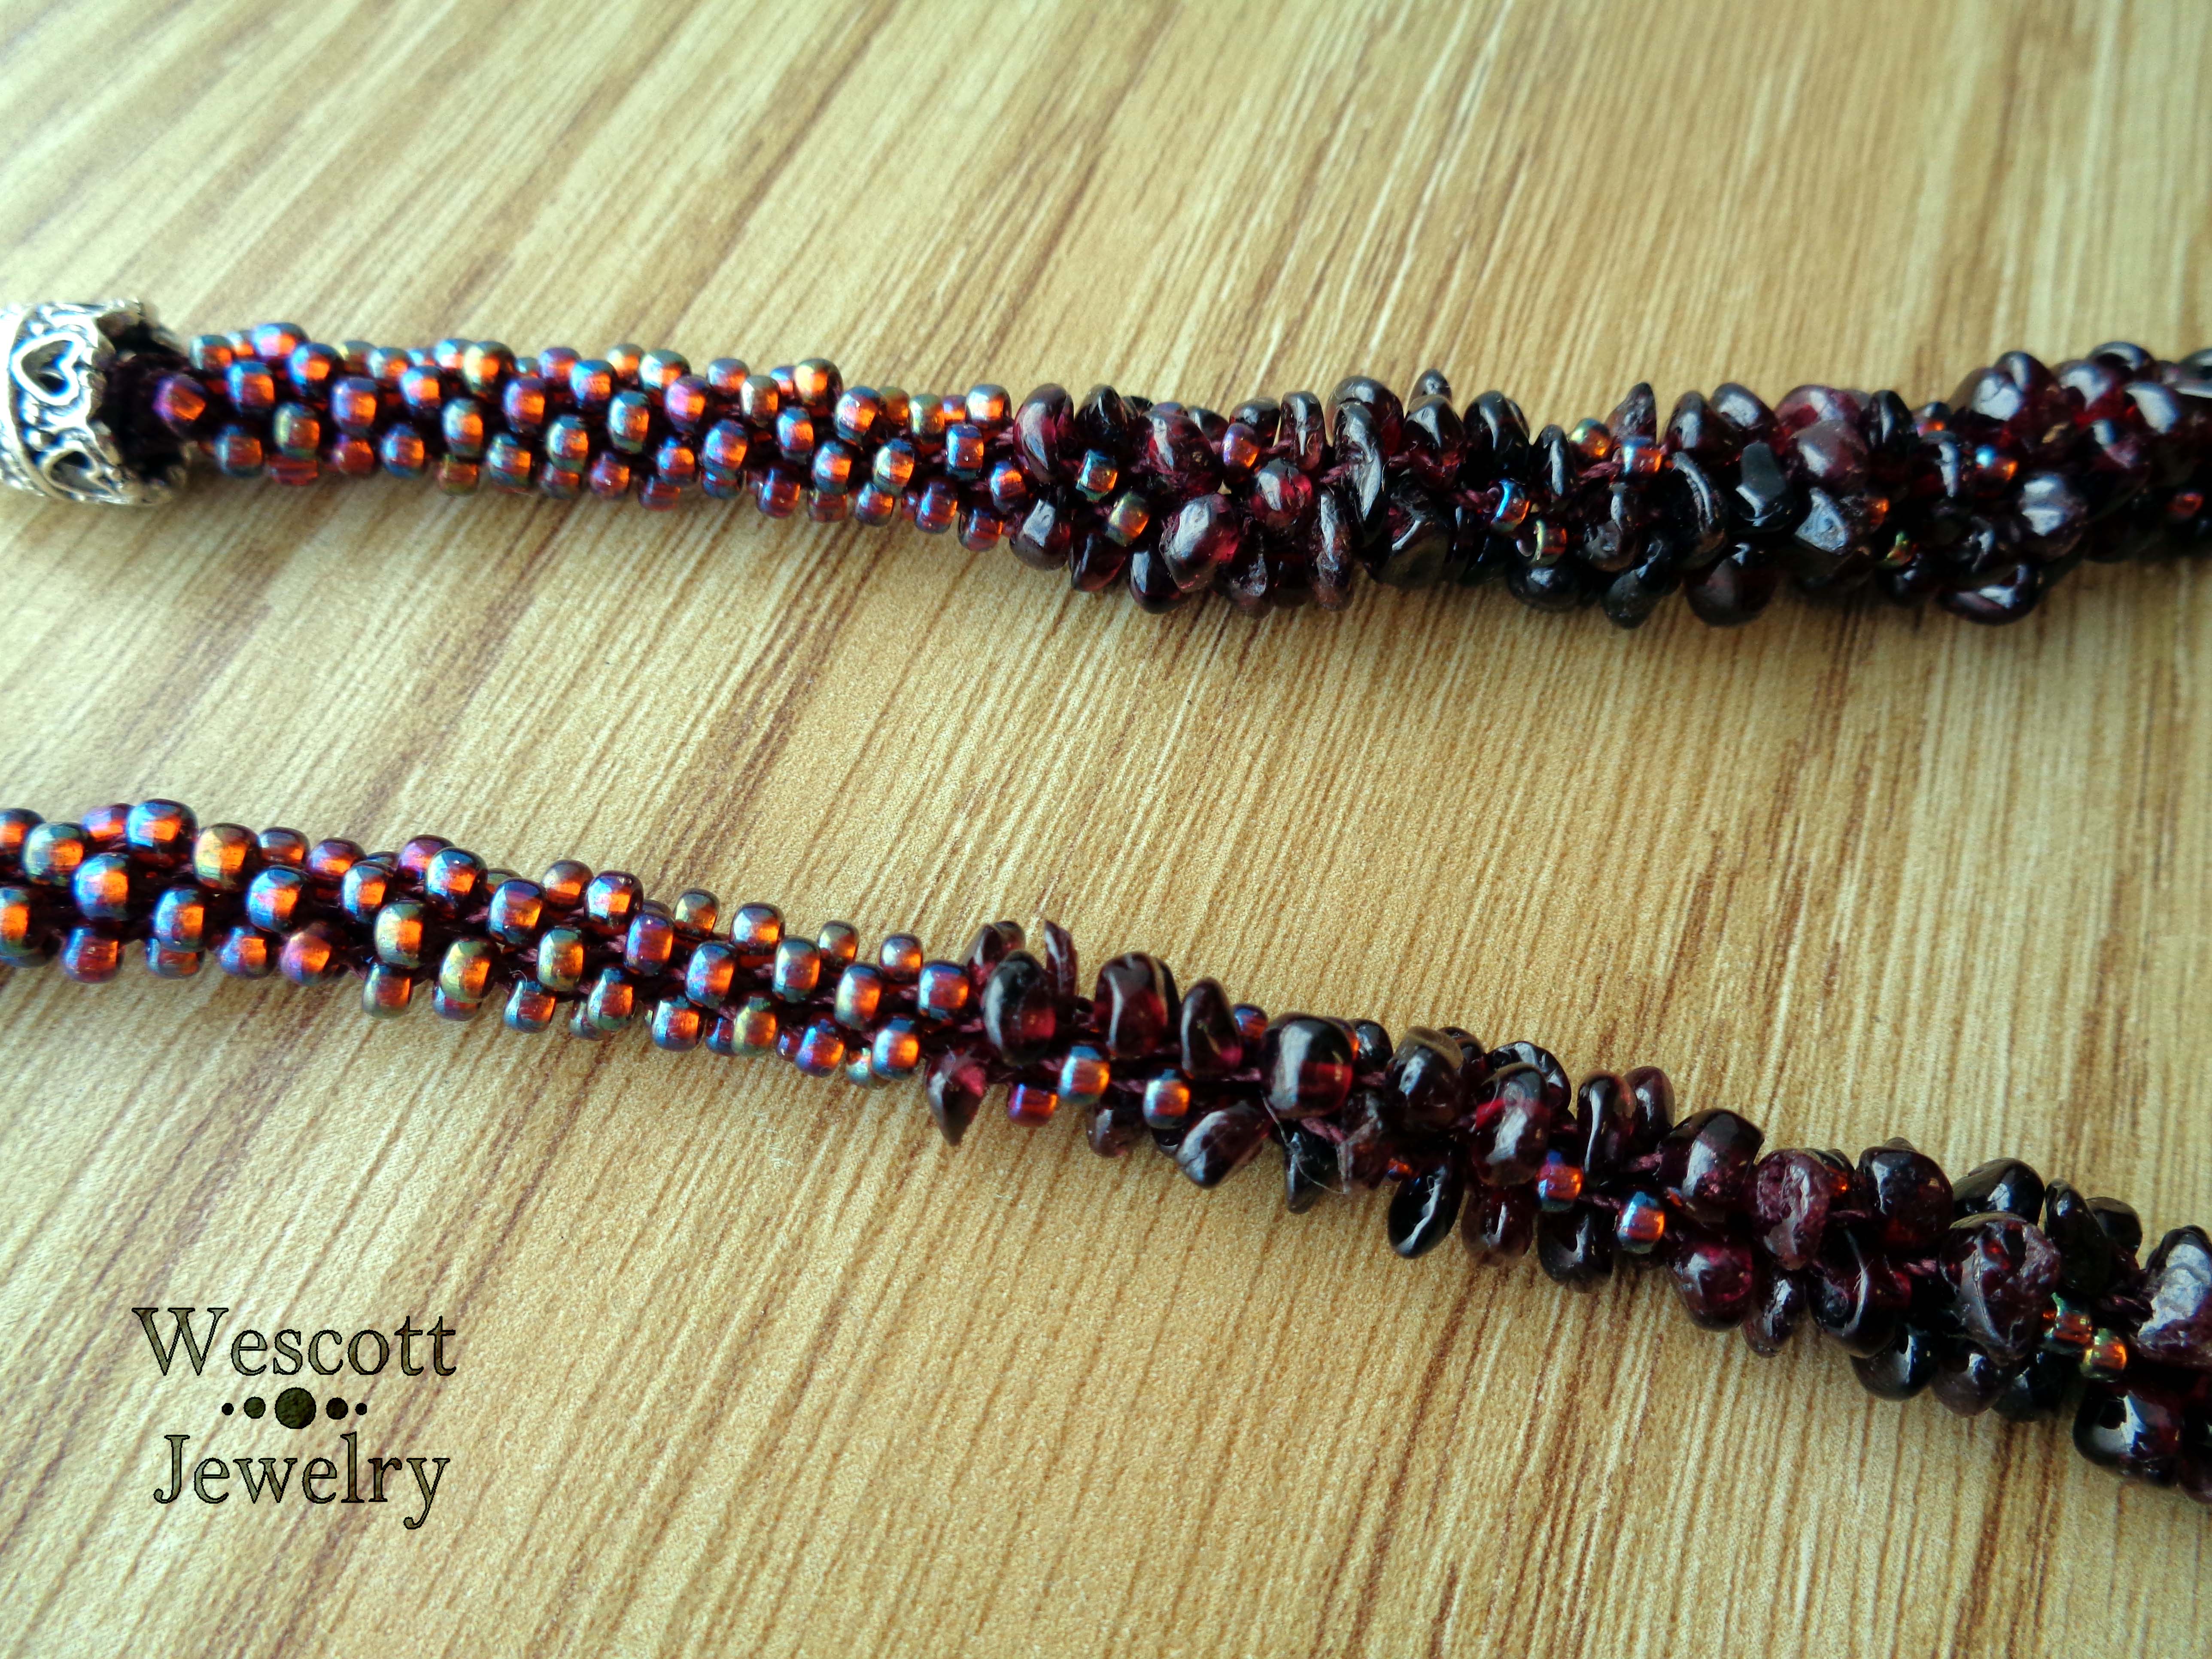
Long story short, my innocent desert liquid became a kumihimo-destroying devil juice. You can actually see in the “finished” necklace where my tension began getting sloppy, as I proceeded to fill and refill and refill and refill my mug of previously non-alcoholic and now very alcoholic Glögg.
I think the graduation turned out okay.
But the tension was super uneven and sloppy, and the caps on the end look TERRIBLE. They aren’t even the right size! It’s obvious that I added those after a particularly high level of, uh, beverage consumption.
It’s certainly not the worst piece I have ever made (boy, there have been some doozies), but it is definitely not up to my usual standards. Unfortunately, I glued the necklace into the caps, so I will have to cut it apart to salvage the garnet chips. In the meantime, I went a completely different direction with my piece for the YOJP Week 2.
I bezeled lavender Rivolis with gunmetal superduos and amethyst rondelles. It’s a pretty simple bezeling technique and works up quickly, but always looks nice.
No, these are not in any way related to garnet, but the themes in YOJP are more inspirational than set in stone. I really wanted to use those garnet chips, but I must admit – I really like these earrings a lot better. (Probably because I actually remember the process of making them).
So, don’t drink and braid, kids. No matter how gross your Glögg is.
Hello, everyone! It would seem that I have completely lost my mind, as is evidenced by my commitment to the Year of Jewelry Project on facebook. The idea is that those who join the group commit to make, photograph, and post a newly made piece of jewelry every week for the entire year. They even post weekly themes to keep your muse awake and active.
I think the group is closed now, meaning that they are not accepting any more members, but the photo albums are available for browsing. I highly recommend you check in every week or so to see the theme and what everyone is up to. Maybe you can work up the madness to join us next year!
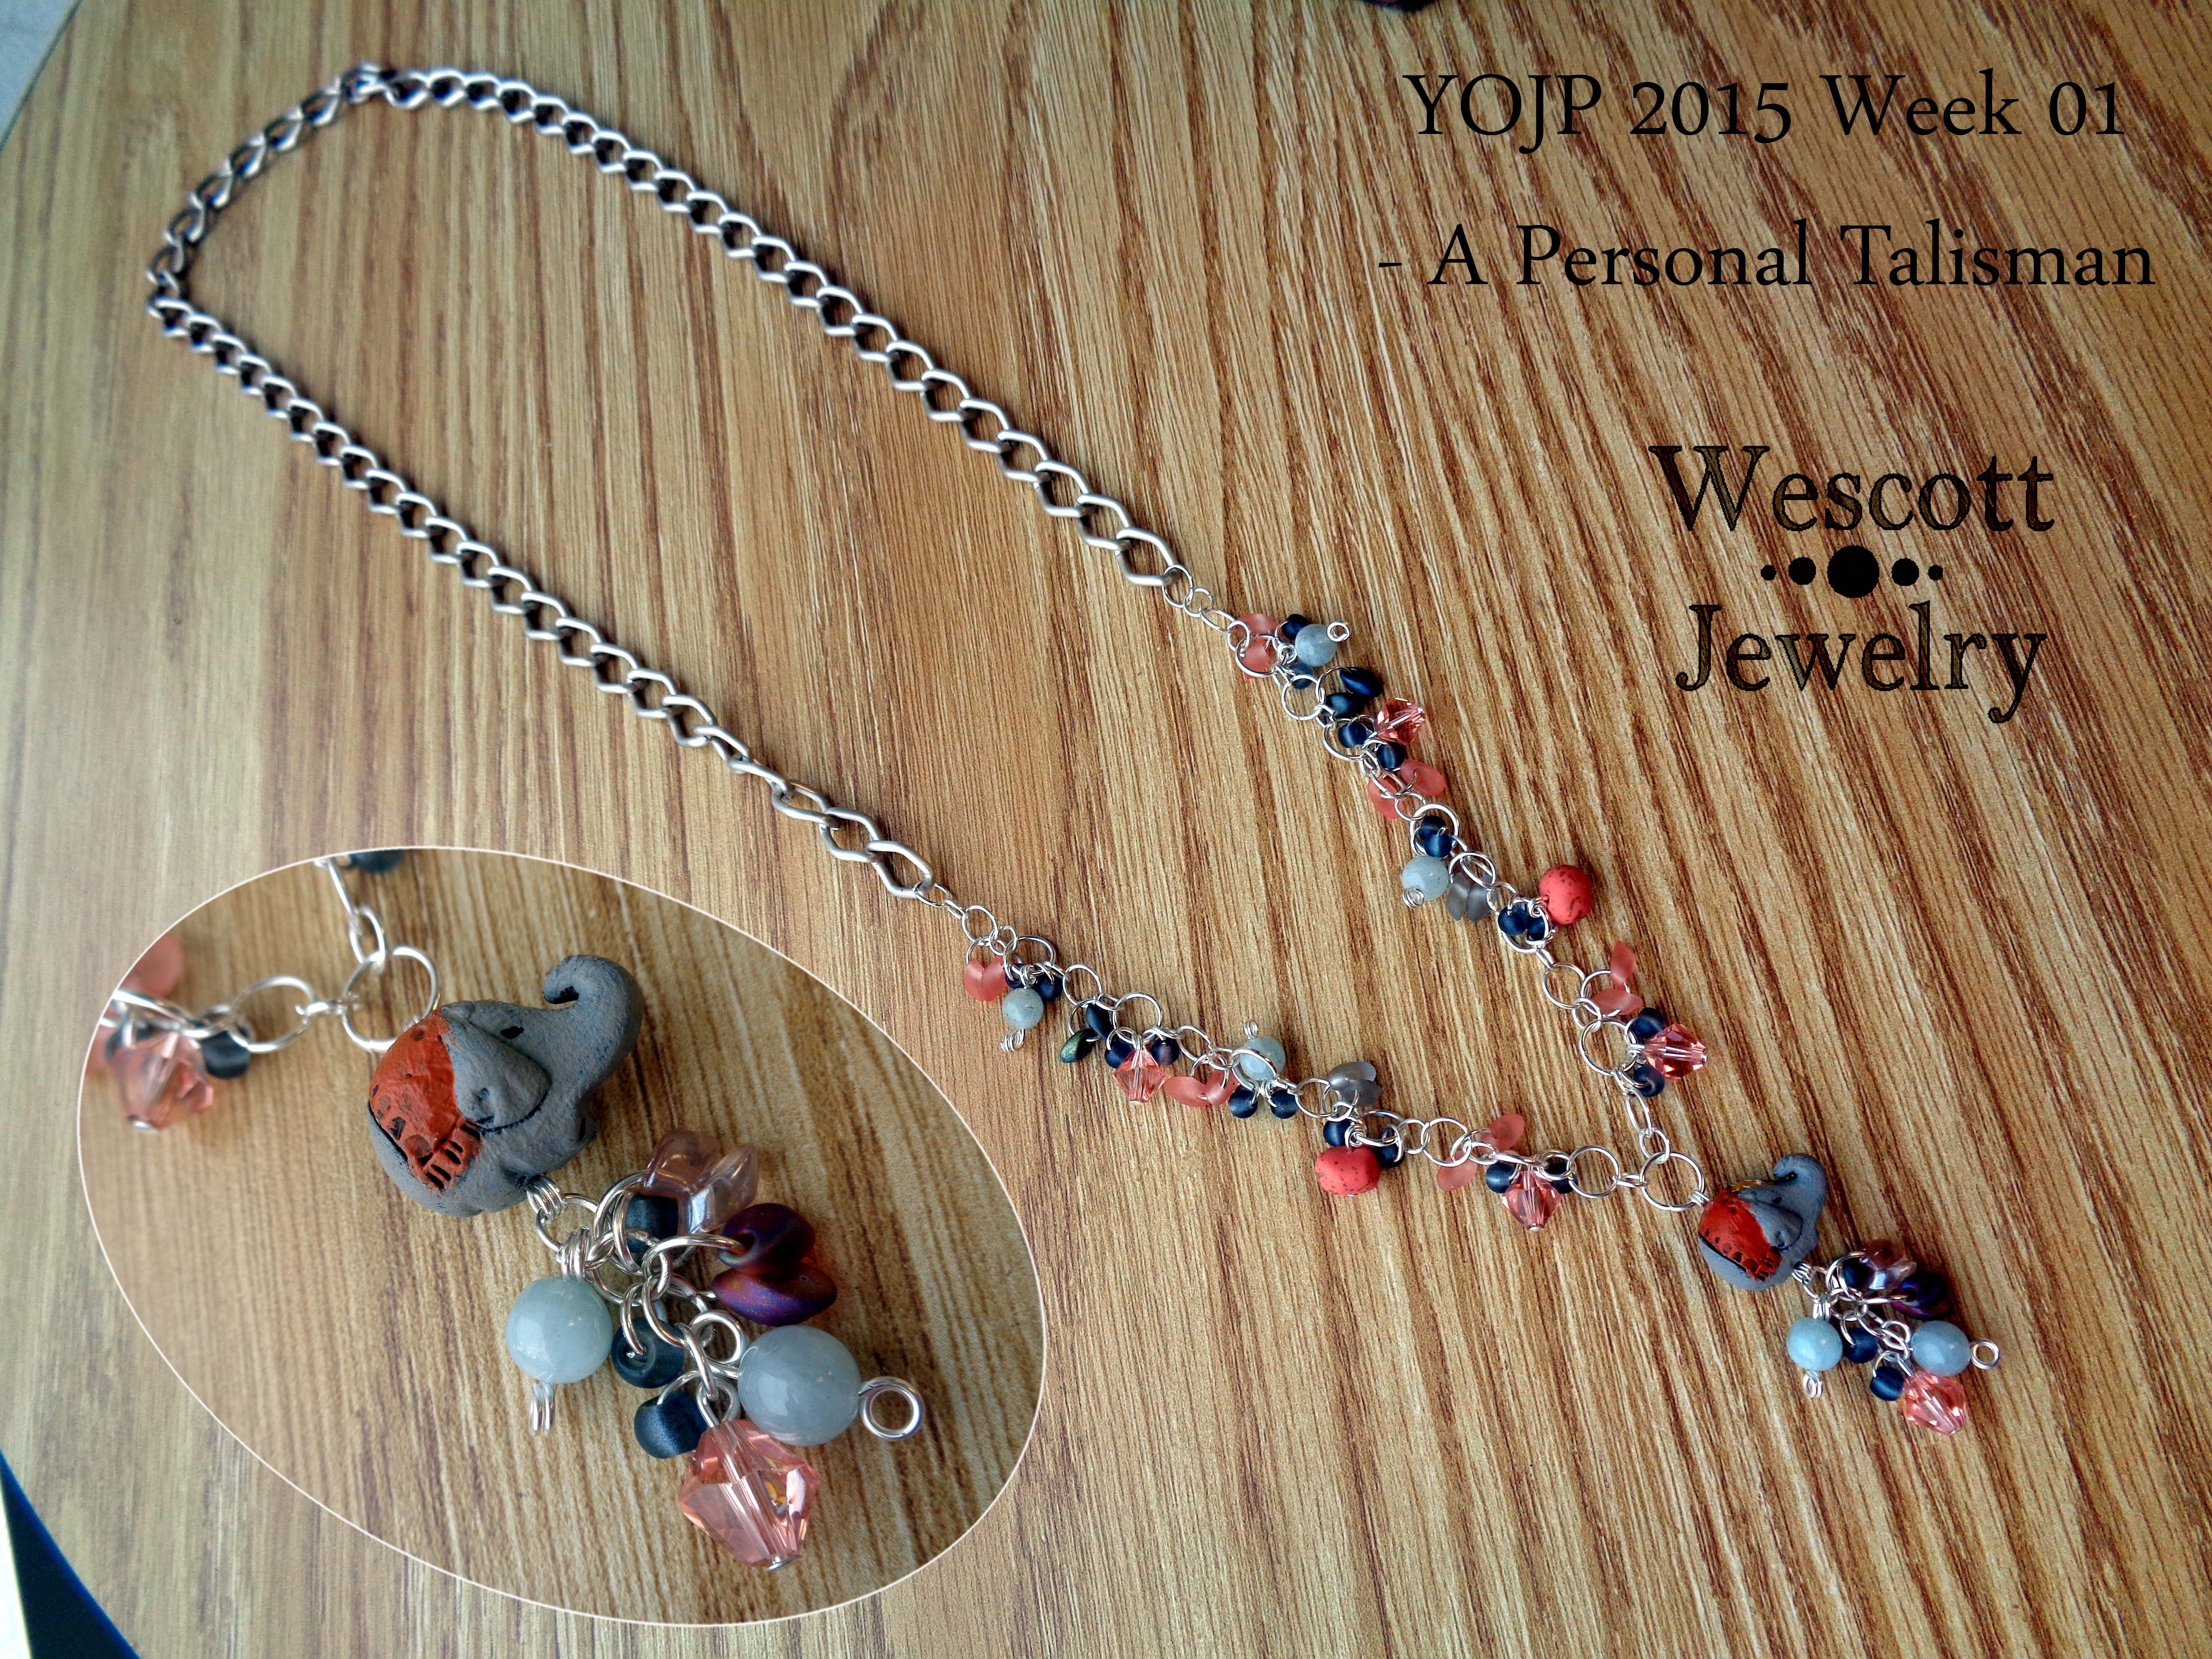
This week’s theme was “A Personal Talisman for my Year”. I’m not much of a talisman person, but I did make a necklace for my younger sister that featured a particular talisman of hers – Elephants!
The little elephant bead was made by Heather Powers of Humblebeads. Seriously, check out her stuff – it is amazing!
The rest of the little dangles are made of an assortment of things from my stash. There are crystal bicones, magatamas, frosted glass beads, and some pretty blue/gray stones I can’t identify. Oh! And there are two matching polymer clay wobble beads that Heather sent with the elephant. The back is finished with a large aluminum chain to give it enough length to sit mid-bust without adding too much weight.
I’m hoping the future challenges work out as well as this one did!
So, I am slightly altering the meaning of Throwback Thursday so that it isn’t about posting embarrassing photos of myself on Facebook. (Besides, I have two younger sisters who will do that for me). Instead, I wanted to post a few updates on old blog entries.
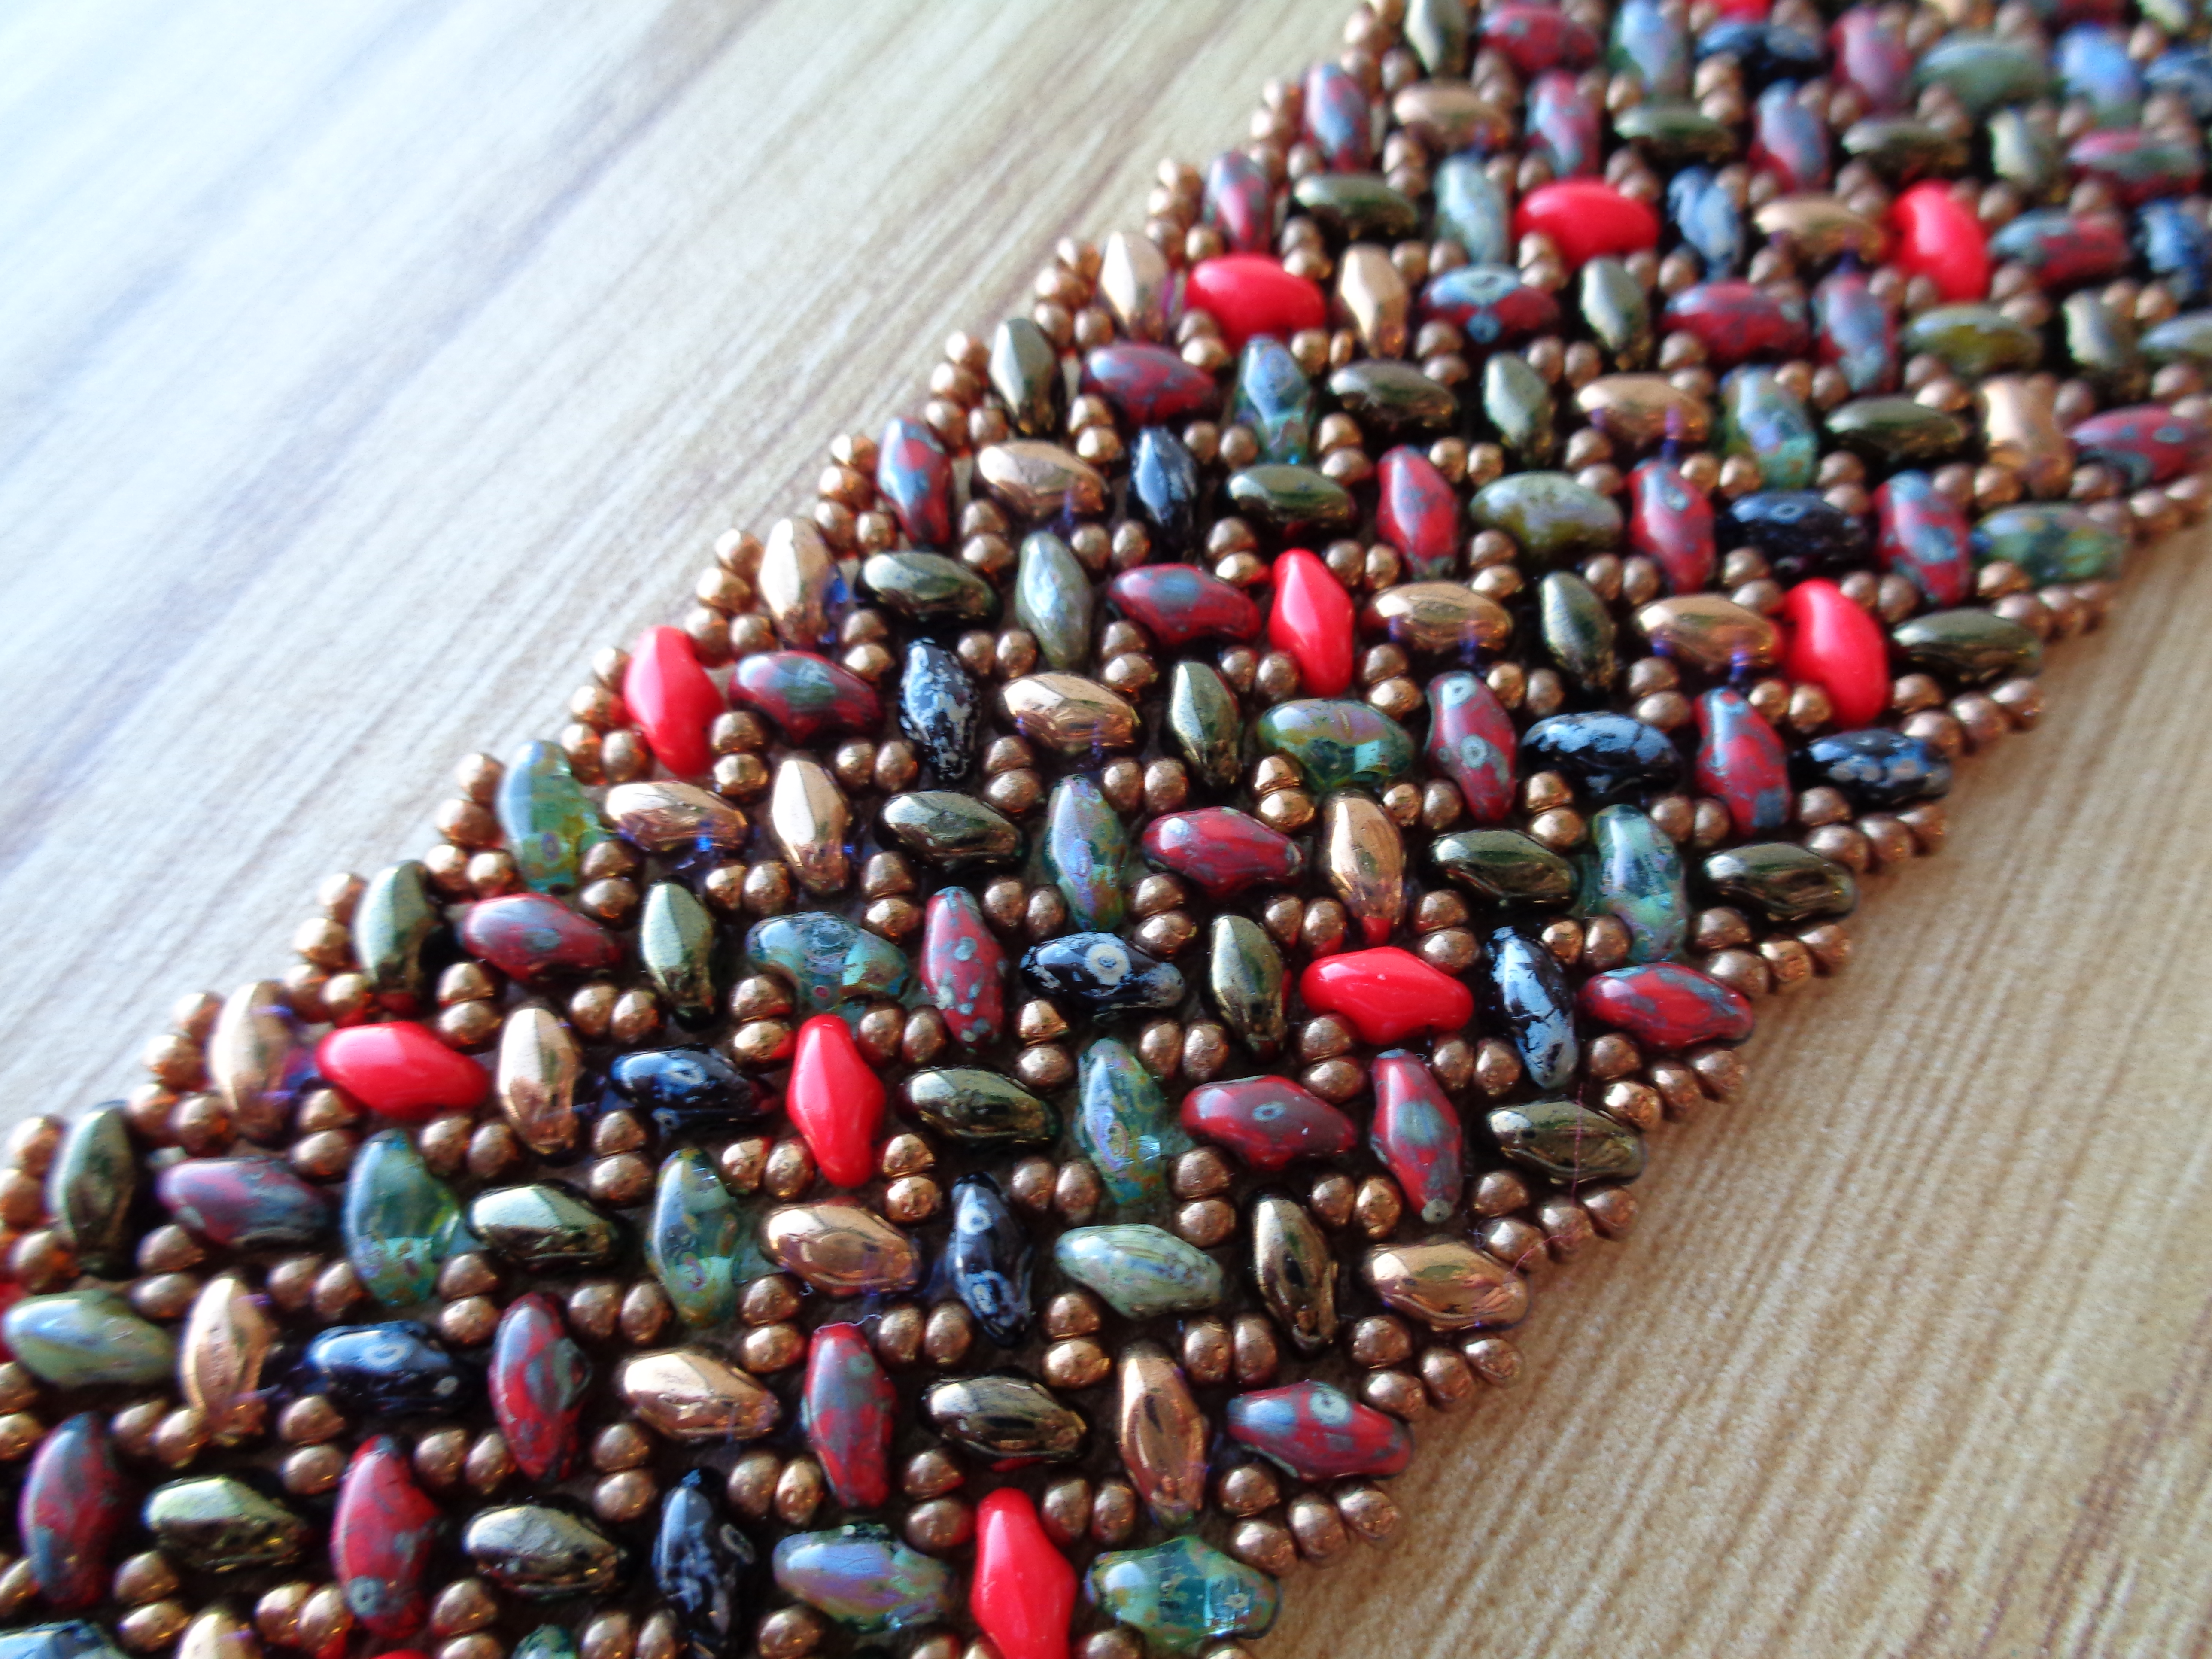
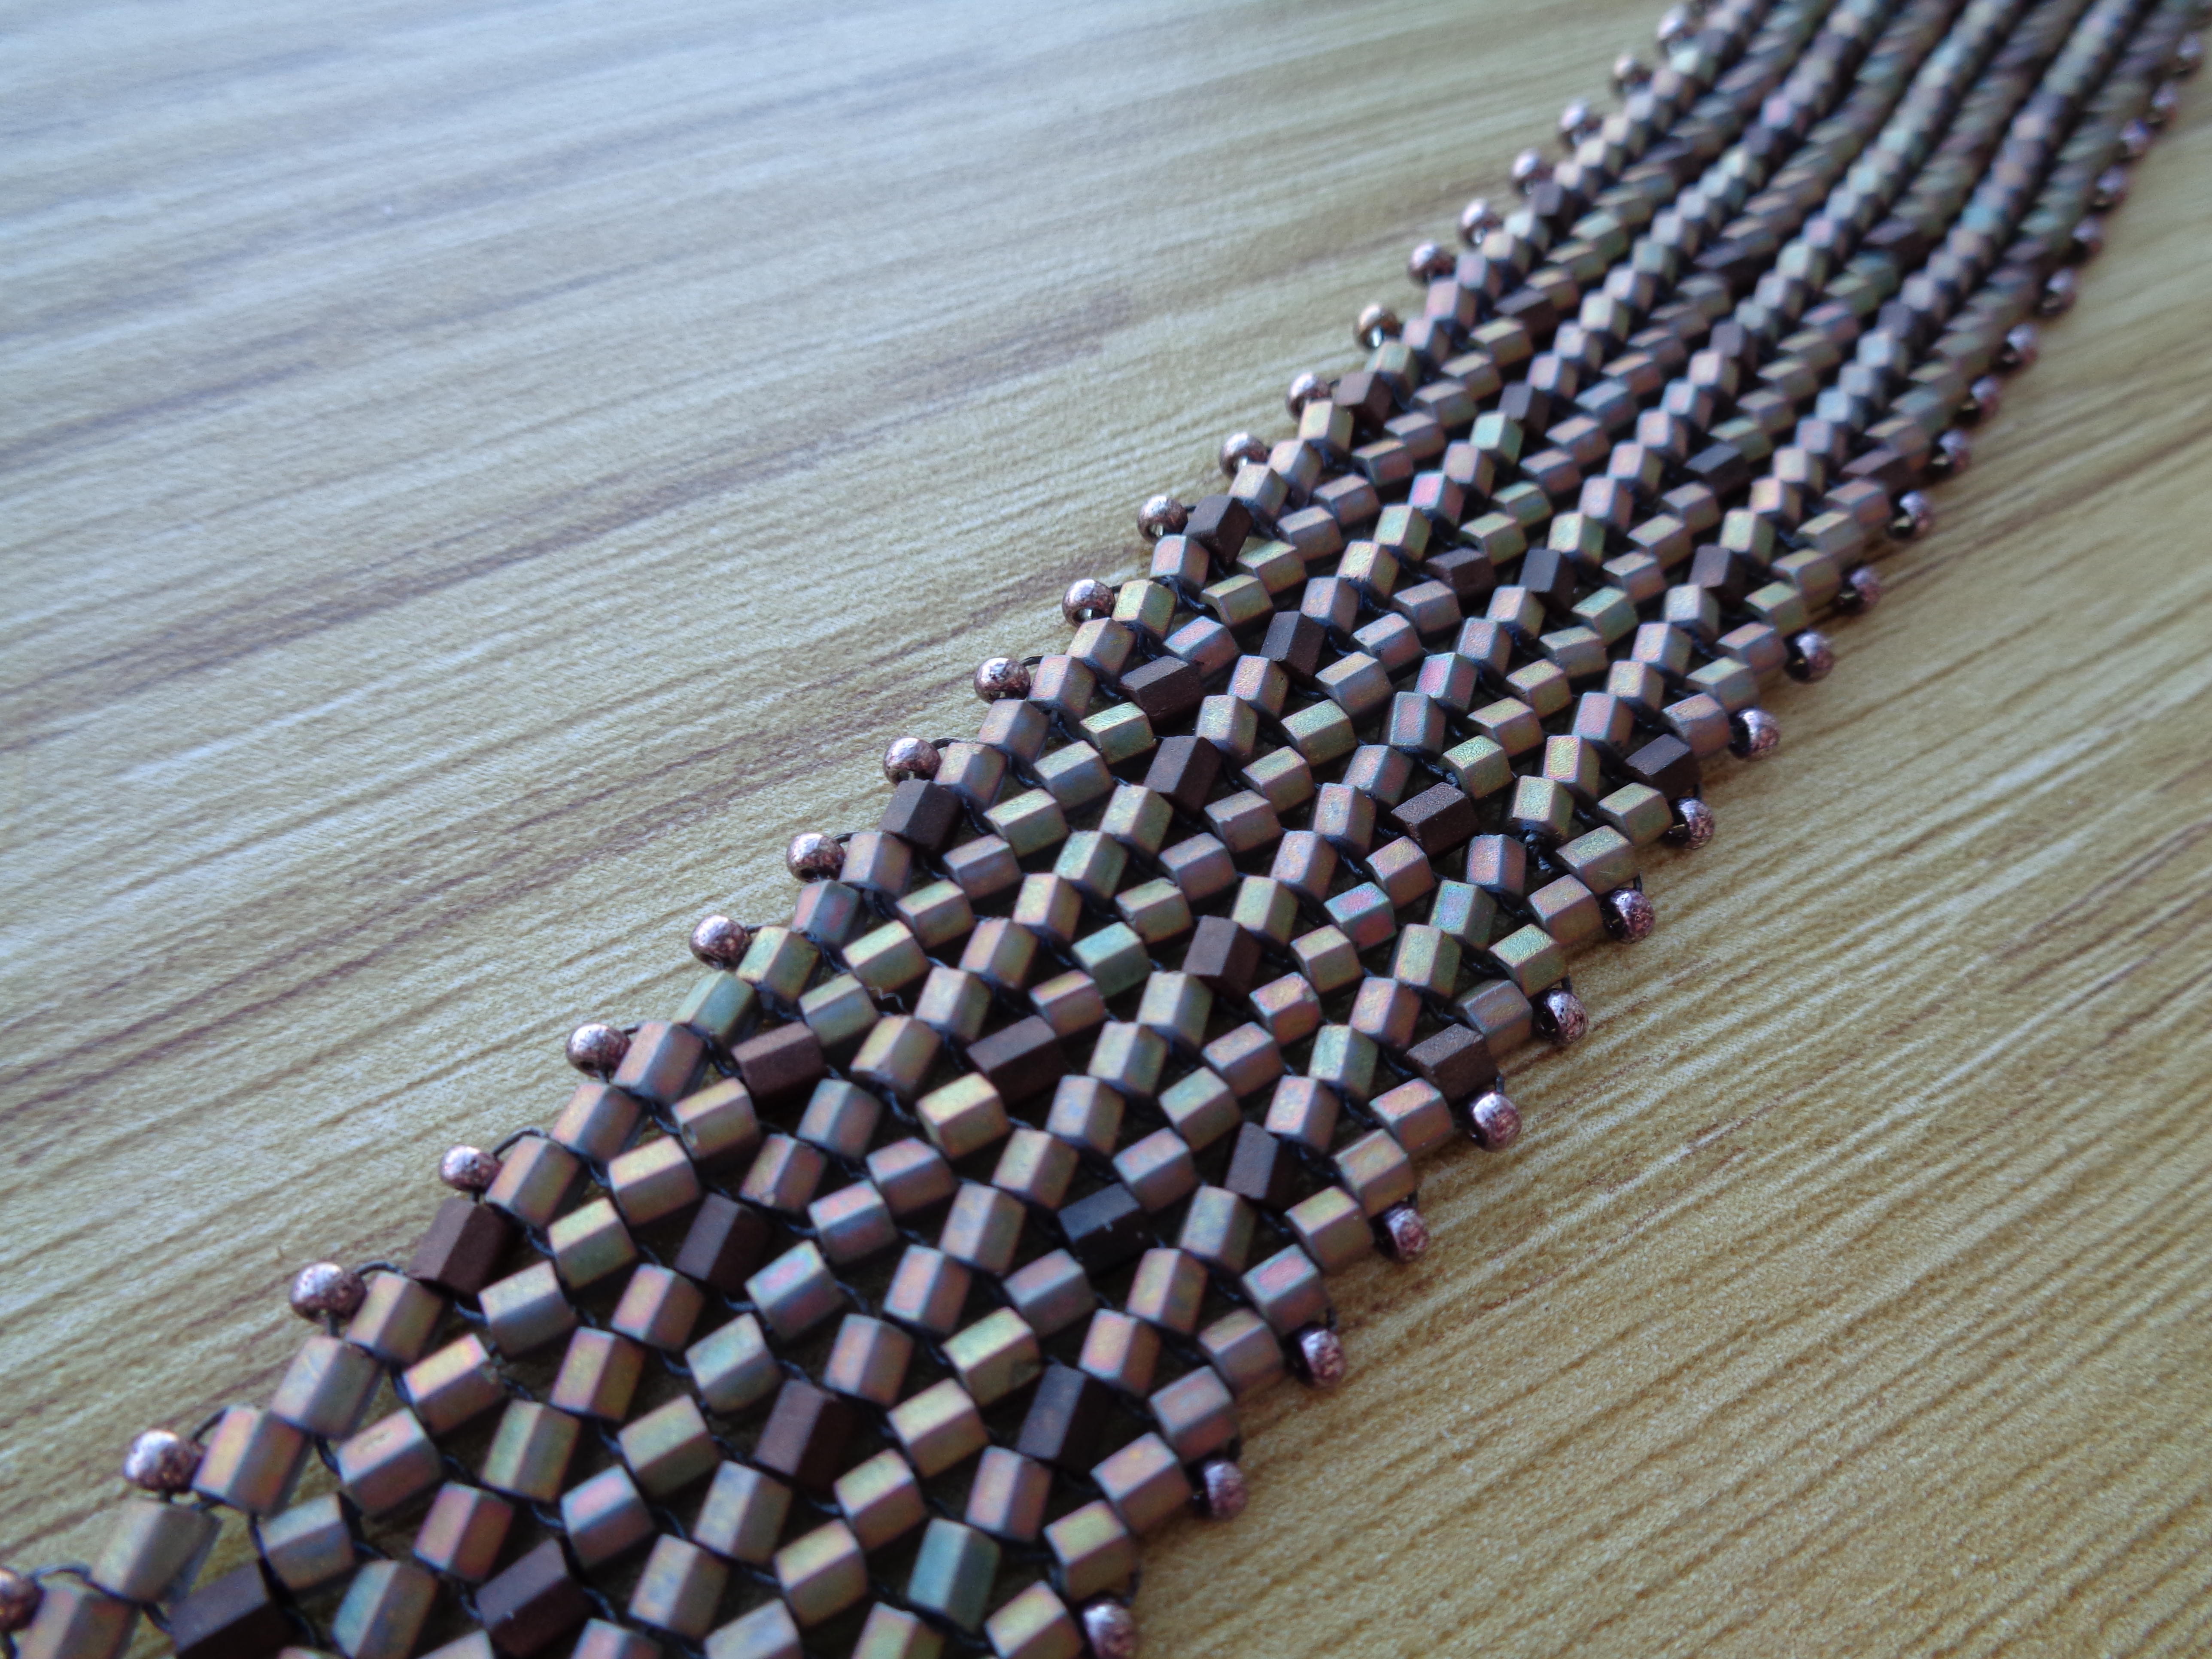
In that post, I explained a few tweaks I made to Potomac Bead Company’s YouTube video explaining their SuperDuo Knit Herringbone Bracelet. I showed you two versions of the bracelet that I had made with my tweaks, but since then, I have made a big holiday cuff!
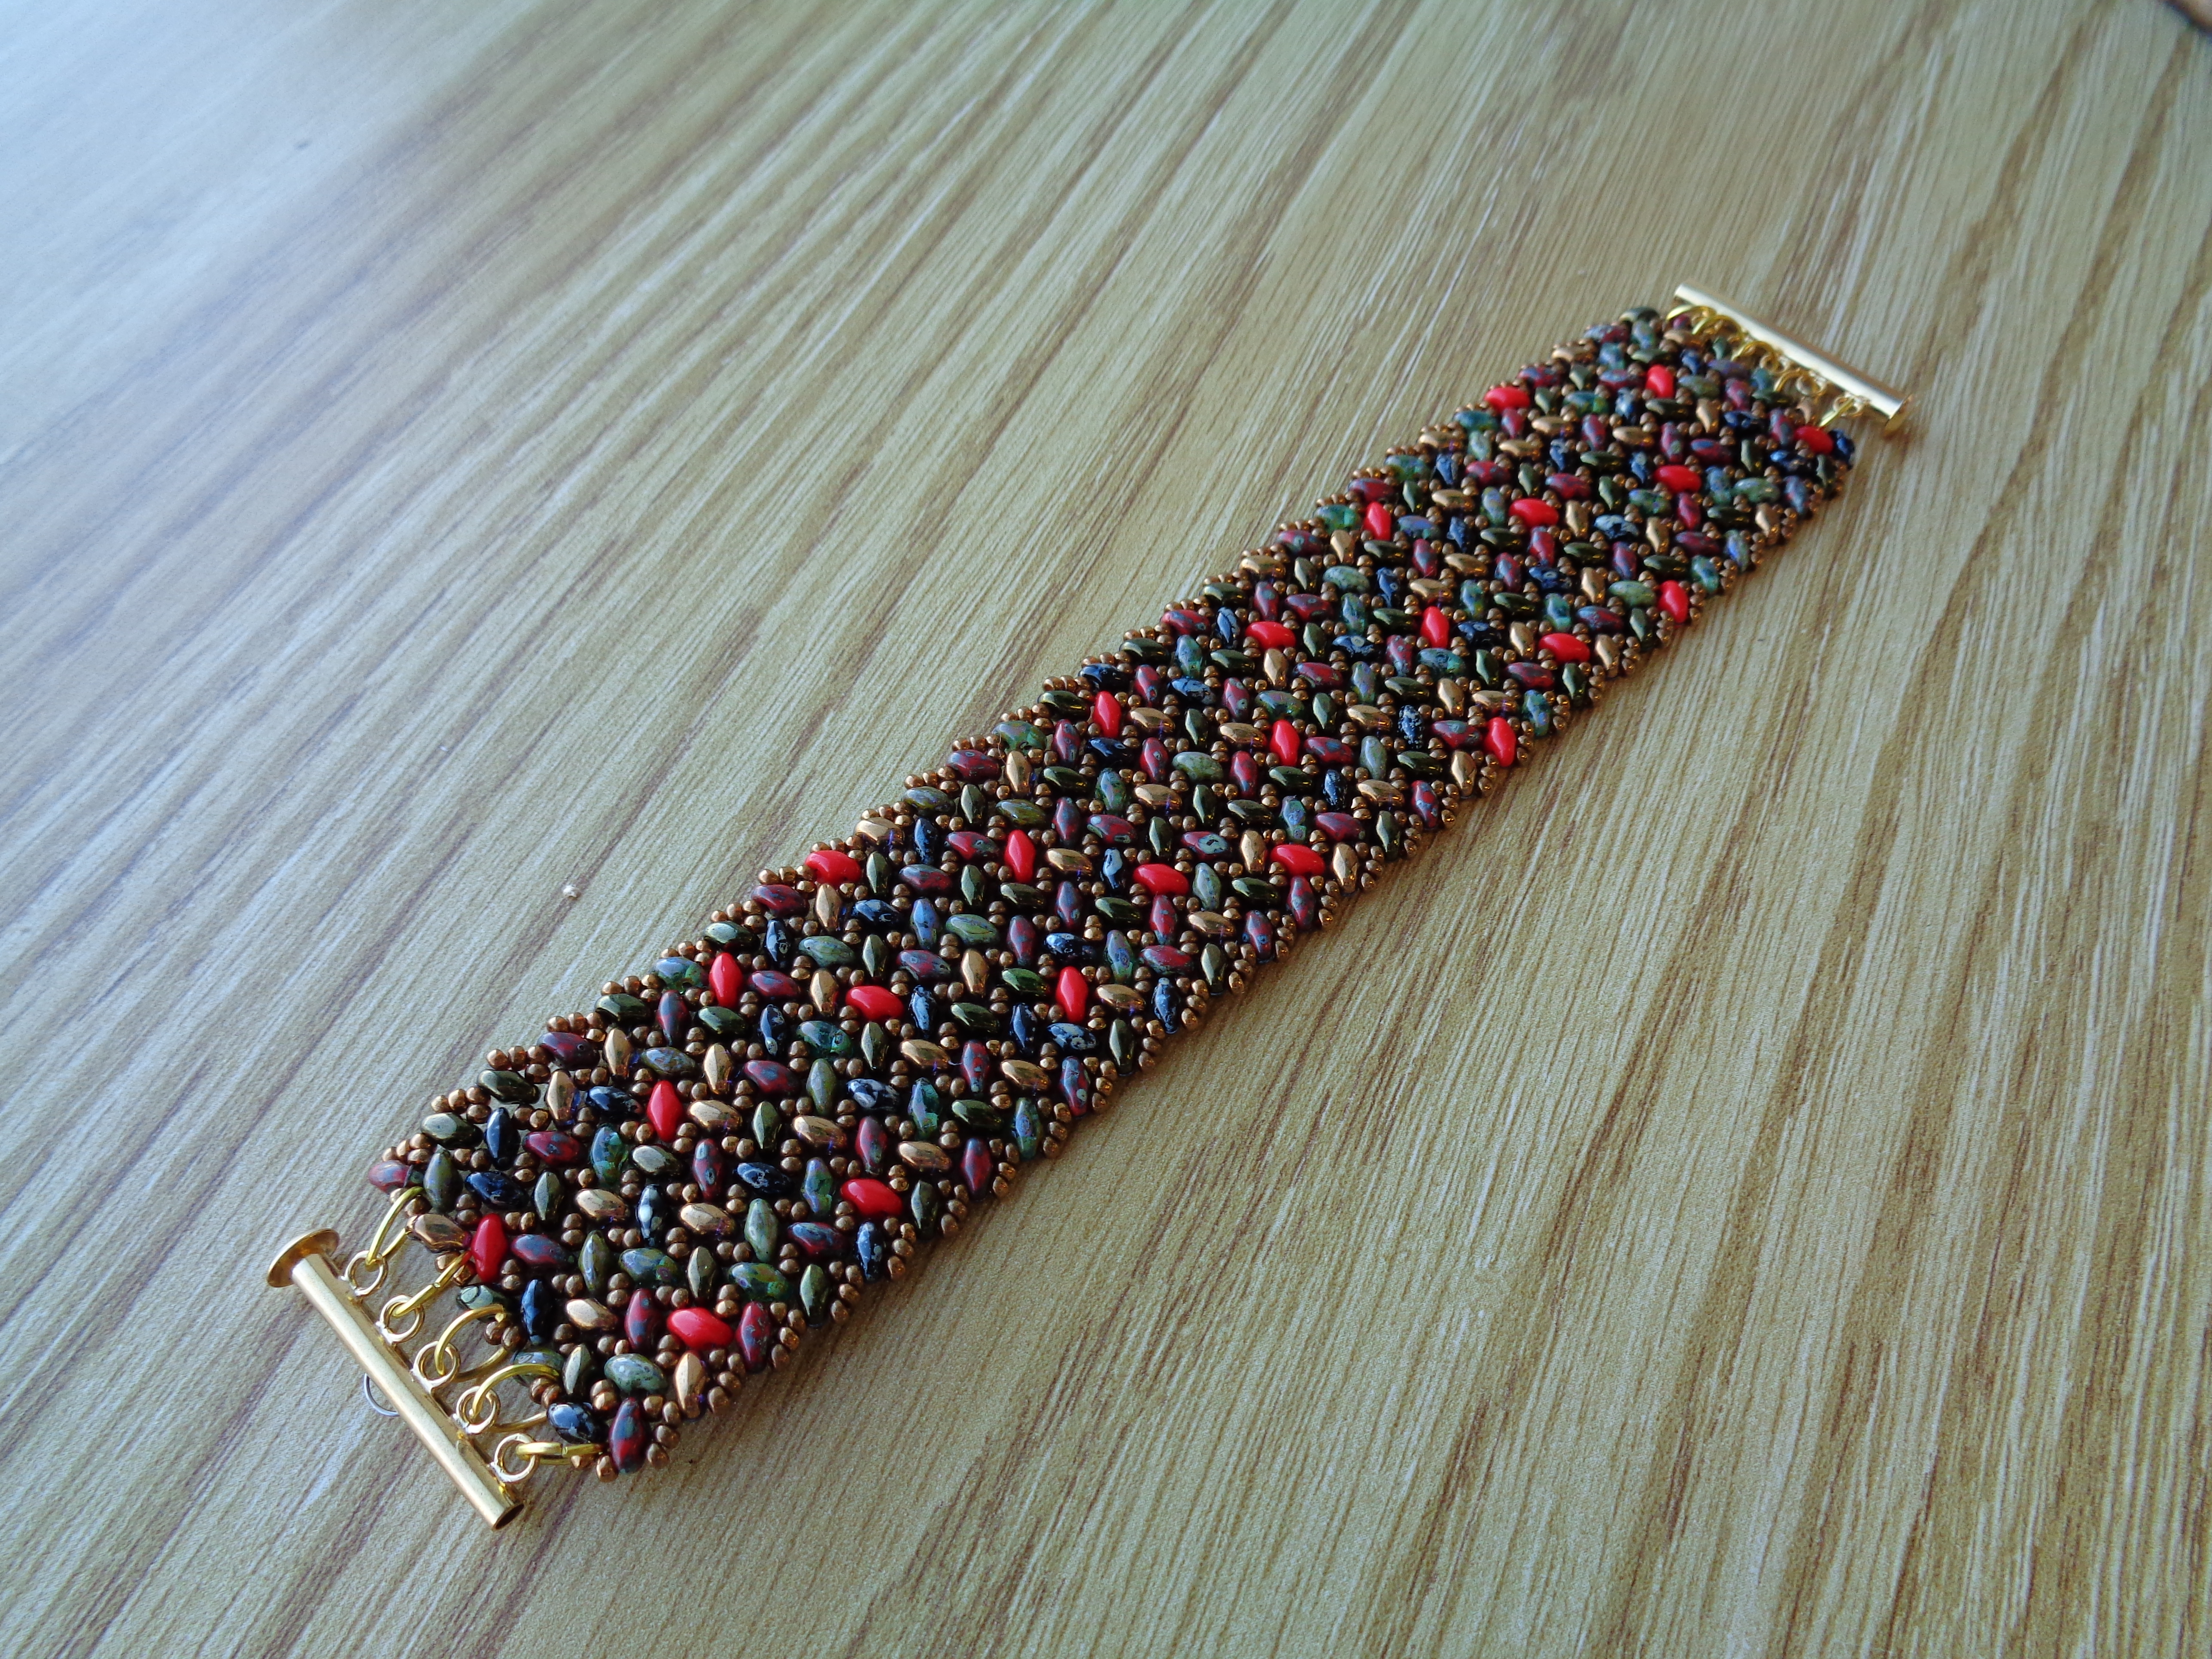
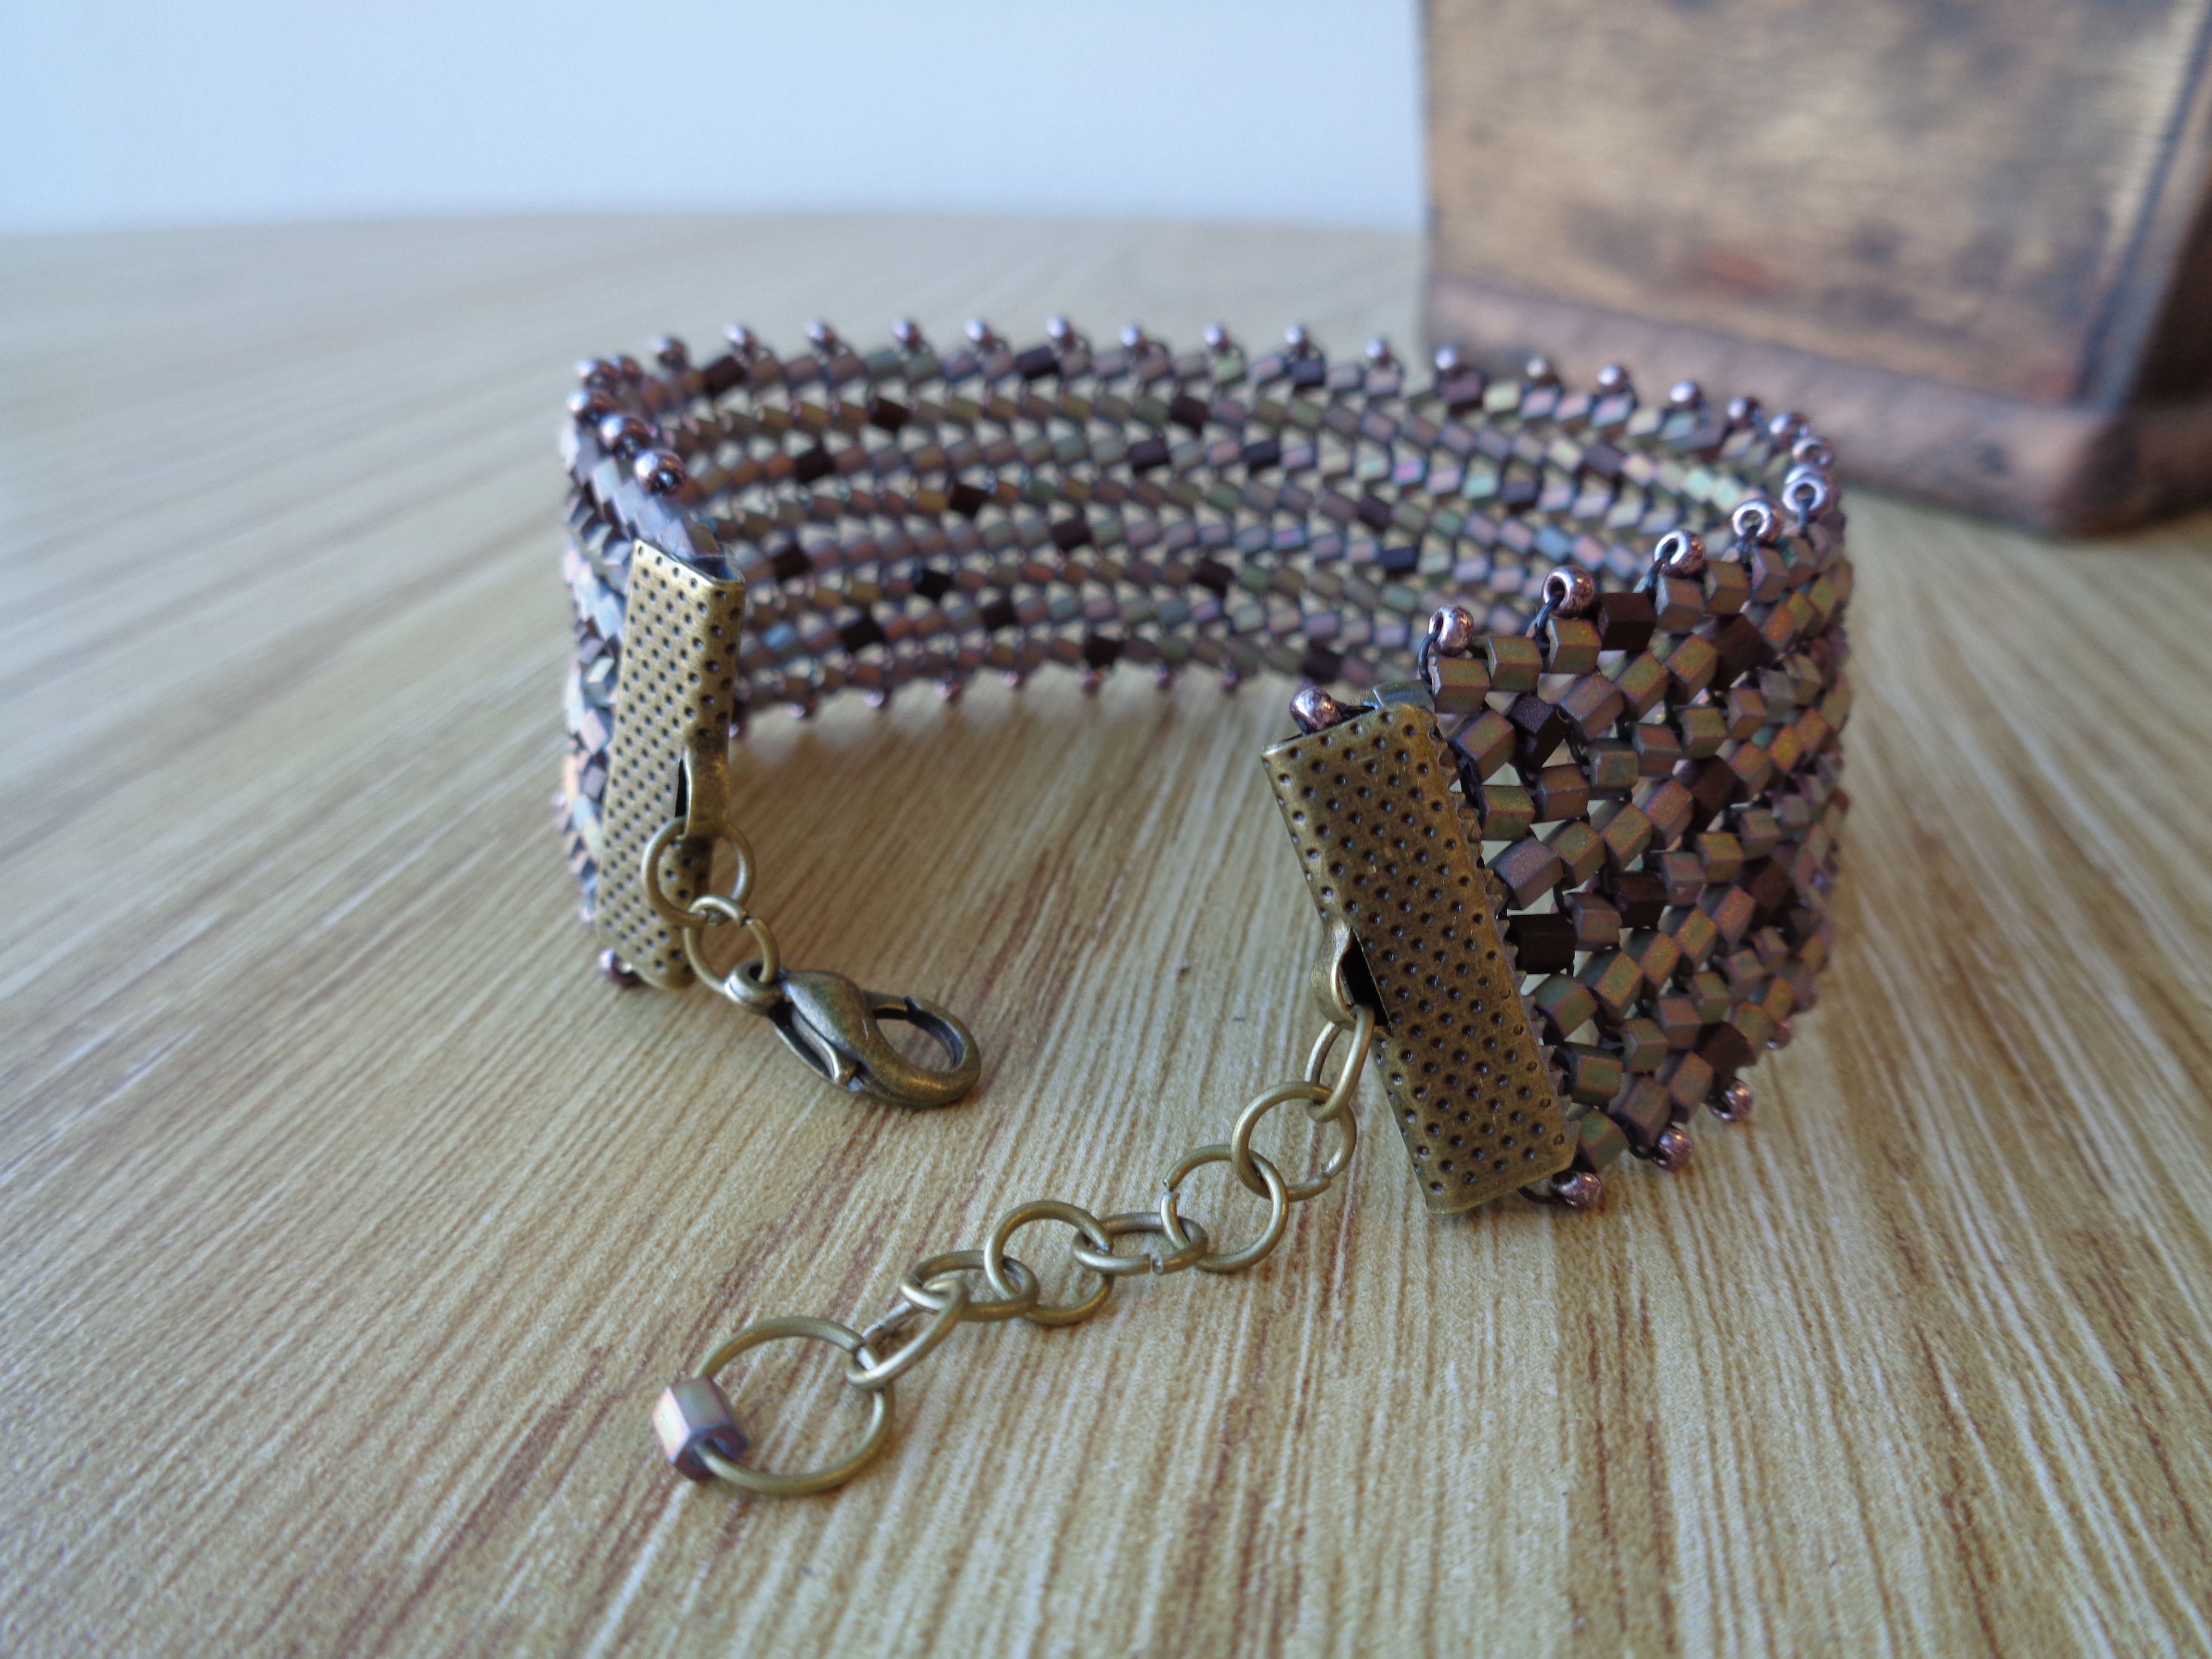
This cuff is five strips of herringbone wide and in muted holiday colors. Picasso red, metallic dark green, copper… All those nice woodsy colors. I really love how this one turned out.
Oy. Was that really back in June? Anyway, in that post I explain how I screwed up purchasing Fireline online and accidentally obtained 20lb Fireline. I used some 4mm Miyuki Cubes in that post, but that project definitely didn’t use up the whole reel, so I still have lots to experiment with.
I did figure out that 20lb Fireline works well with 8/0 Hex Beads!
The only problem I had with this cuff was in figuring out the clasp. The Fireline was so thick that the beads at the beginning and end of the cuff were so stuffed with thread that I could not sew on a clasp! Eventually, I found some ribbon clamps and with copious amounts of glue and careful clamping, I managed to make a pretty clean finish. I am pleased!
So, those are my two throwbacks for this Thursday. My posts should get a bit more regular after the holidays. I’m sure you all understand. I may even have a free tutorial floating around the back of my head. Stay tuned to find out!


 That’s really about it! Each time you will add a core bead, add your loop, and then slide it to the side and do it all again! For the clasp, I usually make a loop of about six 11/0’s to attach it. Just make sure to reinforce to keep it nice and strong.