So, you guys wanna know something super embarrassing about me?
I have been beading for 13 years (half my life) and I have published (and taught) 35 original beadweaving designs. AND YET I have never been able to make peyote bezels for rivoli crystals. It’s a super basic technique that forms the base of SO many designs. I understood the concept and I do peyote all the time… but every time I would give it a go, the bezel would turn out too tight for the crystal. It was infuriating.
But I finally figured out what I was doing wrong! And look what I can do now!

I FINALLY DID IT! These were my first successful Rivoli bezels and I paired them with these gorgeous fuchsia polymer clay leaves from SummerWindArt.

Wanna know what I was doing wrong? It was my hatred of tail threads that did me in. Every time I would try to start a bezel, I would string the requisite number of Delicas (usually 36 for a 14mm Rivoli) and then I would go back through all of the beads in order to tie off the thread. Unfortunately, going through all the Delicas twice before even starting the peyote made the ring way too tight and that’s why my bezels were always too snug!

Cathy (of Beaded Bliss) tipped me off that I needed to keep my tail thread intact and not reinforce that first row and it changed everything. Putting up with a tail thread was definitely worth the success! I can’t stop making these little bezels.

I’ve had these little glass drops for so long that I have no idea what they are or where they came from. My brain says “vintage German glass”, but I have literally no memory of buying them or how I would know that, so we’re gonna call them mystery drops!
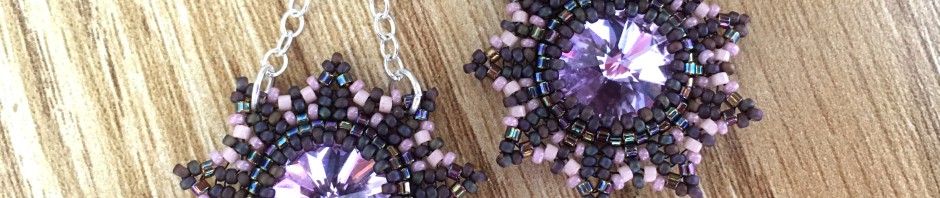
Next, I went browsing for some bezel tutorials that I would have skipped because of the peyote base and look what I found!

These earrings were made using Frolova Oksana’s free Golden Star tutorial. I had to use Google Translate on the page, but honestly, her diagrams are so good that I didn’t need the text instructions.

I am so excited at all the new design possibilities that I’ve opened up just by learning this basic technique. I can’t believe it took me so long to figure it out, but hey, we’ve all got our blind spots, right? And I know better now! Yay!
Do you guys have any tutorials on things I can do with a peyote bezel base? I’d love to get in some more practice and try some new embellishments. Leave some recommendations in the comments if you have any!


Creating Crystal Jewelry with Swarovski by Laura McCabe is an entire book based on bezeling with rivolis. The projects are georgeous and the directions and diagrams are spot on. This classic is out of print but readily available.
LikeLike
Thanks, Linda! I might just add that to my wish list!
LikeLike
Thank you so much for this information. Up until the last project I did Storm Paisley Flower Necklace I did not reinforce the base of the bezel part. This time I thought I would be smart but my bezel was too tight. Now I know why. Thank you again.
LikeLike
Haha, I’m glad my foibles could be of use! <3
LikeLike
Good morning, Sam! Bezeling with peyote is truly satisfying and one of my favorite things. Check out Justine Gage’s (Too Tall to Bead) Andromeda Stars. She gives directions for multi-pointed stars based on a peyote bezel. Also, Erika Sandor (The Storytelling Jeweler) has just published an ebook all about peyote bezels AND how to cover the backs to protect the crystal coating (and make it pretty from the back). I highly recommend both tutorials.
LikeLike
Perfect! Thanks so much for the recommendations! I didn’t even think about protecting the back coating, but that makes so much sense!
LikeLike
Luv all the earrings. Great job as usual!!!
LikeLike
Thank you, Sharon!
LikeLike
I love your first earrings with just a simple bezel and the dangles.
LikeLike
Thanks, Trudy! I like those too. <3
LikeLike
Pingback: Ogalala (Oglala? Ogallala??) Blues | Wescott Jewelry