So, spiral ropes are pretty ubiquitous in the beadweaving world, right? The basic technique is explained in the back of every Beadwork and Bead & Button Magazine and the internet is full of great free tutorials and YouTube videos on how to make them.
Personally, I love this stitch and use it all the time. I don’t, however, usually use all the same size beads like in the tutorials I linked to above. I prefer to use 8/0’s for the center core and graduated bead sizes for the side loops. It’s a great way to clear out your stash a bit and the color combinations are endless!

Version A : Tight and Jumbly
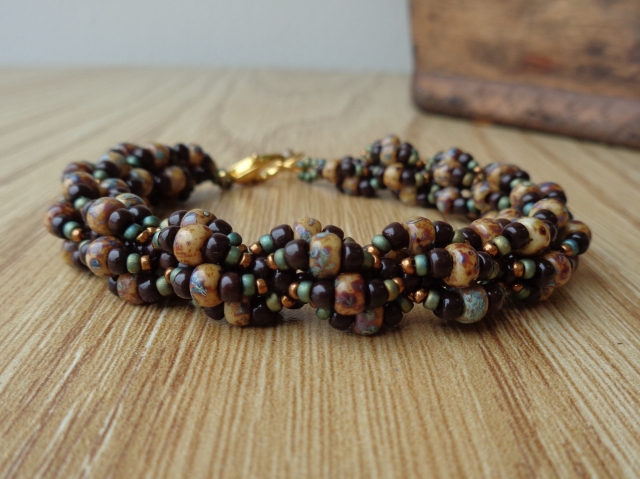
This is my go-to spiral set up. It’s particularly great if you wanna show off some fancy 6/0 beads (in both of my examples, the 6/0’s have special Picasso finishes). The loops are small, but kinda pudgy, so this bracelet is wide and full of texture.
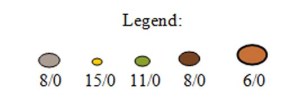
For your materials, you will need seed beads in lots of sizes, so this bracelet is great for stash-busting. You will need sizes 15/0, 11/0, 8/0, and 6/0 for the loops and size 8/0 in a different color for your core beads.
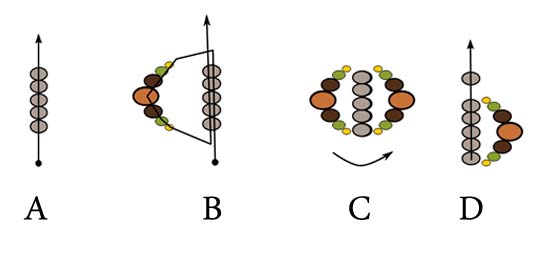
To make this variation, you will want to pick up five of your size 8/0 core beads and hold them so that they are stacked vertically and your needle is coming out the top (A).
Then pick up one 15/0, one 11/0, one 8/0, one 6/0, one 8/0, one 11/0, and one 15/0. Once you have that sequence picked up, go back through your stack of five core beads from bottom to top, making a loop. (B).
Now, slide your loop over from the left of your stack to the right (C). This will be important later, to keep your loops in the correct order to spiral.
Then pick up one of your core beads and slide it down to the top of your stack (D). 
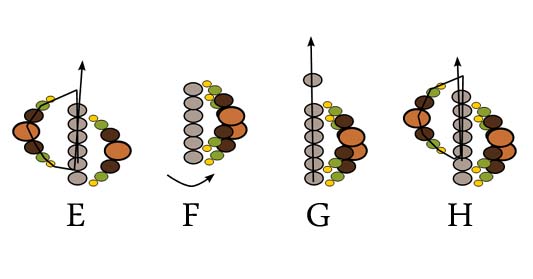
Great! Now pick up your loop sequence again – one 15/0, one 11/0, one 8/0, one 6/0, one 8/0, one 11/0, and one 15/0 and go back through five core beads including the newest one added. That means you are skipping the bottom-most core bead and just going through the top five (E).
Once again, flip your newest loop from the left side to the right to join your last loop (F).
Add another core bead and slide it down to the top of your stack (G).
Then add your sequence of one 15/0, one 11/0, one 8/0, one 6/0, one 8/0, one 11/0, and one 15/0 and go back through the top five core beads including the newest one added (H).
 That’s really about it! Each time you will add a core bead, add your loop, and then slide it to the side and do it all again! For the clasp, I usually make a loop of about six 11/0’s to attach it. Just make sure to reinforce to keep it nice and strong.
It’s a simple pattern, but it looks great and the opportunities for creative color combinations are infinite!
Keep checking back on this blog for more similar tutorials. I’ve got two more go-to graduated spirals that I use a lot, and I’m sure I’ll get posts up about them eventually! So, keep watch for Versions B and C!
In the mean time, whip up some spirals to show me! What colors will you choose?
Note: I know you guys are super great about giving designers the credit they deserve. So please do not just save the diagrams and give them to your friends or post them on facebook or pinterest without a link to me. I definitely want you to tell your friends, but if you do, please link them to this website. Here is the permanent link you can give them:
https://wescottjewelry.com/2015/03/04/free-tutorial-graduated-spiral-rope-stitch-version-a/
Thanks a bunch, friends! I really appreciate the traffic!
Edit 4/3/15: Good news! My friend, Tina, was kind enough to make a video of this free pattern! She has a great beadweaving tutorial channel here that you should definitely subscribe to. It’s a great visual bonus for beaders who want step-by-step instructions.
Thanks again, Tina!


Beautiful! Thank you very much!
LikeLike
Nice job on your instructions. Thanks for sharing.
LikeLike
This is absolutely gorgeous and I can’t wait to try it! Thank you so much!!!!!
LikeLike
That was a nice tutorial. Thanks.
LikeLike
A great twist on a classic stitch. Love the beads you used. Thanks, Sam
LikeLike